Dashboard
The Dashboard serves as the central overview panel of the hotel management system, providing key insights and real-time data in a single view. It displays important metrics such as total users, hotels, pending payments, and support tickets. The dashboard also includes graphical reports for transactions and payment activities, helping administrators monitor performance trends. This module enables quick decision-making by presenting summarized business data in an interactive and visual format.
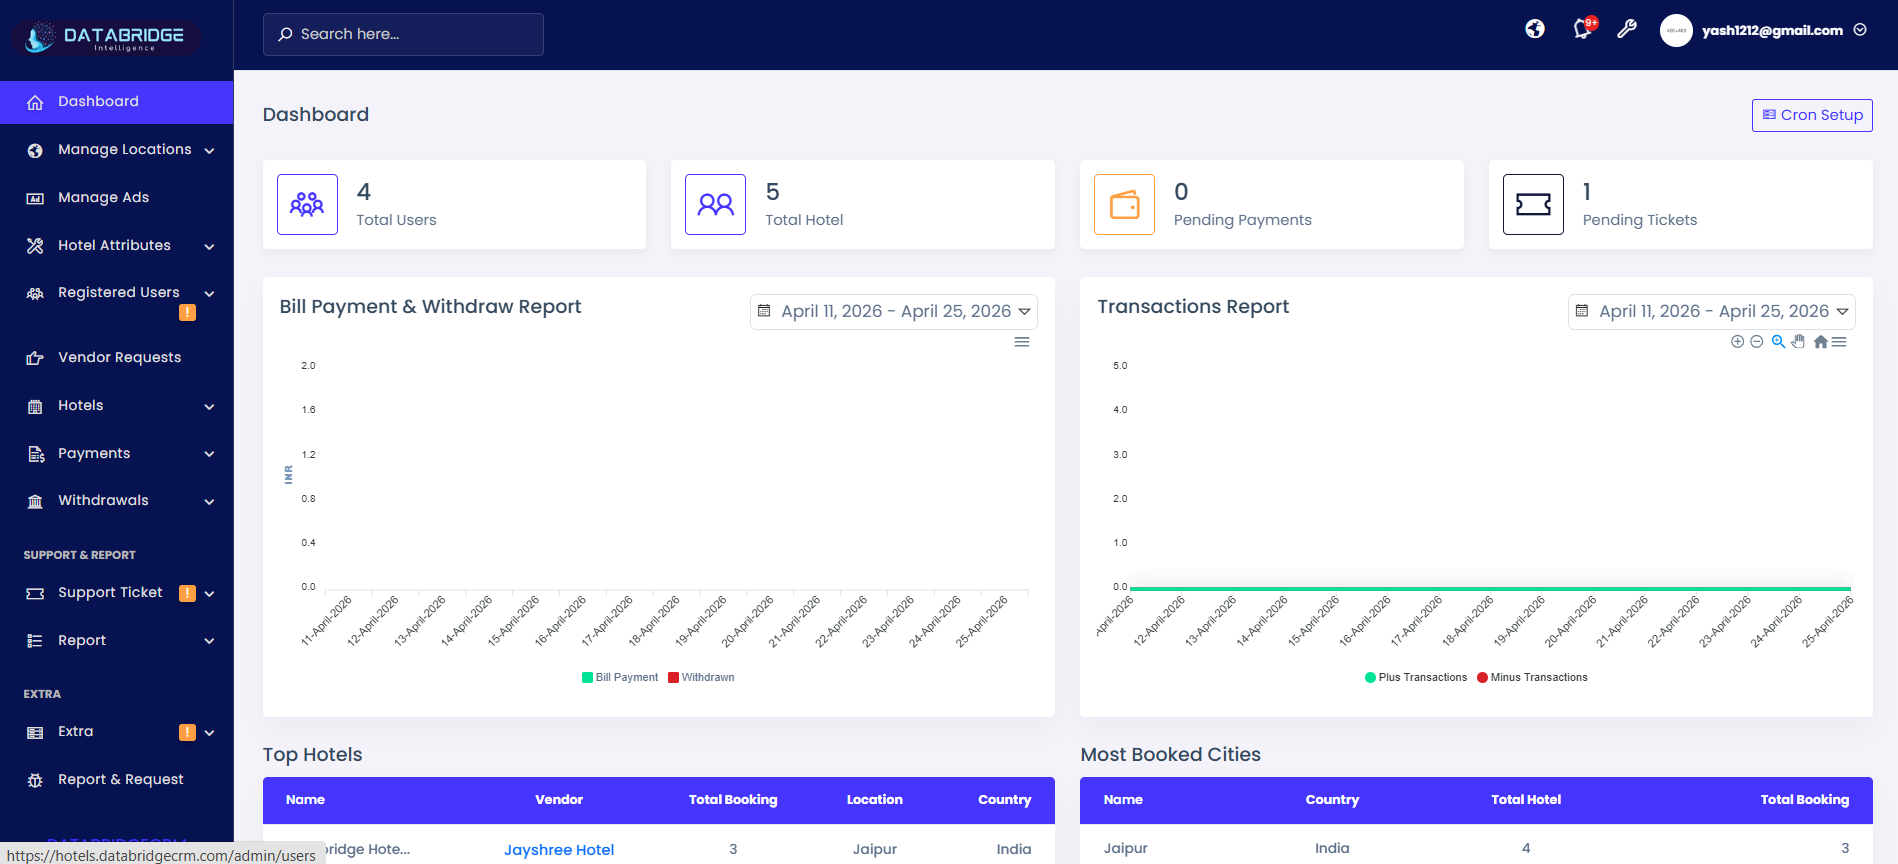
The dashboard provides a quick overview of key hotel management metrics, including users, hotels, payments, and tickets. It displays real-time data and visual reports to help administrators monitor performance and make informed decisions efficiently.
Features:
-KPI cards showing Total Users, Total Hotels, Pending Payments, and Pending Tickets
-Graphical reports for Bill Payment & Withdraw and Transactions
-Date range filter for analyzing reports within a selected period
-Tables for Top Hotels and Most Booked Cities
-Sidebar navigation for accessing all modules (Hotels, Payments, Withdrawals, Reports, etc.)
-Search bar for quick navigation across the system
-Cron Setup button for scheduling automated tasks
Functionality:
-Displays real-time statistics and performance indicators on login
-Admin can filter reports using date range to analyze trends
-Graphs visually represent payment flows and transaction activities
-“Top Hotels” section highlights high-performing hotel vendors
-“Most Booked Cities” shows popular locations based on bookings
-Navigation panel allows quick access to all management modules
-Cron Setup enables automation of system processes like reports or updates
Manage Locations
The Manage Locations module is designed to organize and control geographical data within the hotel management system. It allows administrators to create and manage countries, cities, and specific locations in a structured hierarchy for accurate hotel listings. This module ensures that all properties are mapped correctly based on their location, improving search, filtering, and overall user experience.
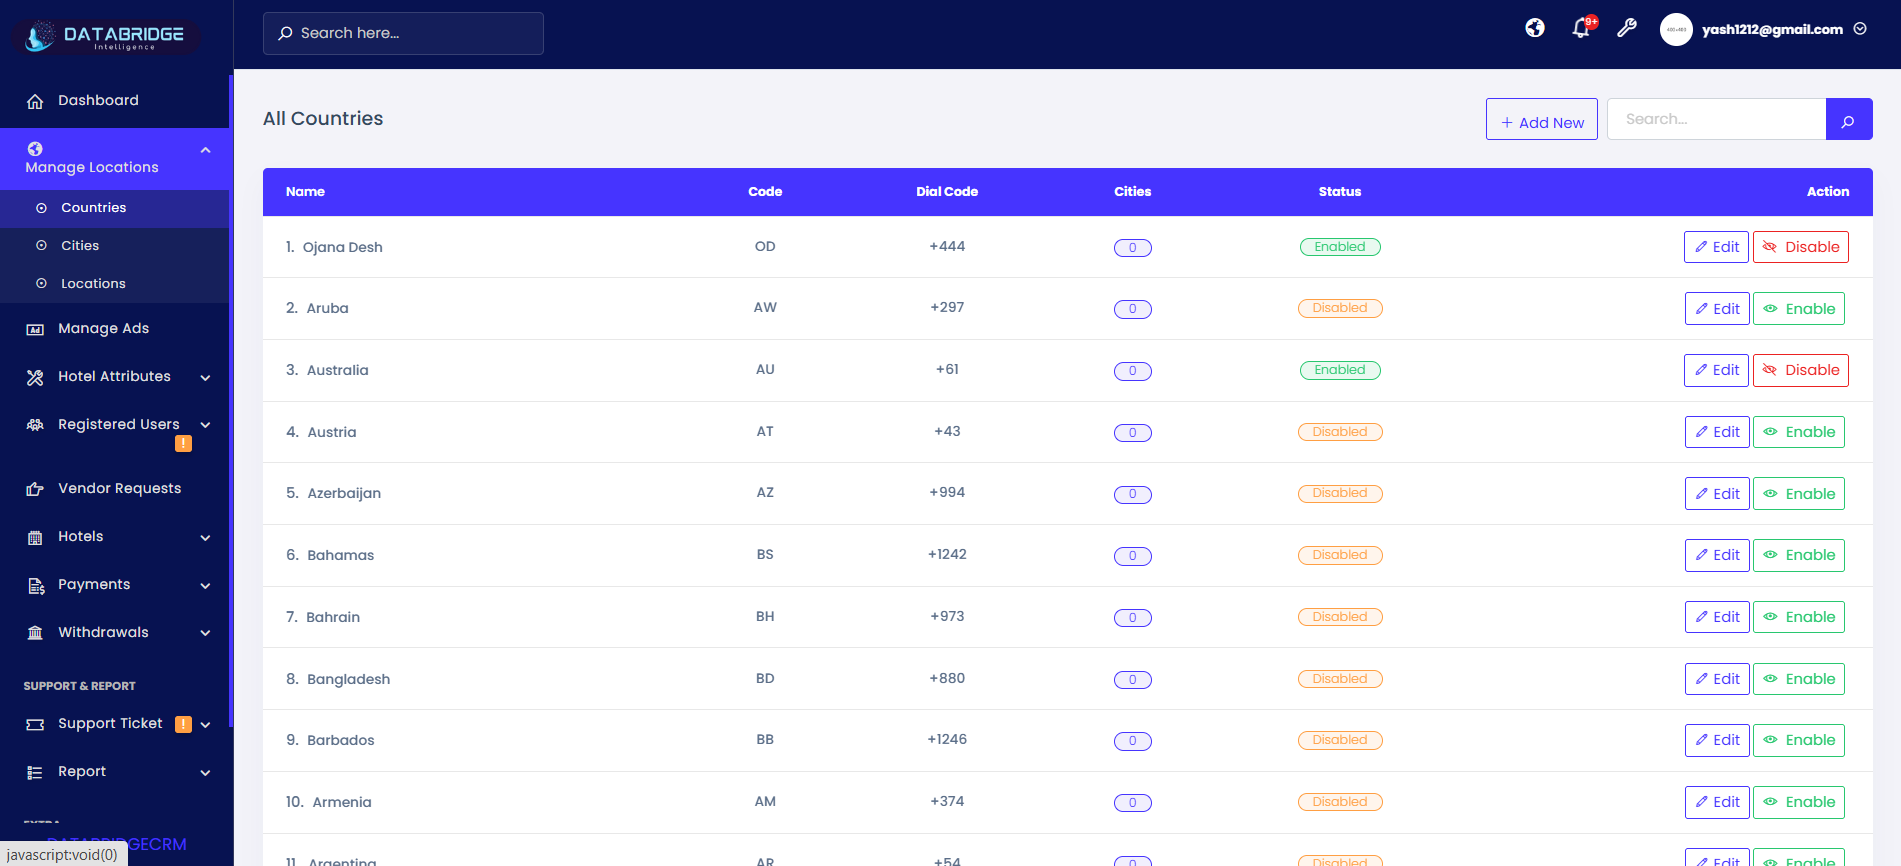
Countries:
This screen displays all countries available in the system along with their codes and status. It helps administrators manage geographical availability for hotel listings.
Features:
-List view with Name, Code, Dial Code, Status
-Search bar to find countries quickly
-“Add New” button to create new country
-Enable/Disable toggle for each country
-Edit option to update country details
-Status indicators for active/inactive countries
Functionality:
-Admin can view all countries in tabular format
-Search filters the country list dynamically
-Clicking Add New opens country form popup
-Enable/Disable controls availability in system
-Edit button updates existing country information
1
Manage Locations
2
Countries
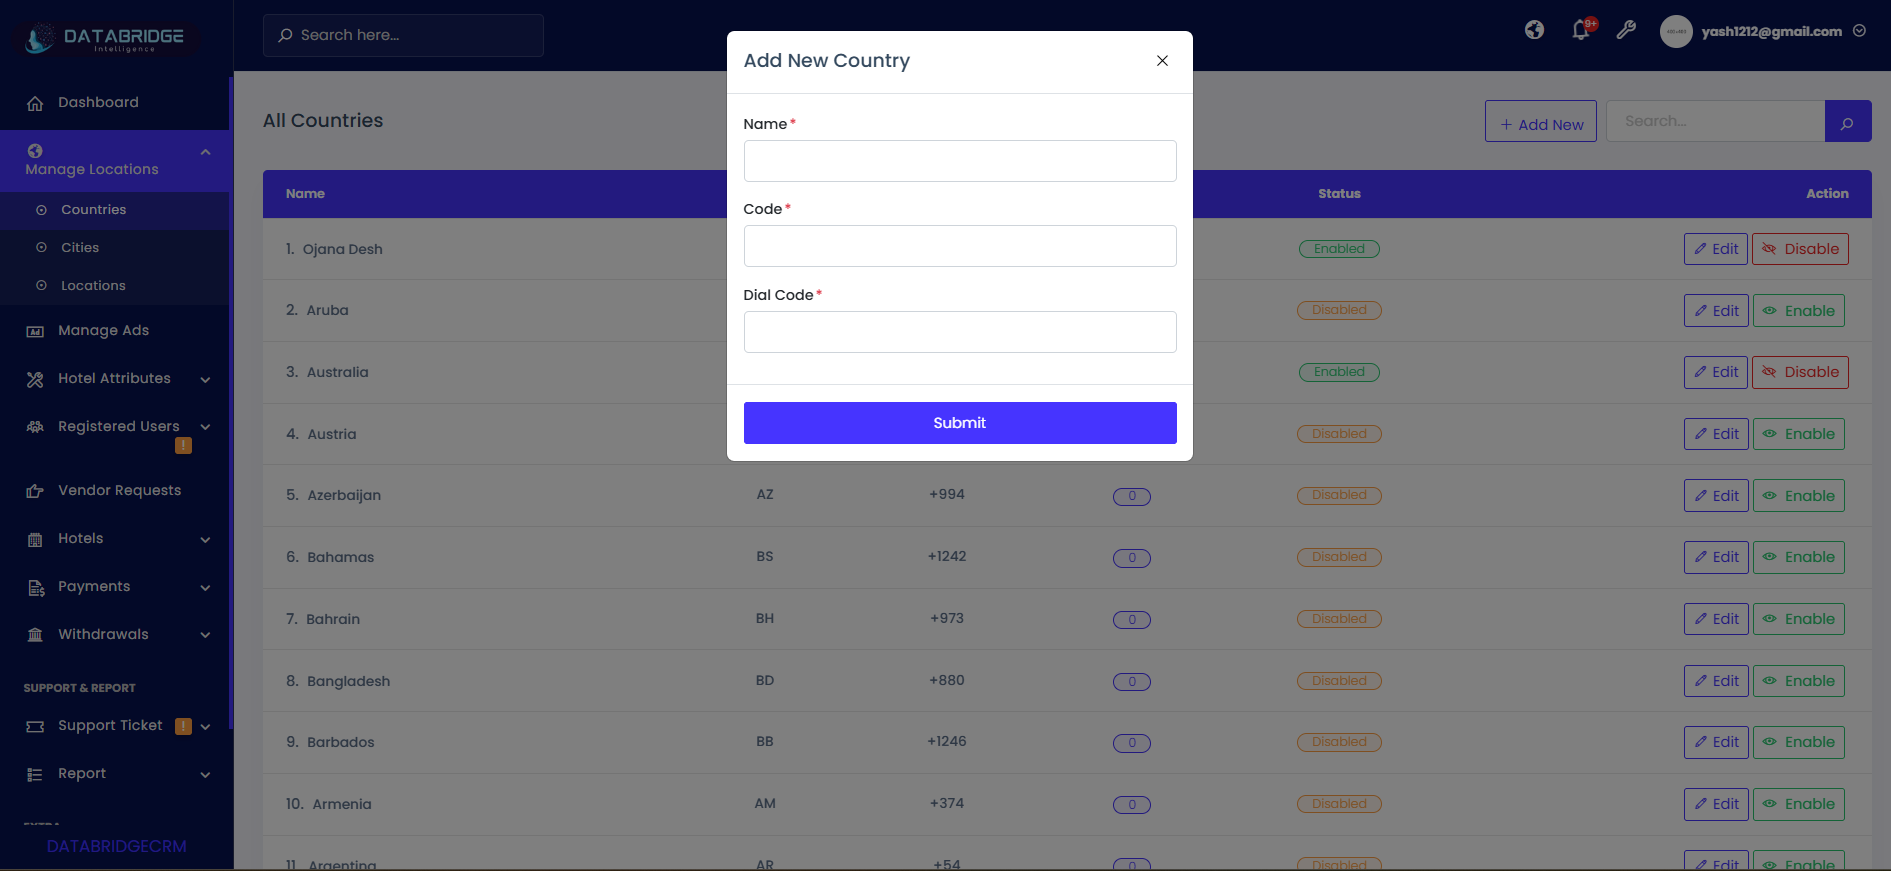
Add New Country (Popup Screen):
This popup allows administrators to add a new country into the system with required details like name and codes.
Features:
-Input fields: Name, Country Code, Dial Code
-Required field validation
-Submit button to save data
-Close (X) button to cancel
Functionality:
-Admin enters country details
-System validates required fields
-On submit, country is saved and added to list
-Popup closes after successful submission
1
Manage Locations
2
Countries
3
Add New
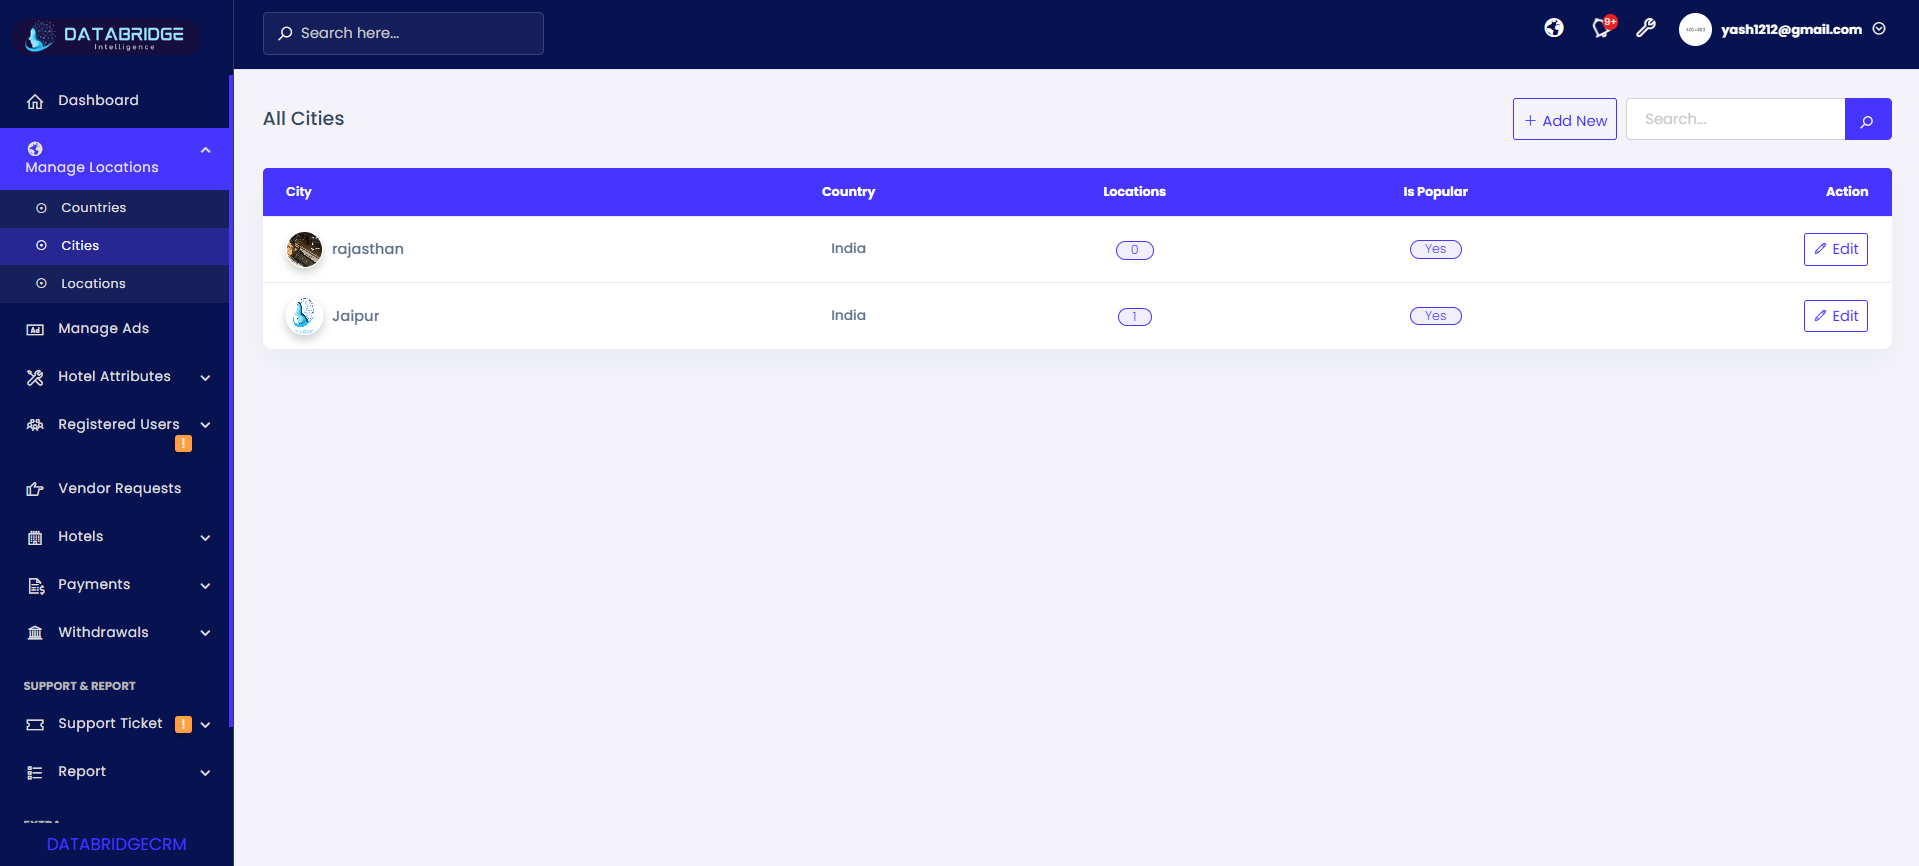
Cities List Screen:
This screen shows all cities mapped under countries and helps manage city-level data for hotel locations.
Features:
-Displays City Name, Country, Locations count
-“Is Popular” toggle for highlighting cities
-Add New button to create city
-Search functionality
-Edit option available
Functionality:
-Admin can view all cities with linked country
-Toggle “Is Popular” to highlight city
-Add New opens city form popup
-Edit allows updating city details
1
Manage Locations
2
Citys
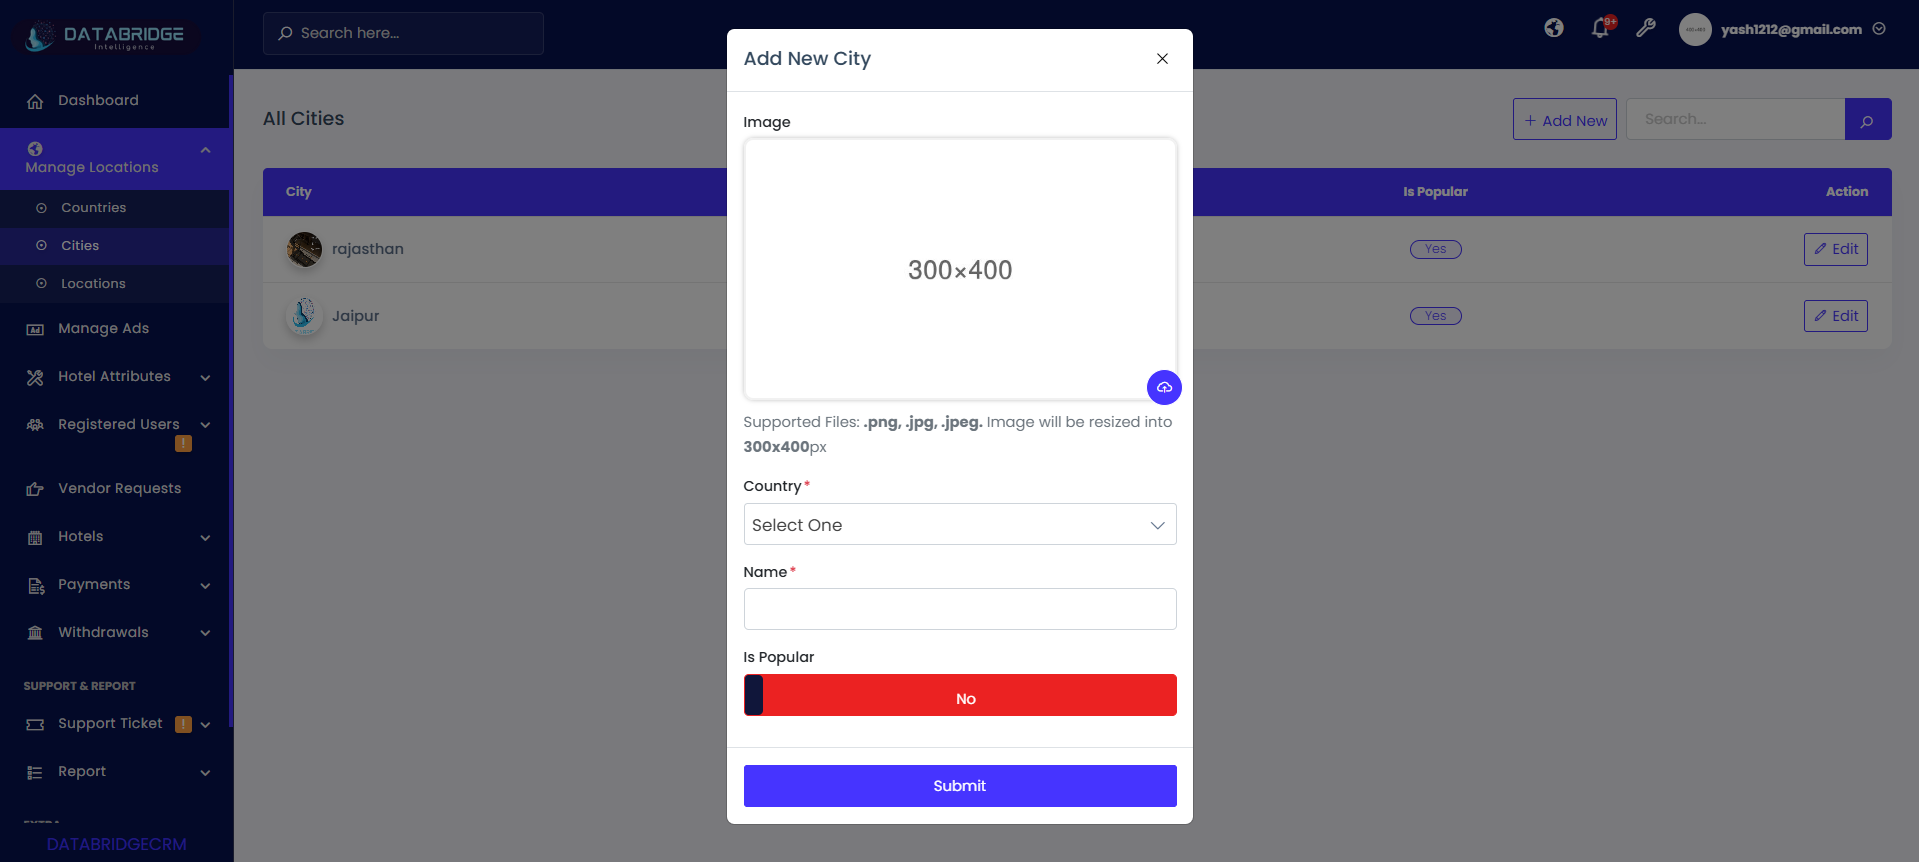
Add New City (Popup Screen):
This popup allows adding a new city with image and country mapping.
Features:
-Image upload (auto resize supported)
-Country dropdown selection
-City name input field
-“Is Popular” toggle switch
-Submit button
Functionality:
-Admin selects country and enters city name
-Optional image upload for city
-Toggle sets city popularity status
-Submit saves city and updates list
1
Manage Locations
2
Citys
3
Add New
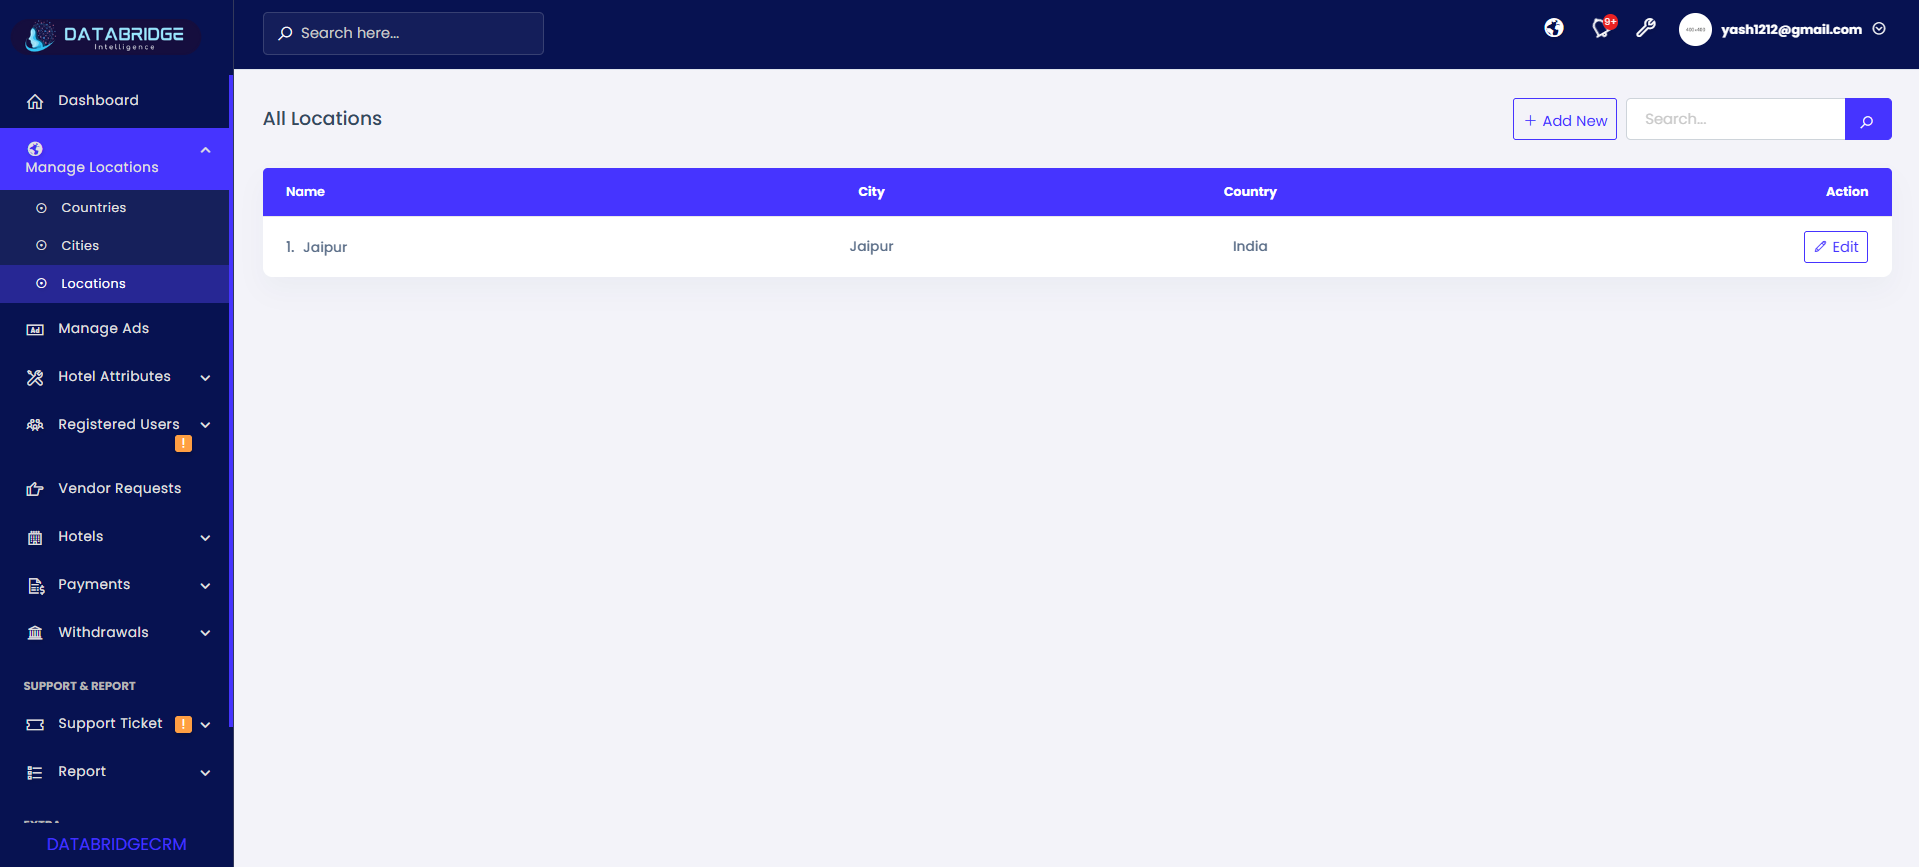
Locations List Screen:
This screen manages specific locations within cities, helping define exact hotel areas.
Features:
-Displays Location Name, City, Country
-Add New button
-Search functionality
-Edit option for each location
Functionality:
-Admin can view all locations mapped to cities
-Search filters location records
-Add New opens location form
-Edit updates location details
1
Manage Locations
2
Locations
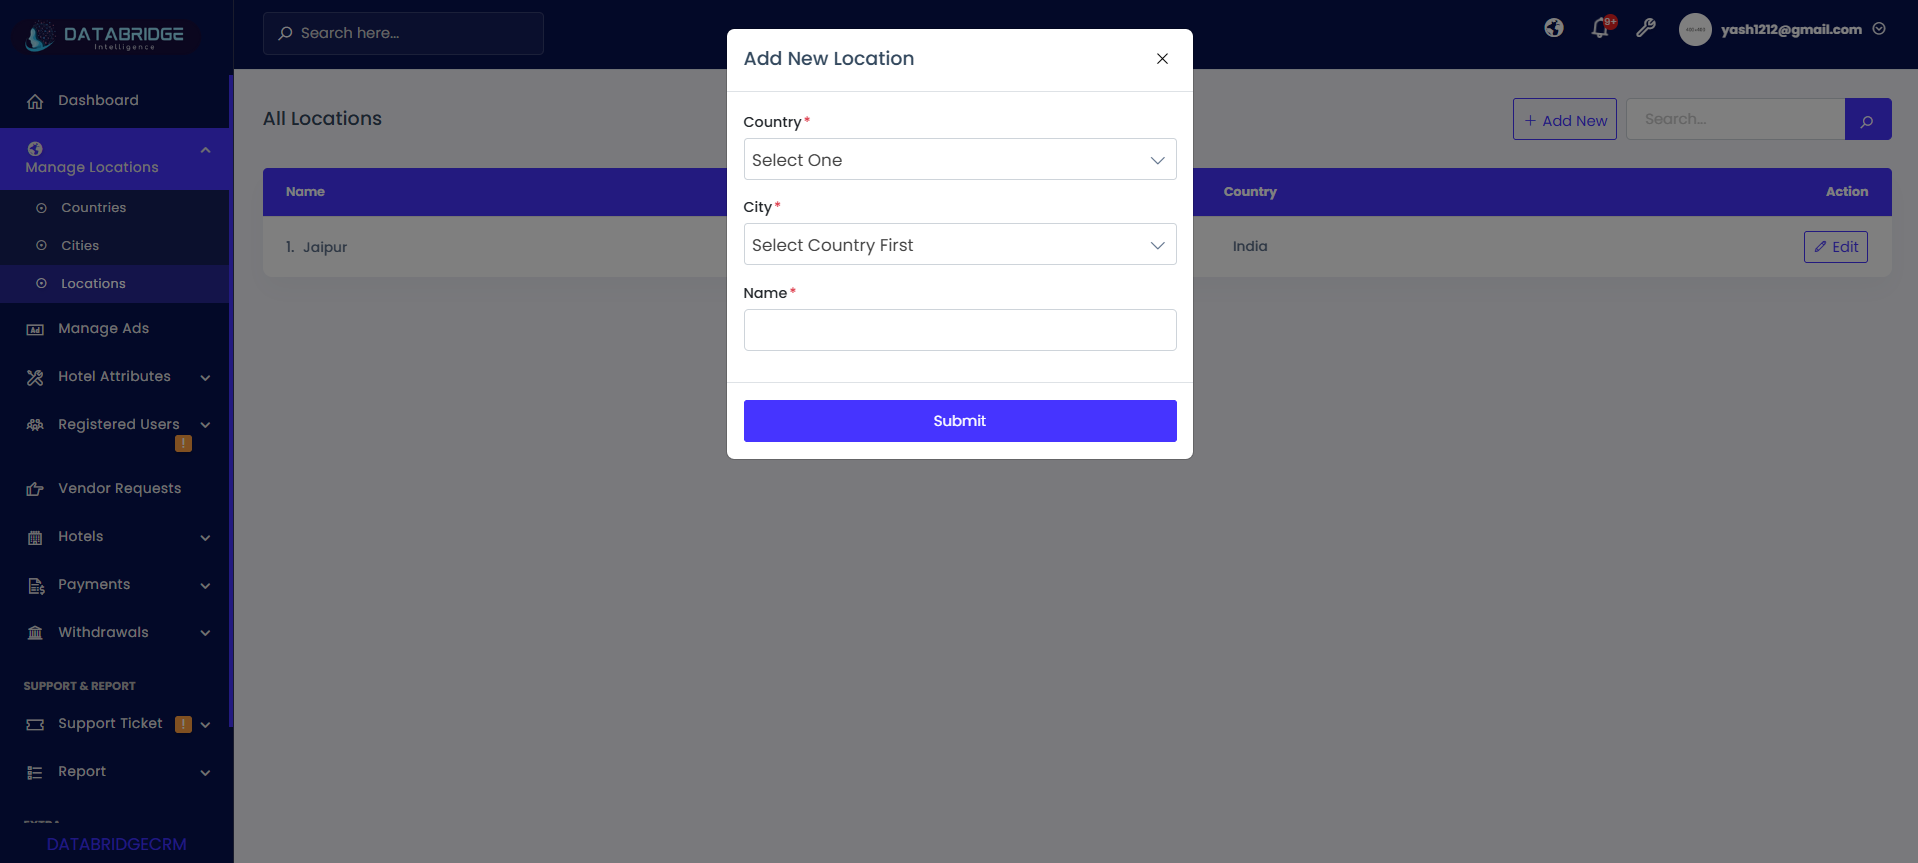
Add New Location (Popup Screen):
This popup is used to create a new location under a selected city and country.
Features:
-Country dropdown selection
-City dropdown (dependent on country)
-Location name input field
-Submit button
Functionality:
-Admin selects country → system loads cities
-Admin selects city and enters location name
-Submit saves location into system
-Location becomes available for hotel mapping
1
Manage Locations
2
Locations
3
Add New
Manage Ads
The Manage Ads module allows administrators to create, manage, and control promotional advertisements within the hotel management system. It enables linking ads to specific hotels, setting redirect URLs, and defining expiry dates to ensure time-based visibility. This module helps in promoting featured hotels, special offers, and marketing campaigns, enhancing user engagement and business growth.
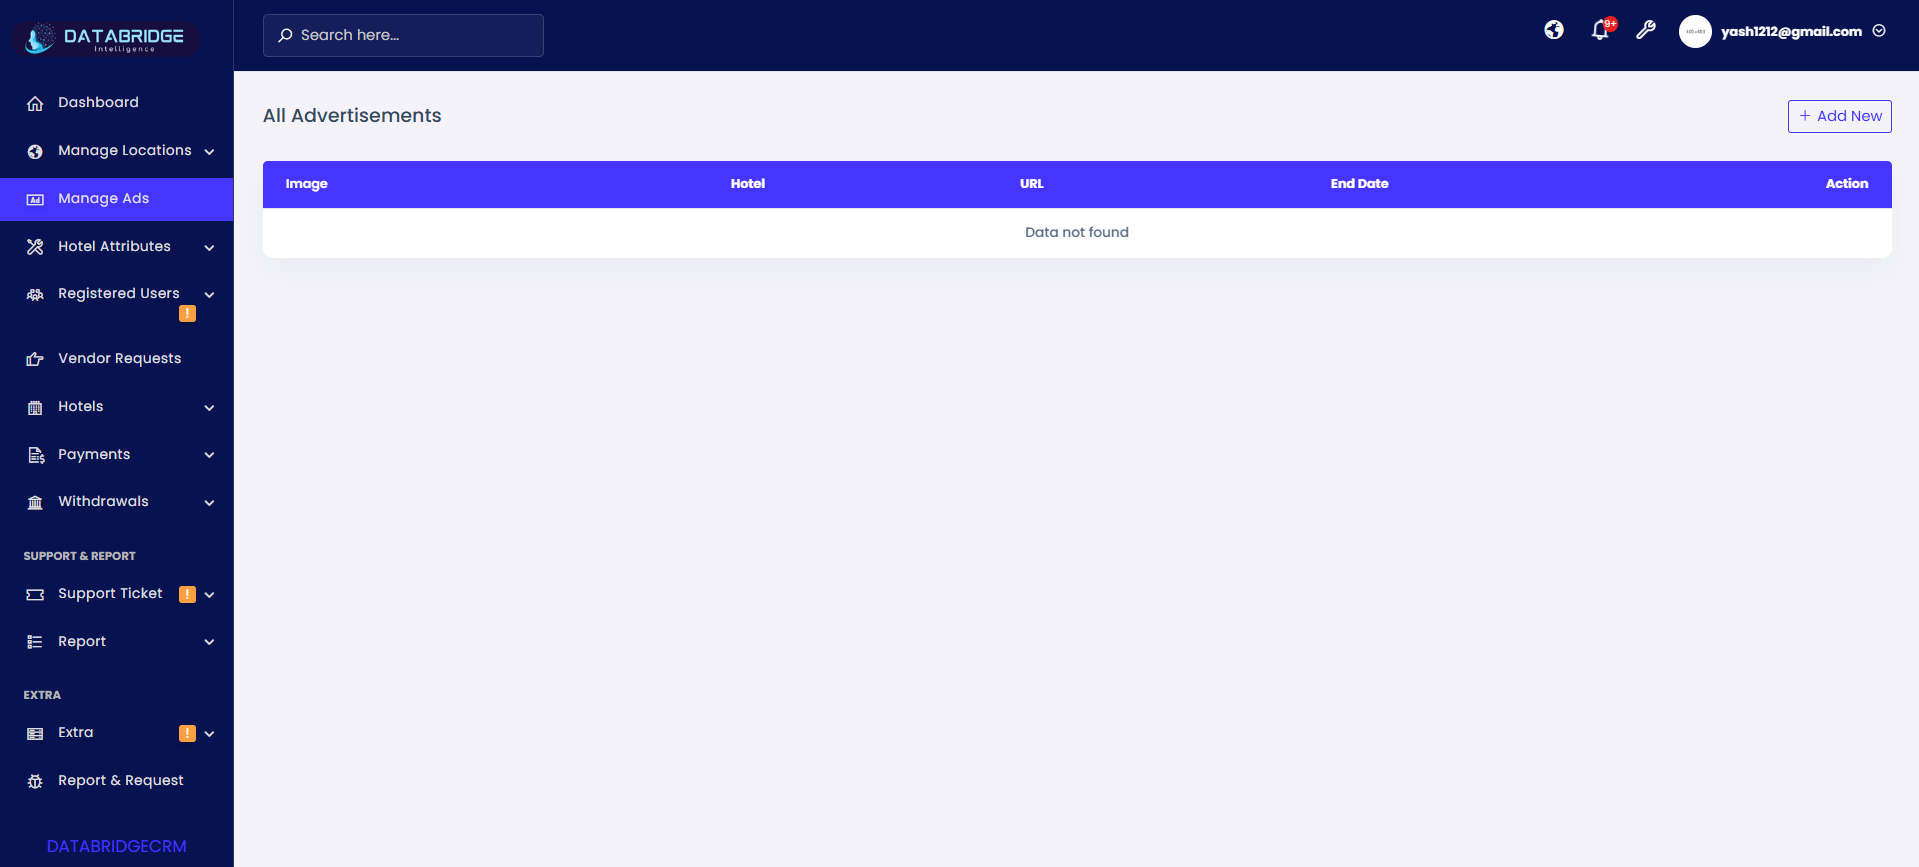
Advertisements List Screen:
This screen allows administrators to manage all promotional advertisements displayed within the hotel management system. It helps in linking ads with specific hotels, tracking their validity, and controlling visibility for marketing purposes.
Features:
-Displays advertisement list with Image, Hotel, URL, and End Date
-“Add New” button to create a new advertisement
-Table view for organized ad management
-Action column for editing or deleting ads
-Supports linking ads to specific hotels
-Displays message when no data is available
Functionality:
-Admin can view all advertisements in a structured table format
-Clicking Add New allows creation of a new advertisement
-Each ad includes image, hotel association, redirect URL, and expiry date
-Edit option allows updating advertisement details
-Delete option removes advertisement from the system
-End Date ensures ads are time-bound and expire automatically
-Ads can be used for promotions, offers, or featured hotel listings

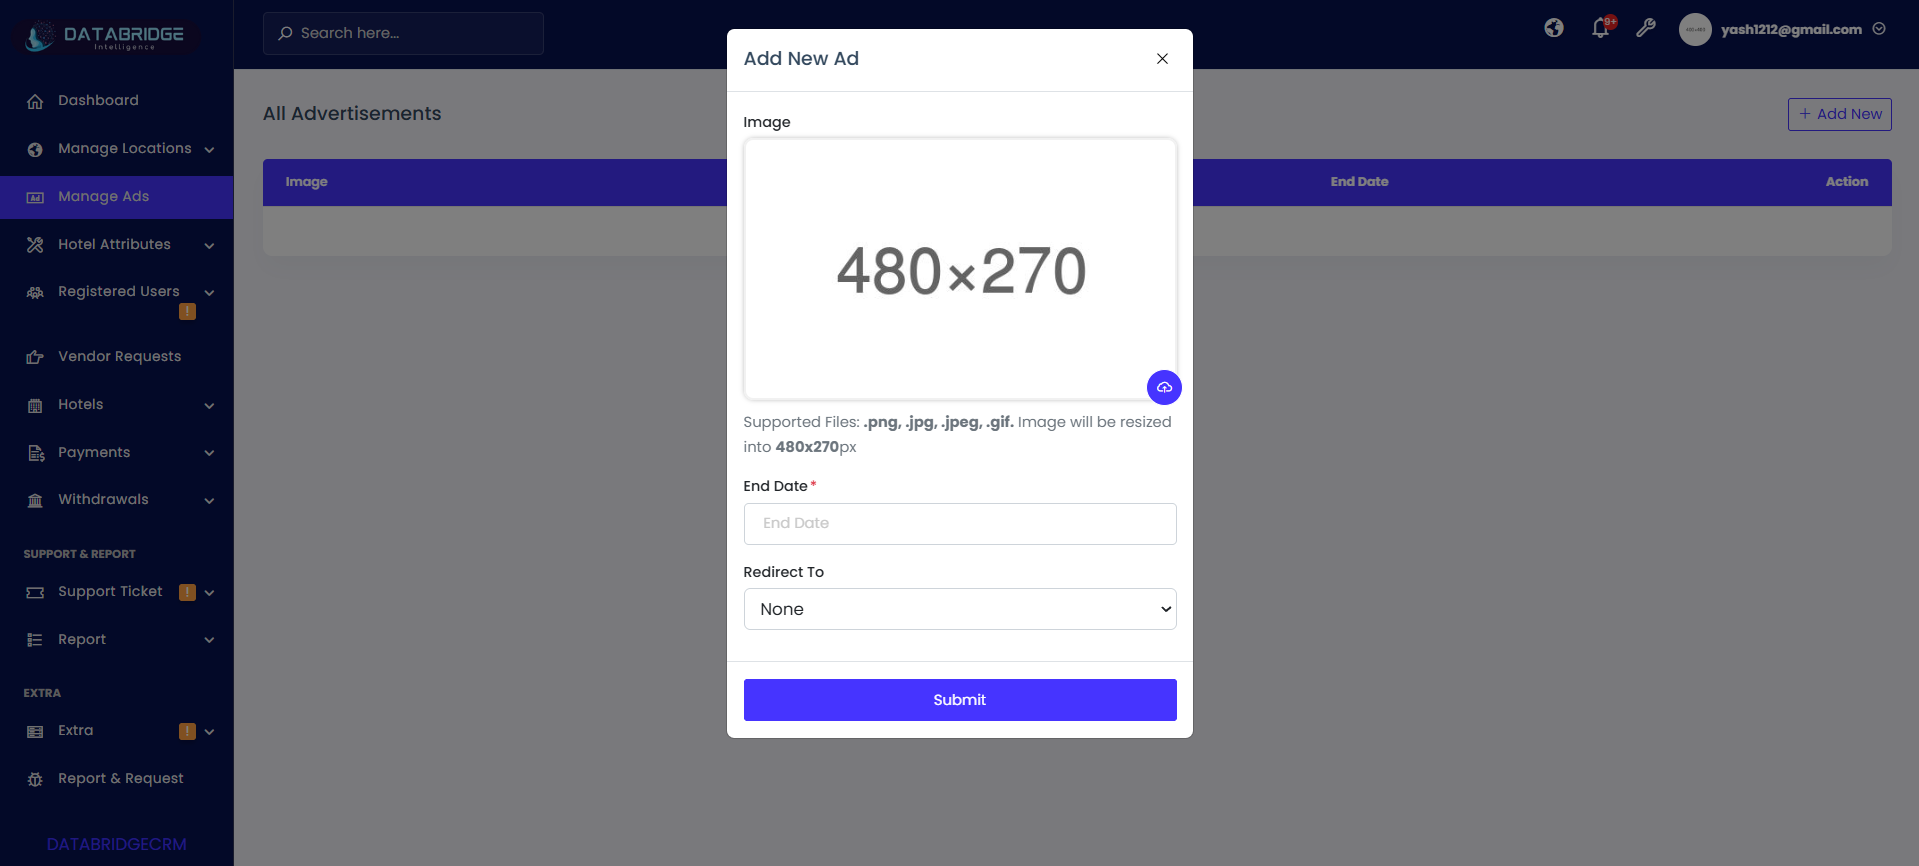
Add New Advertisement Screen:
This screen allows administrators to create and publish new advertisements within the system. It enables uploading ad banners, setting expiration dates, and defining redirection targets to promote hotels or offers effectively.
Features:
-Image upload section with preview (recommended size: 480×270 px)
-Supports file formats: .png, .jpg, .jpeg, .gif
-Automatic image resizing for consistency
-End Date field to define advertisement validity
-“Redirect To” dropdown for linking ads (e.g., hotel, URL, or none)
-Submit button to save advertisement
-Close (X) button to cancel the process
Functionality:
-Admin uploads an advertisement image using the upload option
-System validates file format and resizes image automatically
-Admin selects an End Date to control ad expiry
-Admin chooses a redirect option (e.g., specific hotel or external link)
-On clicking Submit, the advertisement is saved and displayed in the Ads list
-Ads automatically expire based on the selected end date
-Cancel/Close option exits without saving changes
1
Manage Ads
2
Add New
Hotel Attributes
The Hotel Attributes module is used to manage and define all configurable attributes related to hotels, such as amenities, facilities, and bed types. This screen acts as a centralized setup area where administrators can create, update, and control various attribute categories that are applied across hotel listings. It ensures consistency, better organization, and standardized data for all hotel-related features within the system.
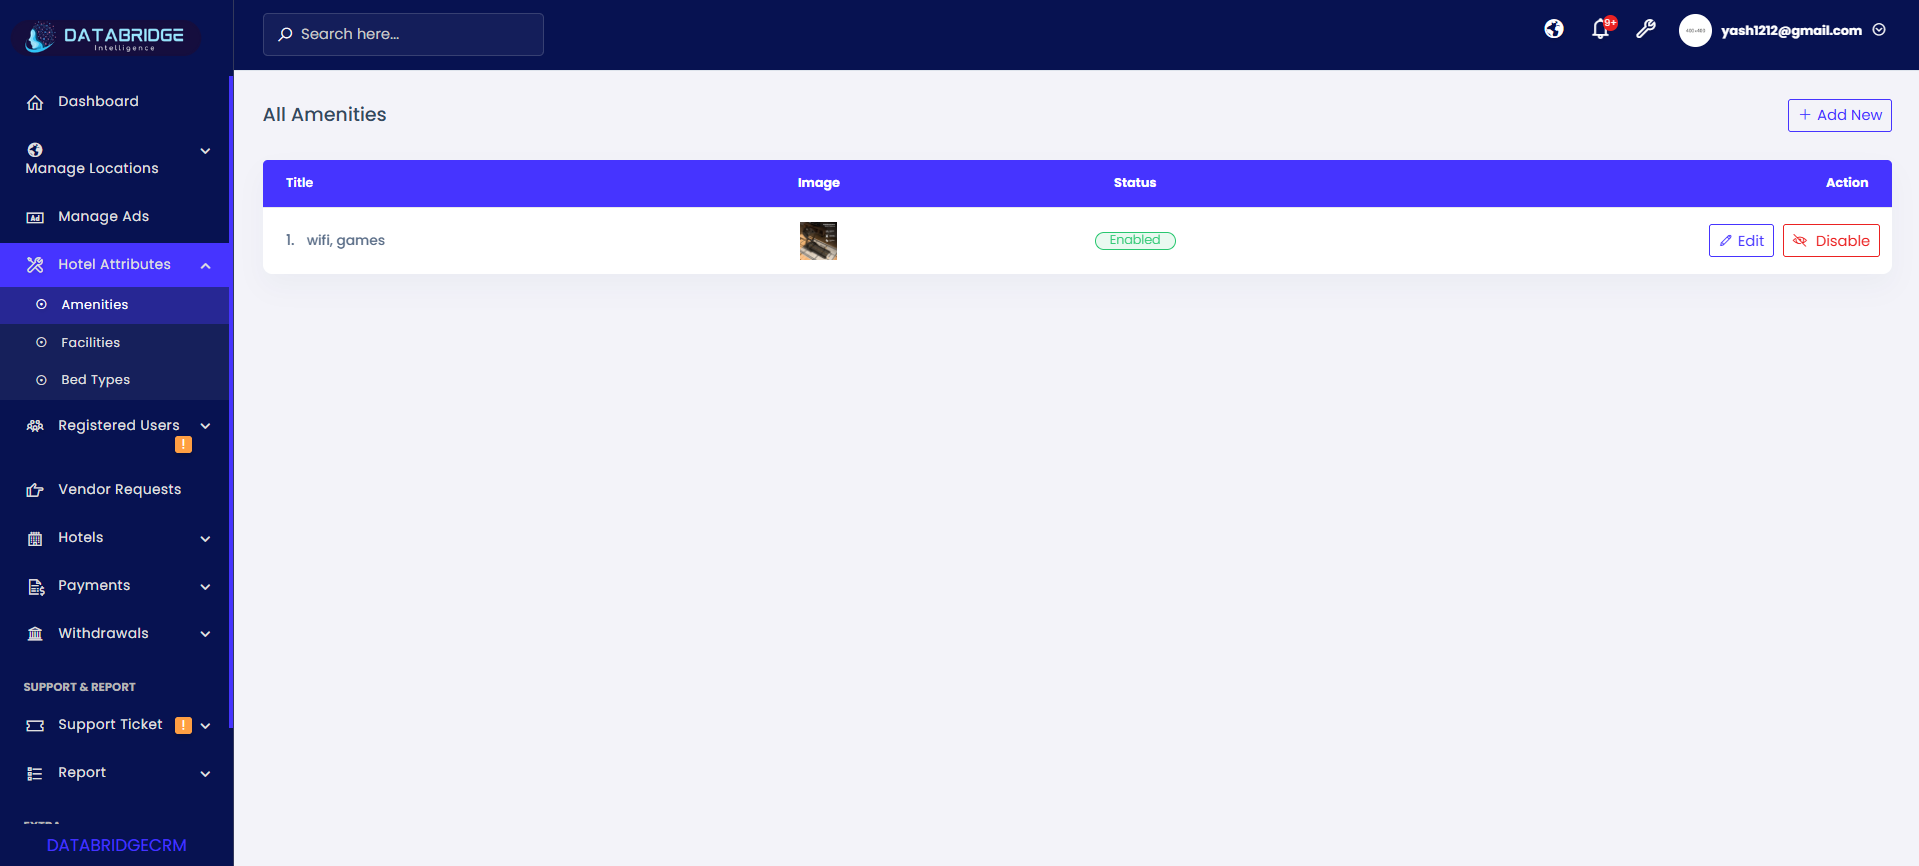
Amenities List Screen (Main Screen):
This screen displays all available hotel amenities in the system, allowing administrators to manage, update, and control their availability. It acts as the central panel for maintaining amenity records.
Features:
-List view of all amenities with Title and Image
-Status indicator (Enabled/Disabled)
-Action buttons: Edit and Disable/Enable
-“Add New” button to create a new amenity
-Clean table layout for easy management
-Real-time status visibility
Functionality:
-Displays all amenities stored in the system
-Admin can click Add New to open the add amenity form
-Edit button opens the update screen with pre-filled data
-Disable button triggers confirmation before deactivation
-Status updates reflect instantly in the list
-Helps maintain standardized hotel amenities
1
Hotel Attributes
2
Amenities
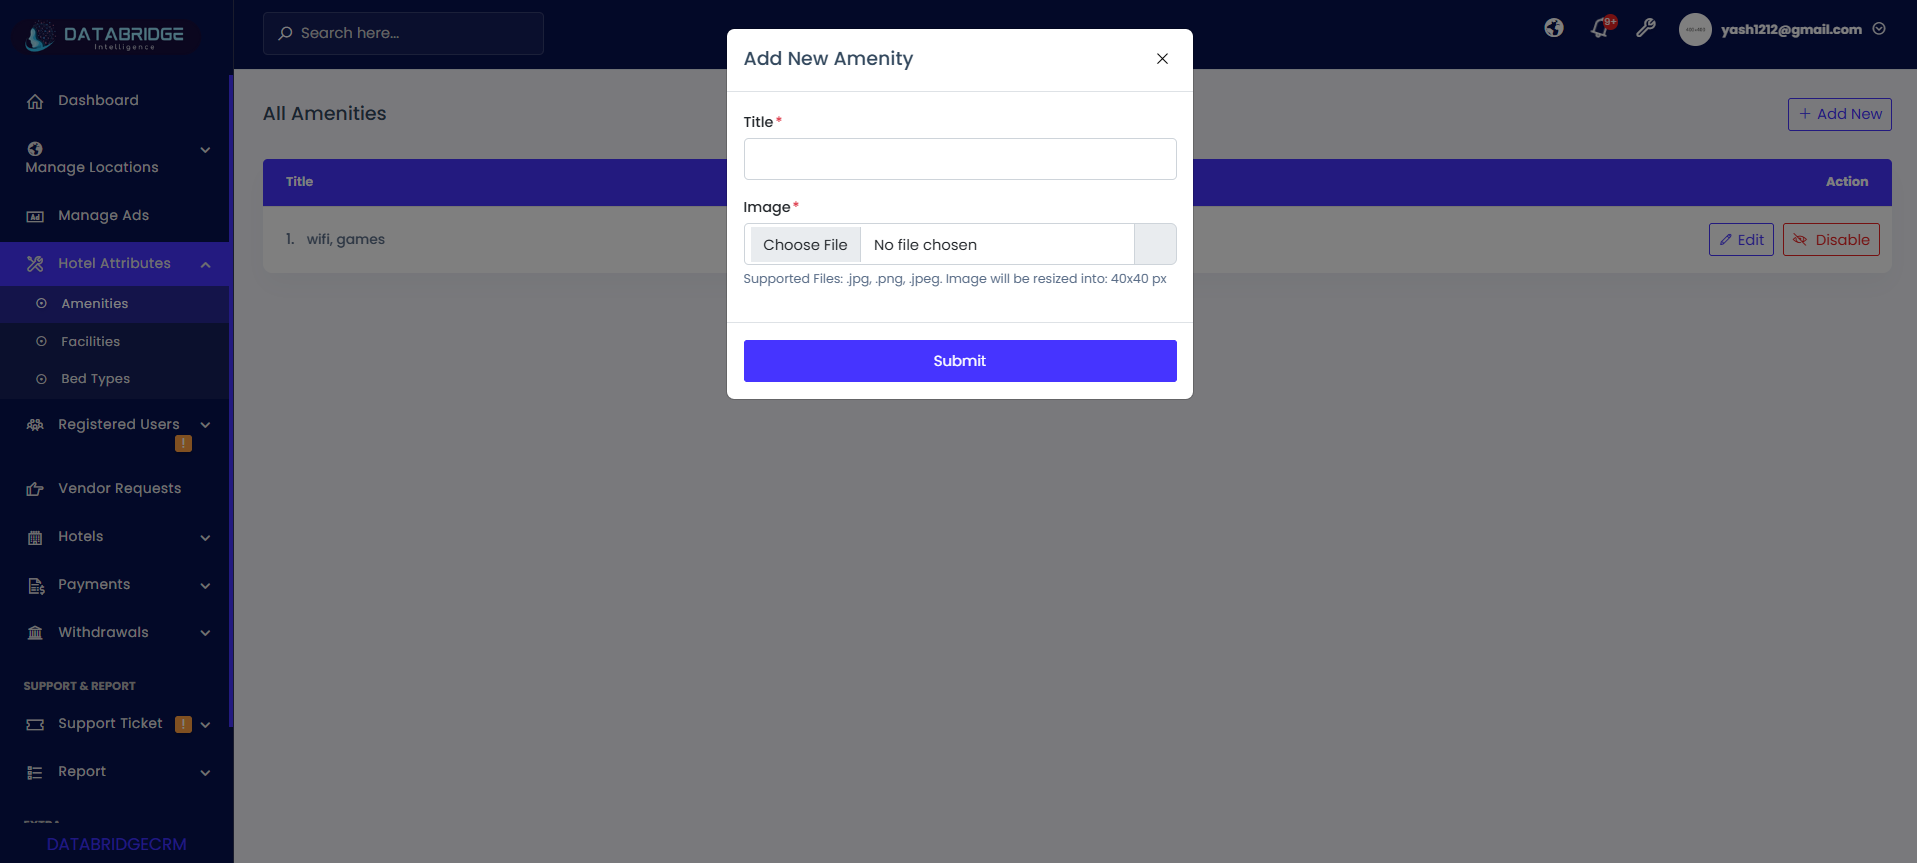
Add New Amenity Screen:
This screen allows administrators to add new amenities by entering a title and uploading an image. It ensures that all amenities are visually represented and properly categorized.
Features:
-Input field for Amenity Title
-Image upload option
-Supported formats: .jpg, .png, .jpeg
-Auto resize image (40×40 px)
-Submit button to save data
-Required field validation
Functionality:
-Admin enters the amenity name (e.g., WiFi, Parking, Pool)
-Uploads an icon/image representing the amenity
-System validates required fields before submission
-On clicking Submit, amenity is saved in the database
-Newly added amenity appears in the amenities list
-Ensures consistent UI representation across hotels
1
Hotel Attributes
2
Amenities
3
Add New
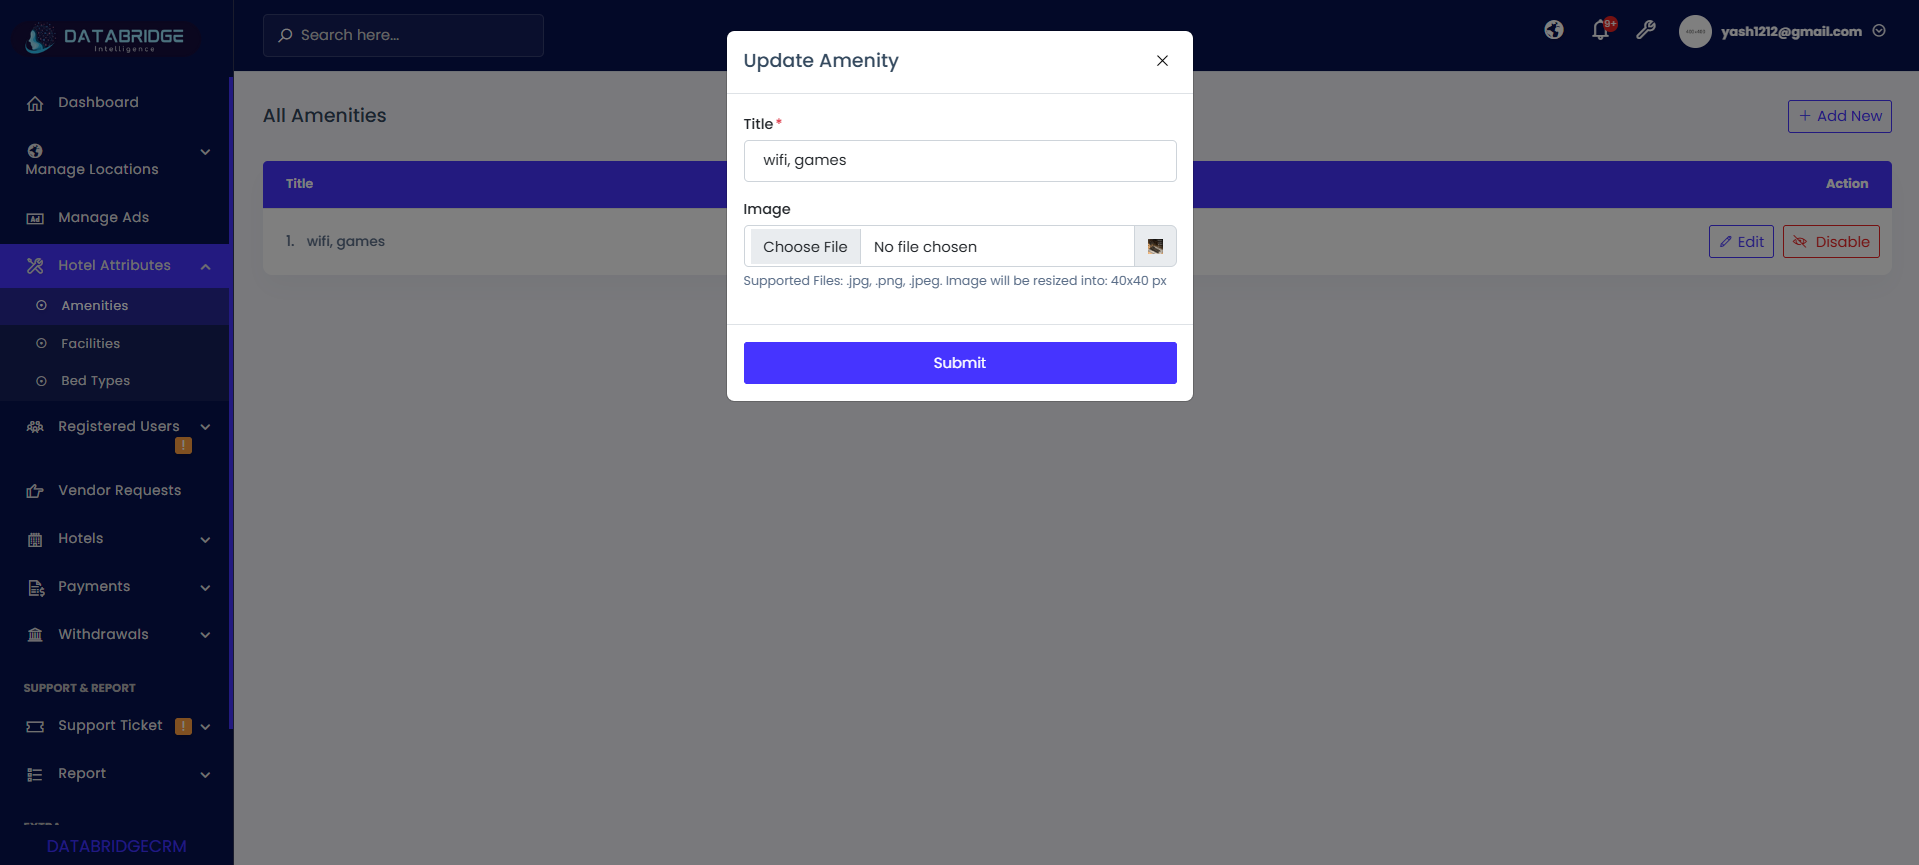
Update Amenity Screen (Edit Screen):
This screen enables administrators to modify existing amenity details such as title and image, ensuring up-to-date and accurate information.
Features:
-Pre-filled Title field
-Existing image preview
-Option to upload new image
-Same file format support as Add screen
-Submit button to update changes
-Simple and user-friendly layout
Functionality:
-Admin clicks Edit from the list screen
-System loads existing amenity details
-Admin updates title or replaces image
-On clicking Submit, changes are saved
-Updated data reflects immediately in the list
-Maintains data accuracy and consistency
1
Hotel Attributes
2
Amenities
3
Edit
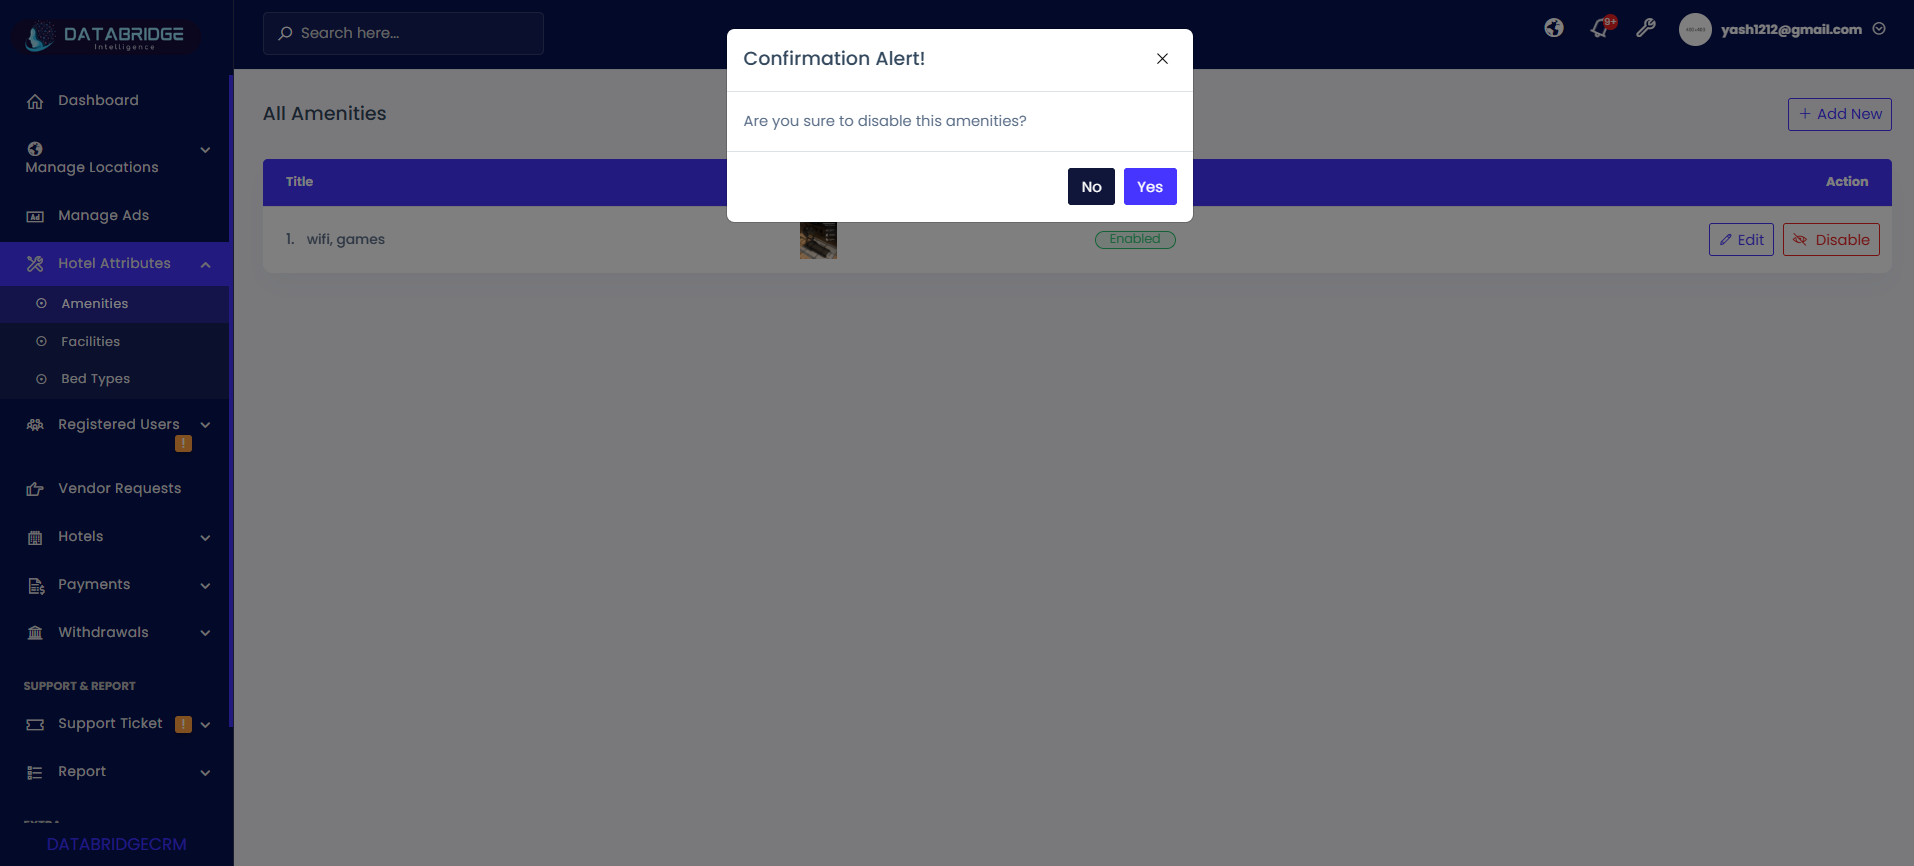
Disable Amenity Screen (Confirmation Alert):
This screen provides a confirmation prompt before disabling an amenity to prevent accidental changes. It ensures controlled management of active amenities.
Features:
-Confirmation message popup
-“Yes” and “No” action buttons
-Clear warning message
-Modal-based UI interaction
-Prevents accidental disable actions
Functionality:
-Admin clicks Disable from the amenities list
-System shows confirmation alert
-Clicking Yes disables the amenity
-Clicking No cancels the action
-Disabled amenities are marked accordingly in the list
-Can be re-enabled later if required
1
Hotel Attributes
2
Amenities
3
Disable
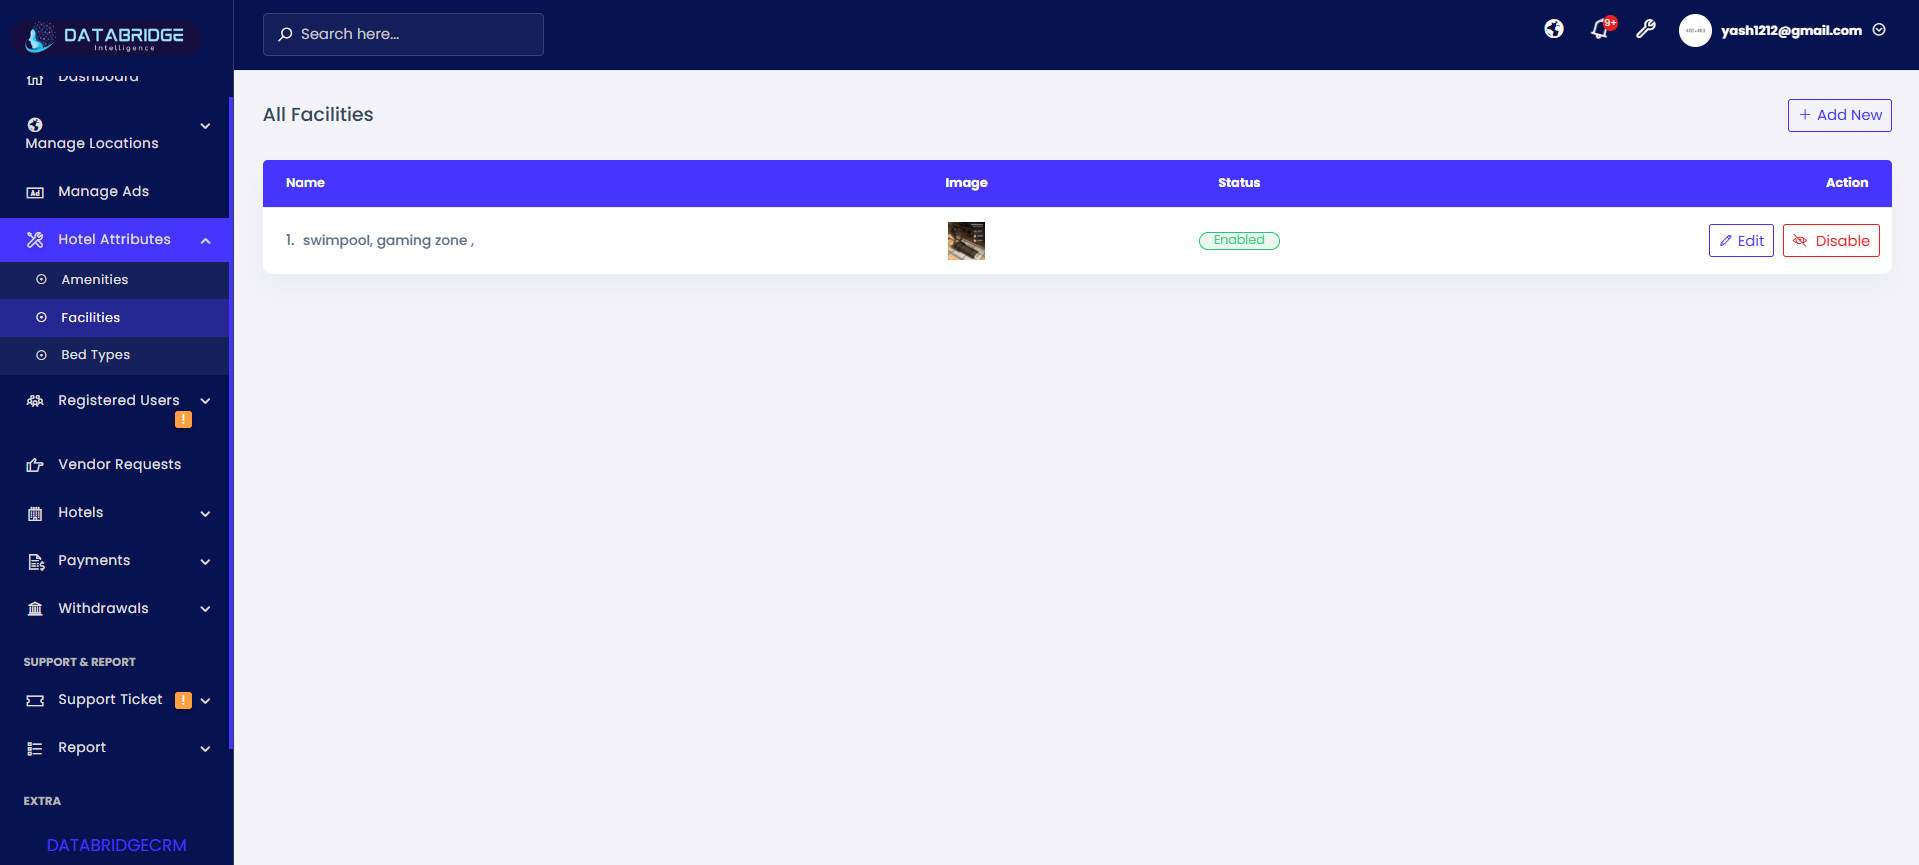
Facilities List Screen (Main Screen)
This screen displays all hotel facilities available in the system, allowing administrators to manage, update, and control facility records. It acts as the central interface for maintaining facility-related data used across hotel listings.
Features:
-Table view of all facilities with Name and Image
-Status indicator (Enabled/Disabled)
-Action buttons: Edit and Disable/Enable
-“Add New” button to create a new facility
-Organized and clean UI for easy navigation
-Real-time status updates
Functionality:
-Displays a list of all facilities stored in the system
-Admin can click Add New to open the add facility form
-Edit button opens the update screen with existing data
-Disable button allows admin to deactivate a facility
-Status changes are reflected instantly
-Ensures standardized facility data across all hotels
1
Hotel Attributes
2
Facilities
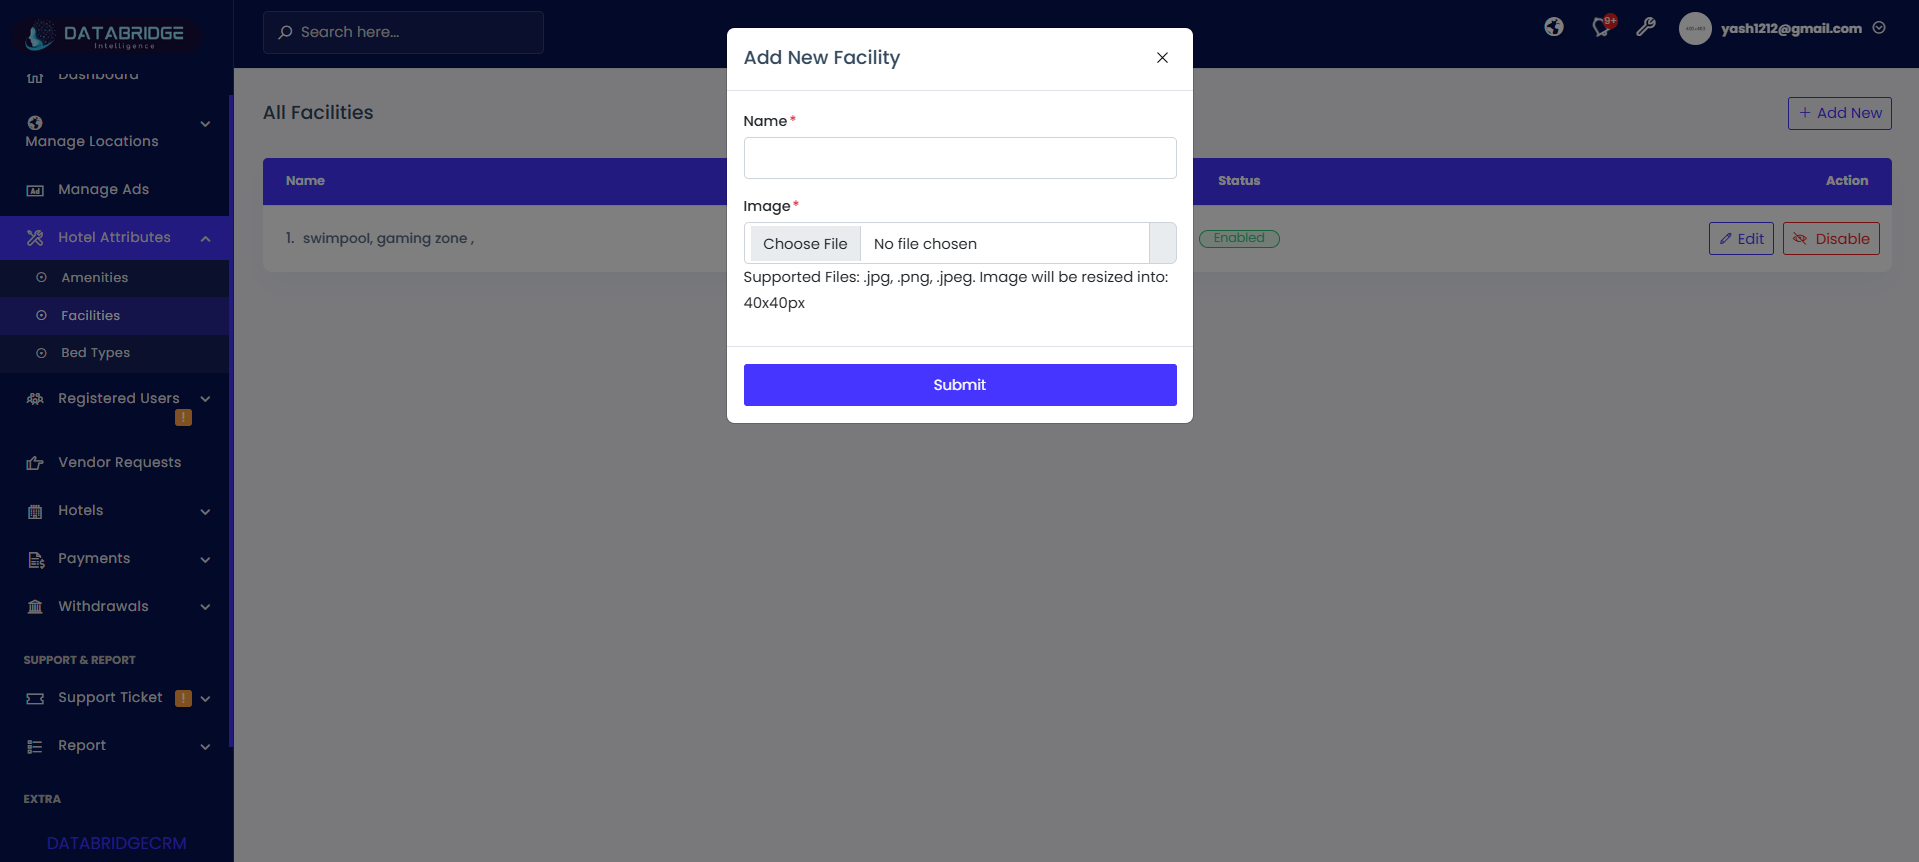
Add New Facility Screen:
This screen allows administrators to add new facilities by entering a name and uploading an image. It ensures that facilities are properly defined and visually represented in the system.
Features:
-Input field for Facility Name
-Image upload option
-Supported formats: .jpg, .png, .jpeg
-Auto resize image (40×40 px)
-Submit button to save facility
-Required field validation
Functionality:
-Admin enters facility name (e.g., Swimming Pool, Gym, Parking)
-Uploads an image/icon representing the facility
-System validates required inputs before submission
-On clicking Submit, facility is saved in the database
-Newly added facility appears in the facilities list
-Helps maintain uniform facility representation across hotels
1
Hotel Attributes
2
Facilities
3
Add New
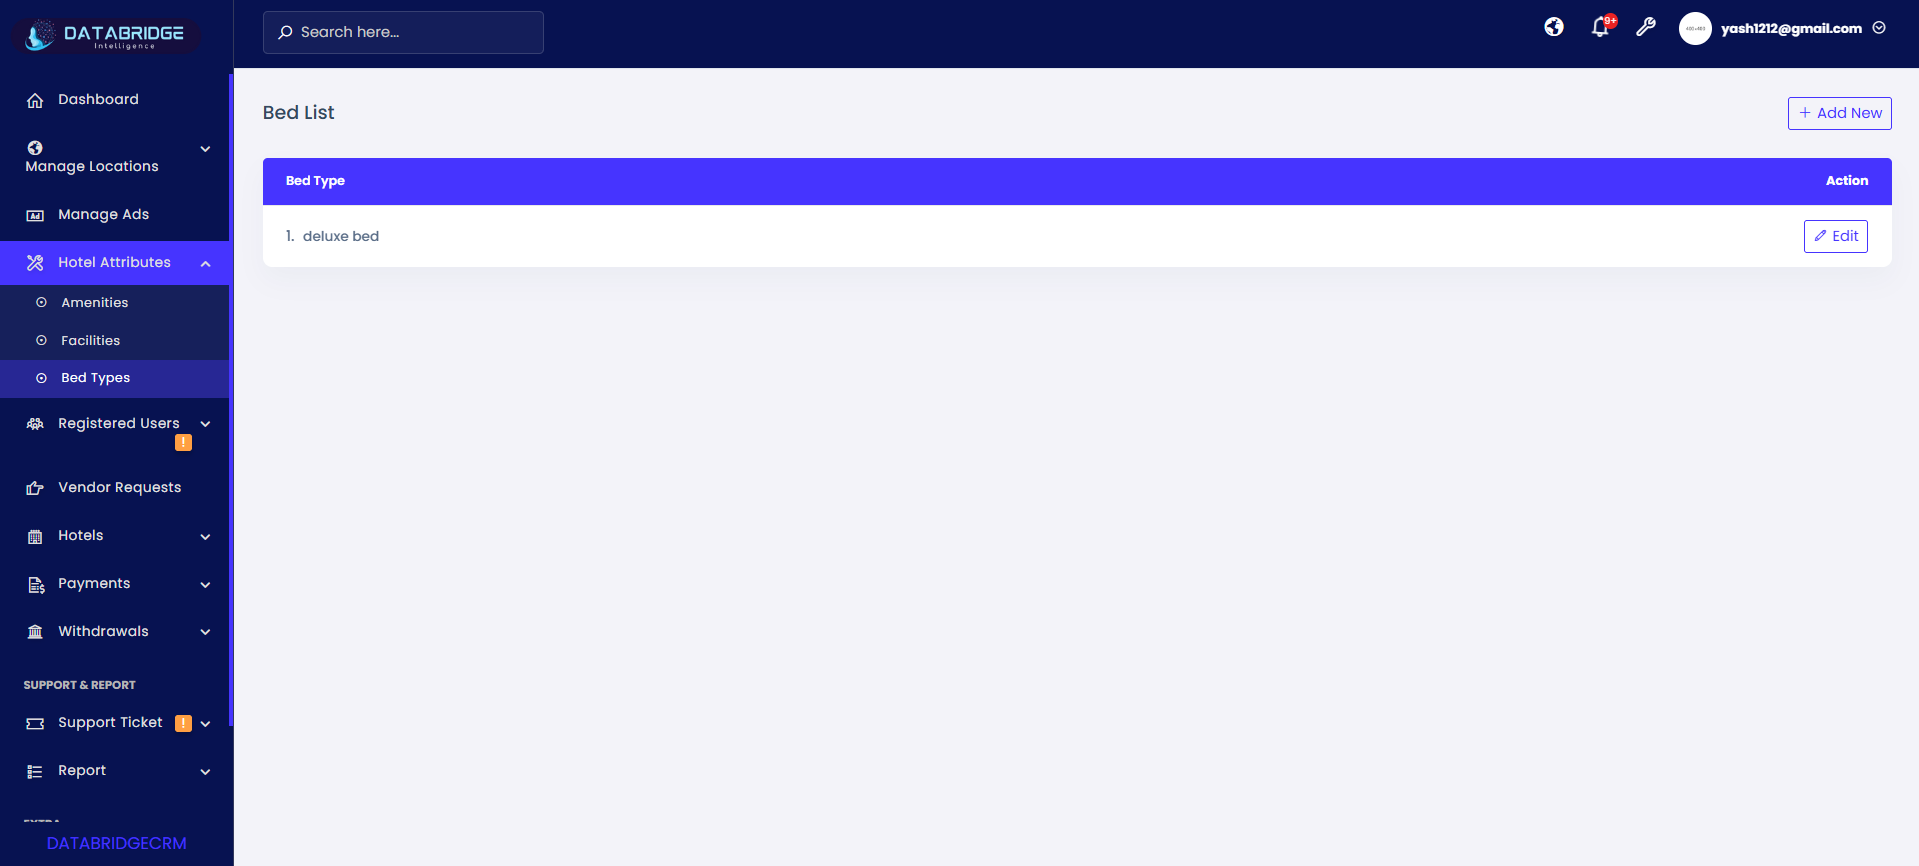
Bed Types List Screen (Main Screen):
This screen displays all available bed types configured in the system, allowing administrators to manage and update bed type options used across hotel room listings. It ensures standardized room configurations for better booking clarity.
Features:
-Table view listing all bed types
-Displays bed type names (e.g., Deluxe Bed, King Size, Twin Bed)
-Action button: Edit
-“Add New” button to create a new bed type
-Simple and clean interface for easy management
-Centralized control for room configuration
Functionality:
-Displays all bed types stored in the system
-Admin can click Add New to open the add bed type form
-Edit button allows modification of existing bed types
-Updates are reflected instantly in the list
-Ensures consistency in room configuration across hotels
-Helps improve booking accuracy by defining clear bed options
1
Hotel Attributes
2
Bed Types
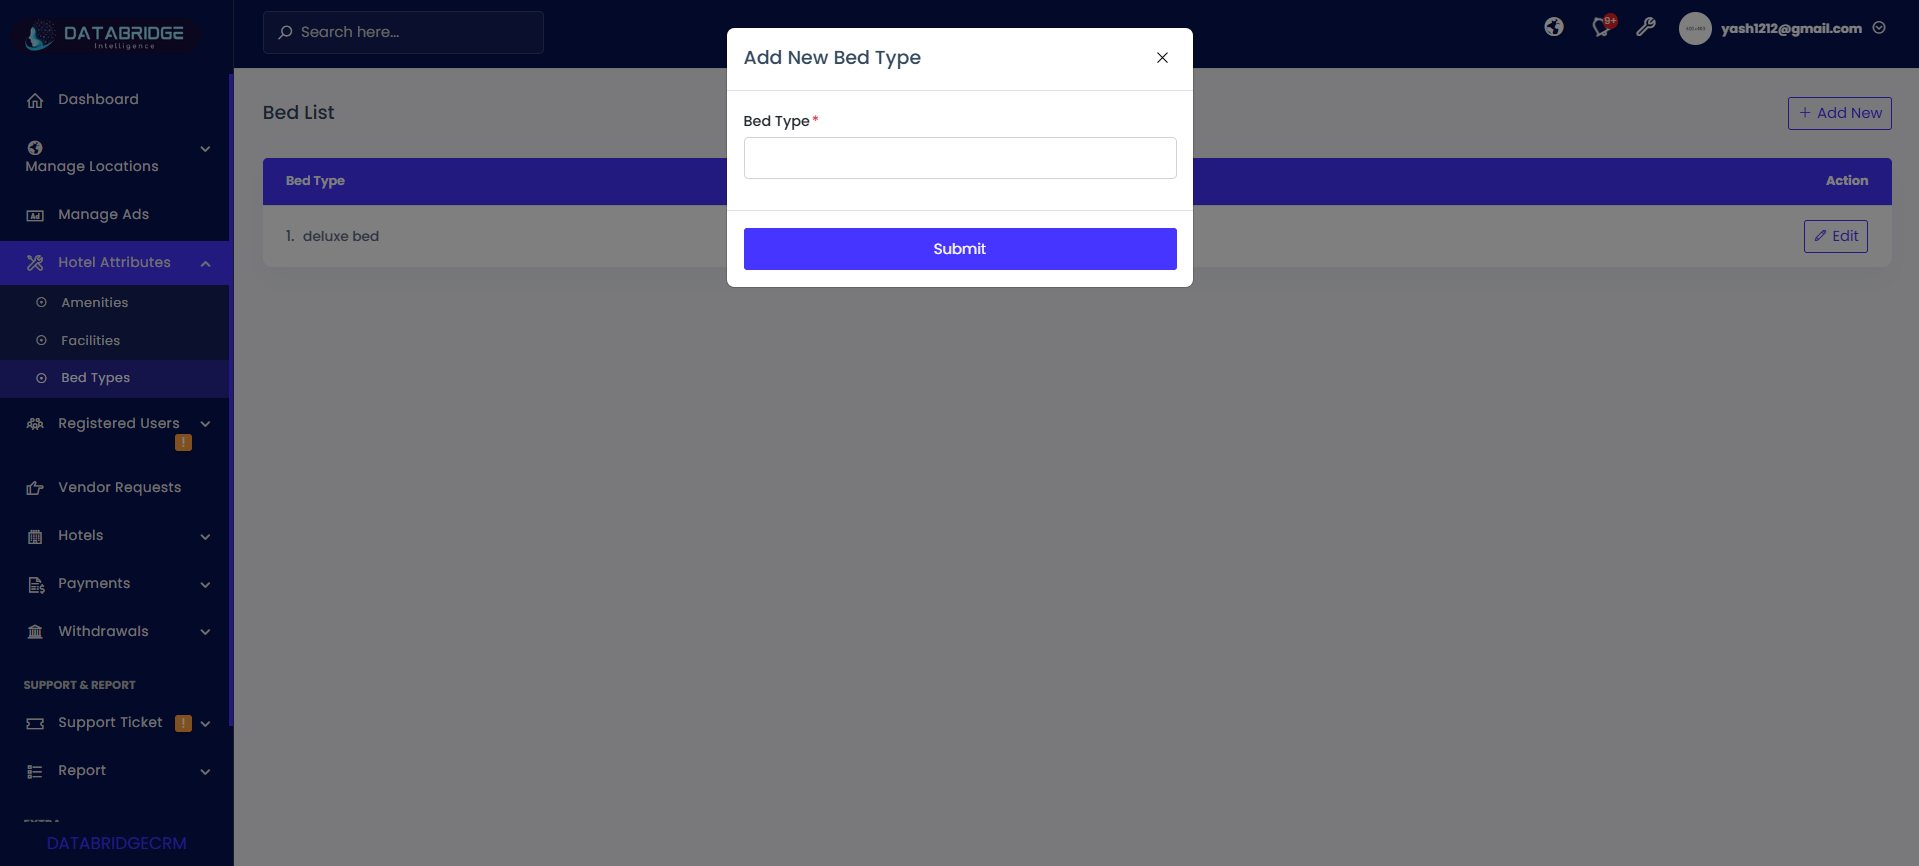
Add New Bed Type Screen:
This screen allows administrators to add new bed types by entering the bed type name. It helps define various sleeping arrangements available in hotel rooms.
Features:
-Input field for Bed Type name
-Required field validation
-Submit button to save data
-Simple modal-based UI
-Quick data entry process
Functionality:
-Admin enters bed type name (e.g., Queen Bed, Twin Bed, Deluxe Bed)
-System validates the input field before submission
-On clicking Submit, bed type is saved in the database
-Newly added bed type appears in the list screen
-Ensures standardized bed configuration options across the system
1
Hotel Attributes
2
Bed Types
3
Add New
Registered Users
The Registered Users module in DatabridgeCRM provides a centralized interface to manage and monitor all users registered on the platform. It allows administrators to view user details, track verification status (email and mobile), and categorize users based on their activity such as active, banned, or unverified.This module helps in maintaining user data efficiently by offering filtering options, search functionality, and detailed insights into each user’s profile, including contact information, registration date, and account balance. Additionally, it enables administrators to communicate with users through notifications (Email, SMS, Firebase), ensuring smooth engagement and platform management.
Active Users Screen:
This screen displays all currently active users registered in the system, providing key details such as user identity, contact information, country, joining date, and account balance. It helps administrators monitor active platform users efficiently.
Features:
-Table listing all active users
-Columns: User Name, Email/Mobile, Country, Joined Date, Balance
-Search bar (Username / Email based search)
-“Details” button for each user
-Clean tabular layout for easy readability
-Real-time user data display
Functionality:
-Displays all active users stored in the database
-Admin can search users using name or email
-“Details” button opens user profile or detailed view
-Shows registration time and activity status
-Helps track user engagement and financial balance
-Data updates dynamically as users are added
1
Registered Users
2
Active Users
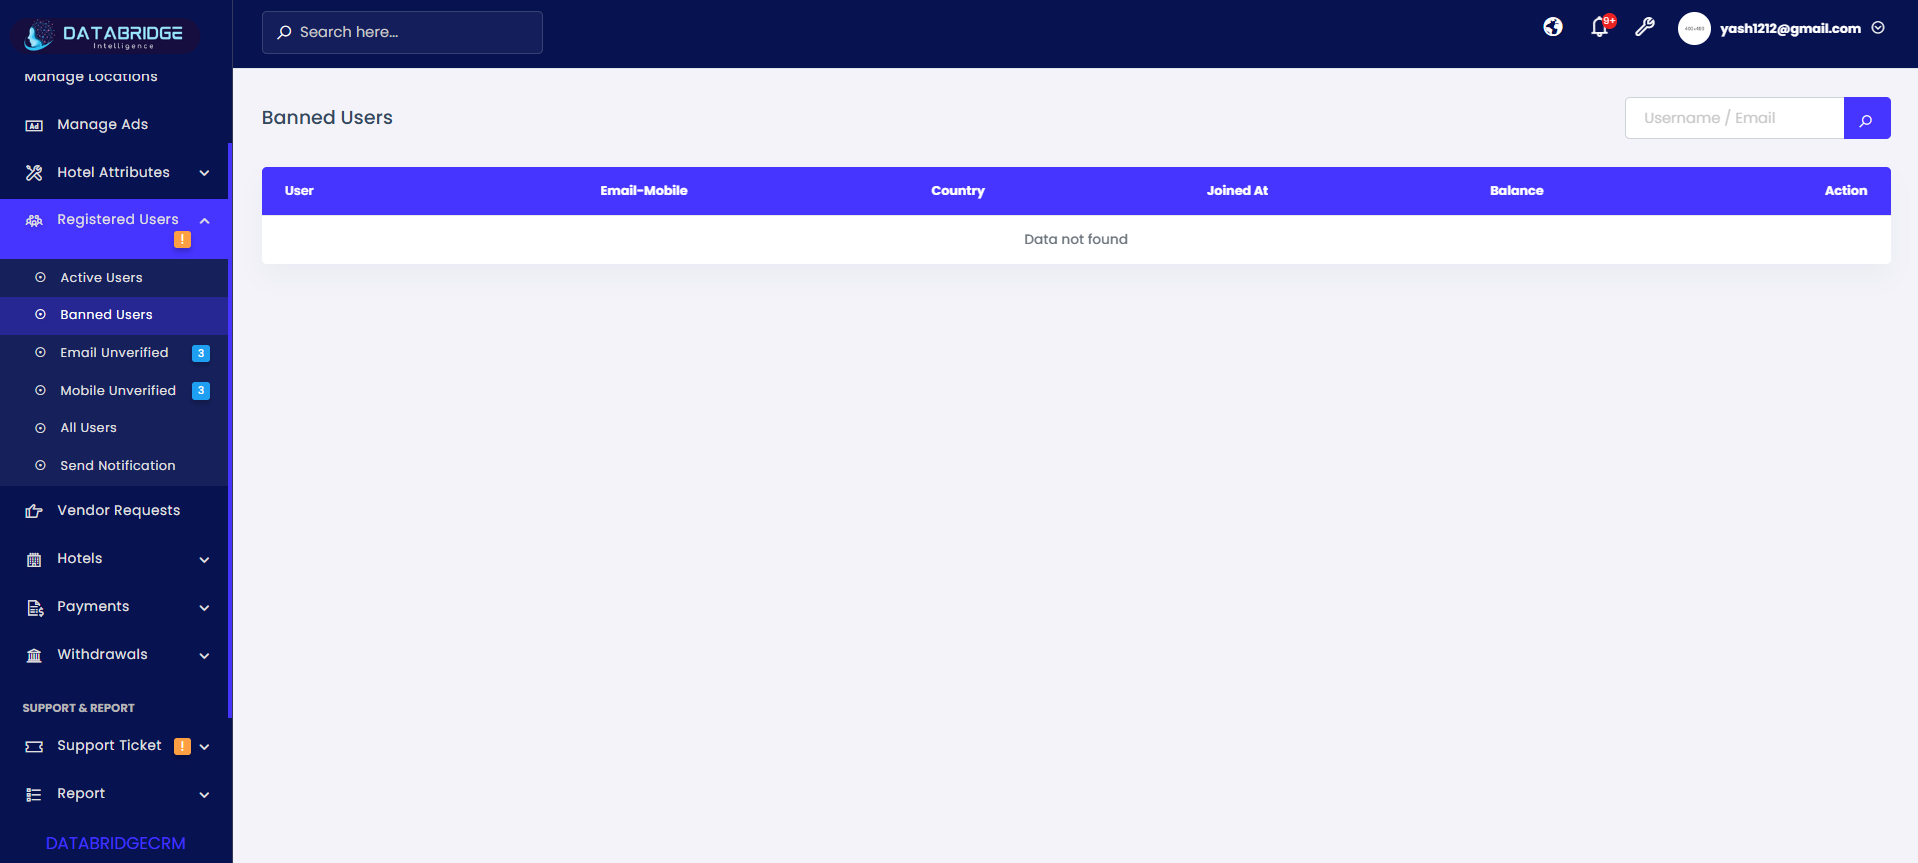
Banned Users Screen:
This screen lists users who have been restricted or banned from accessing the platform. It helps administrators monitor and manage restricted accounts.
Features:
-Table structure similar to Active Users
-Displays banned user records
-Search functionality available
-Empty state message (Data not found)
-Consistent UI with other user modules
Functionality:
-Shows all banned users in the system
-Helps admin review restricted accounts
-Can be used for future actions (unban/reactivate)
-Displays no data if no banned users exist
-Maintains system security by tracking blocked users
1
Registered Users
2
Banned Users
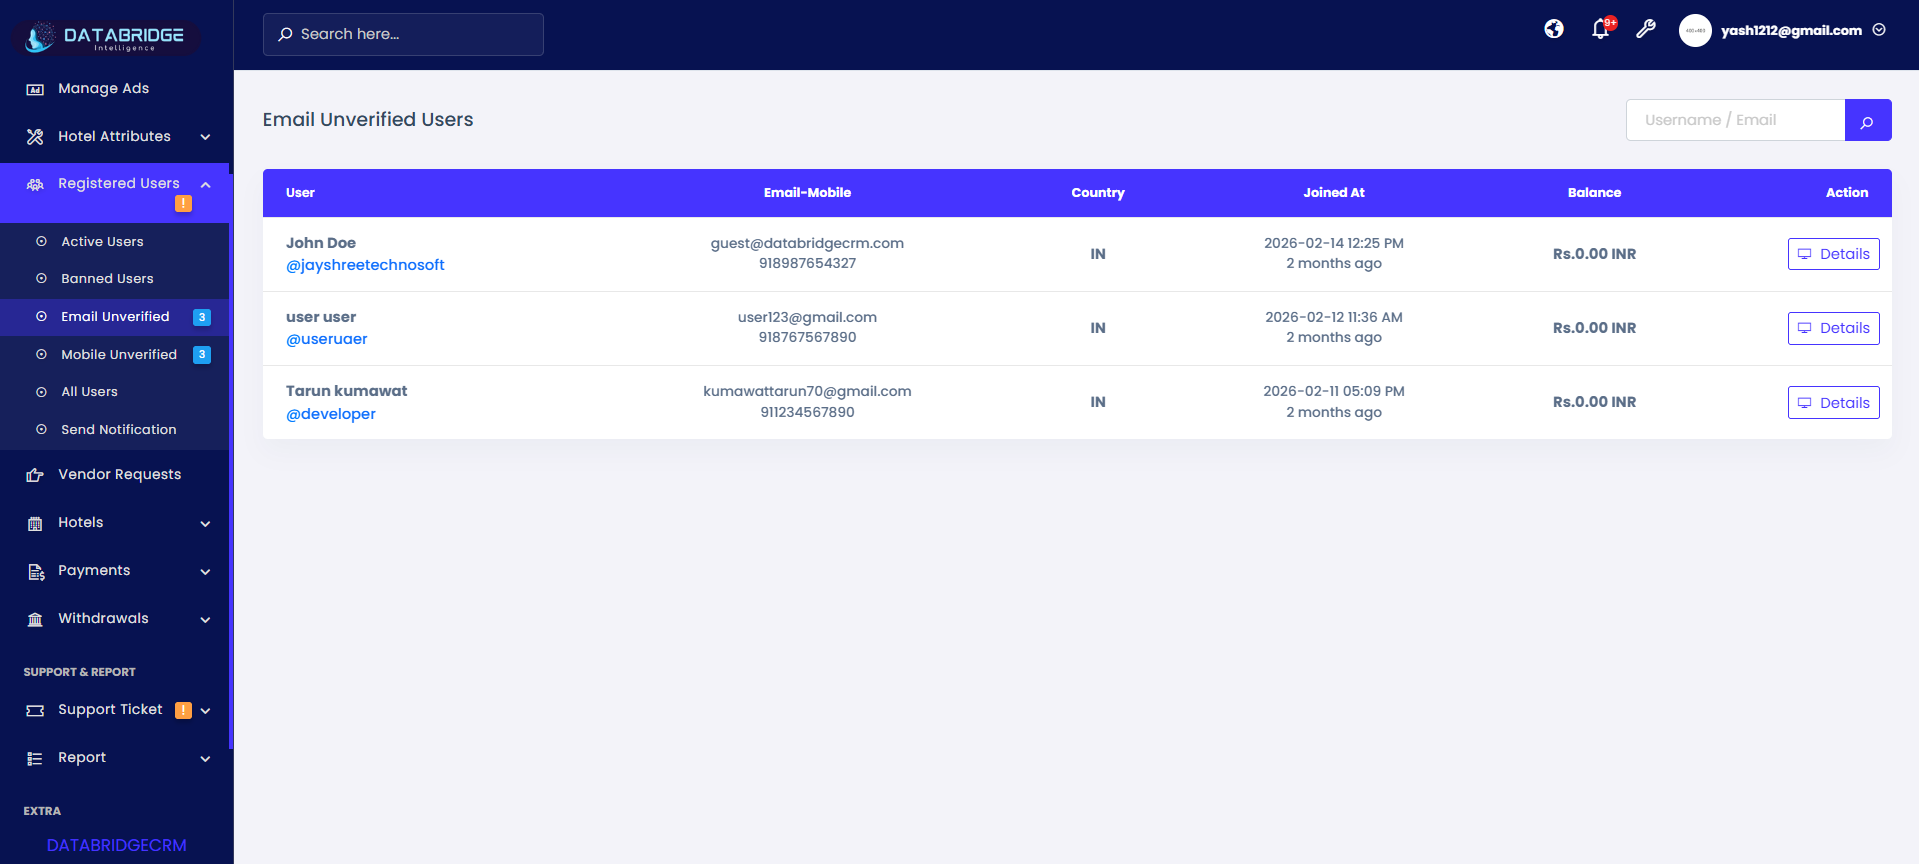
Email Unverified Users Screen:
This screen displays users who have not verified their email addresses, helping administrators track incomplete registrations.
Features:
-User list with email and mobile details
-Badge count indicator in sidebar
-Search functionality
-“Details” button for each user
-Shows join date and balance
Functionality;
-Displays users with unverified email status
-Helps admin identify pending verification accounts
-Admin can view user details for follow-up
-Useful for sending verification reminders
-Ensures data authenticity and communication readiness
Registered Users
1
Registered Users
2
Email Unverified
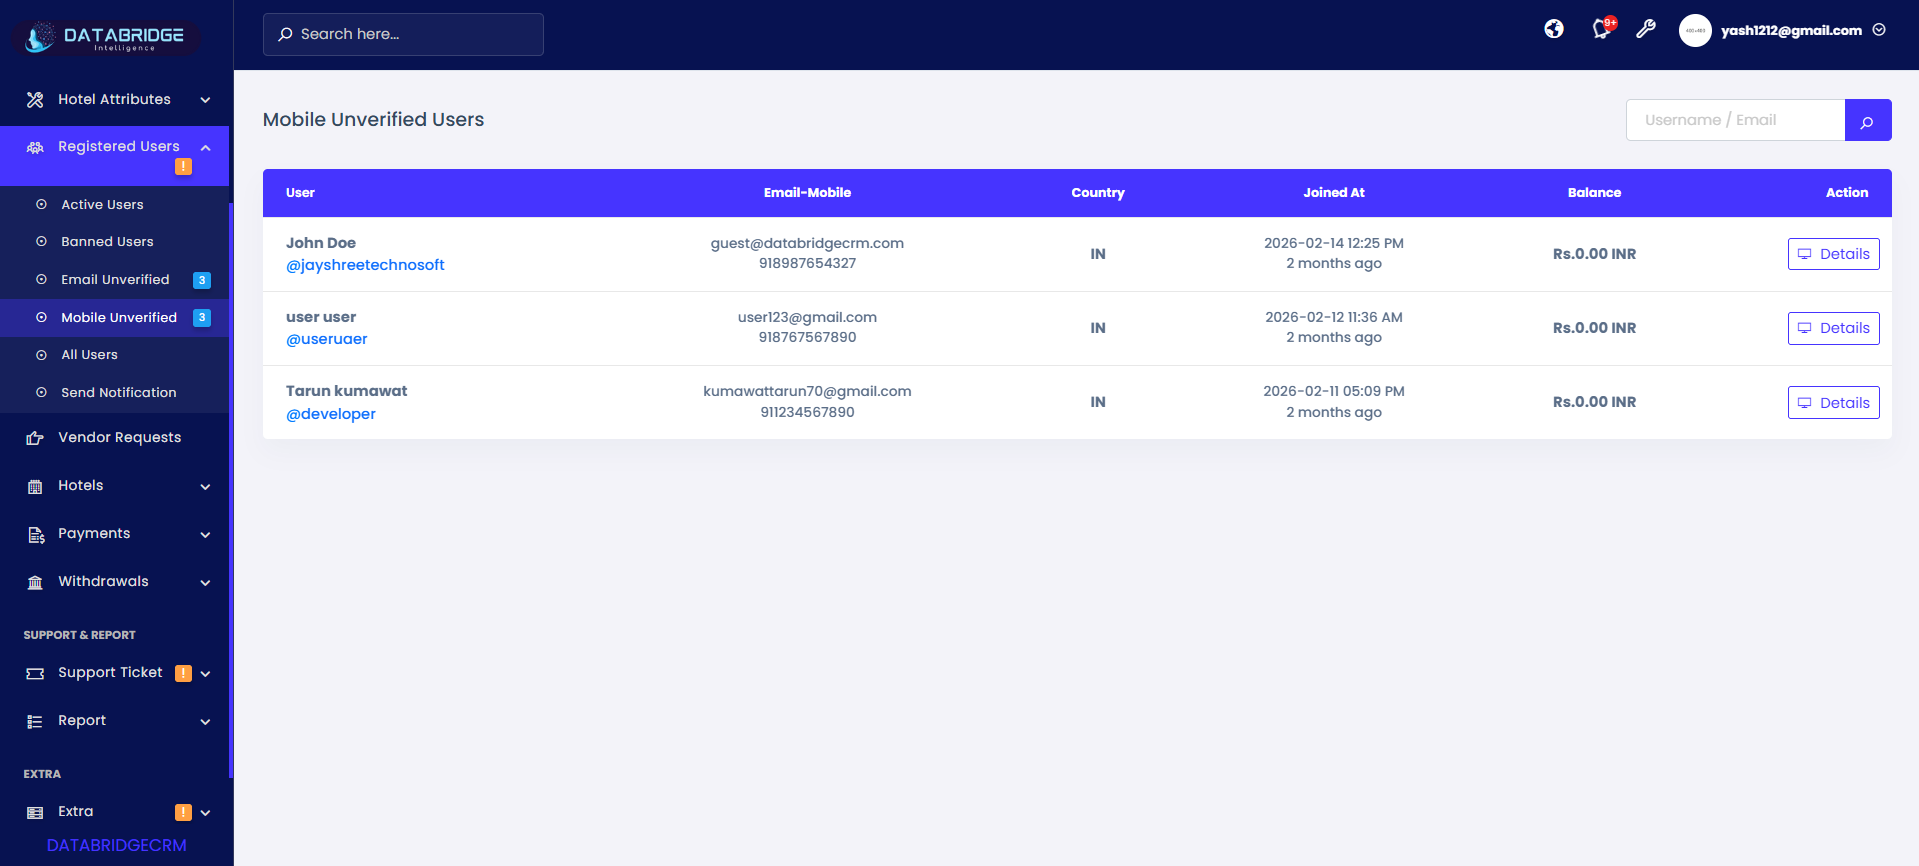
Mobile Unverified Users Screen:
This screen lists users who have not verified their mobile numbers, enabling administrators to monitor verification status.
Features:
-Same table structure as other user screens
-Mobile number visibility
-Search bar for quick filtering
-“Details” action button
-Sidebar badge indicator
Functionality:
-Displays all users with unverified mobile numbers
-Helps maintain verified communication channels
-Admin can review and take necessary action
-Improves platform security and trust
-Data updates automatically
1
Registered Users
2
Mobile Unverified
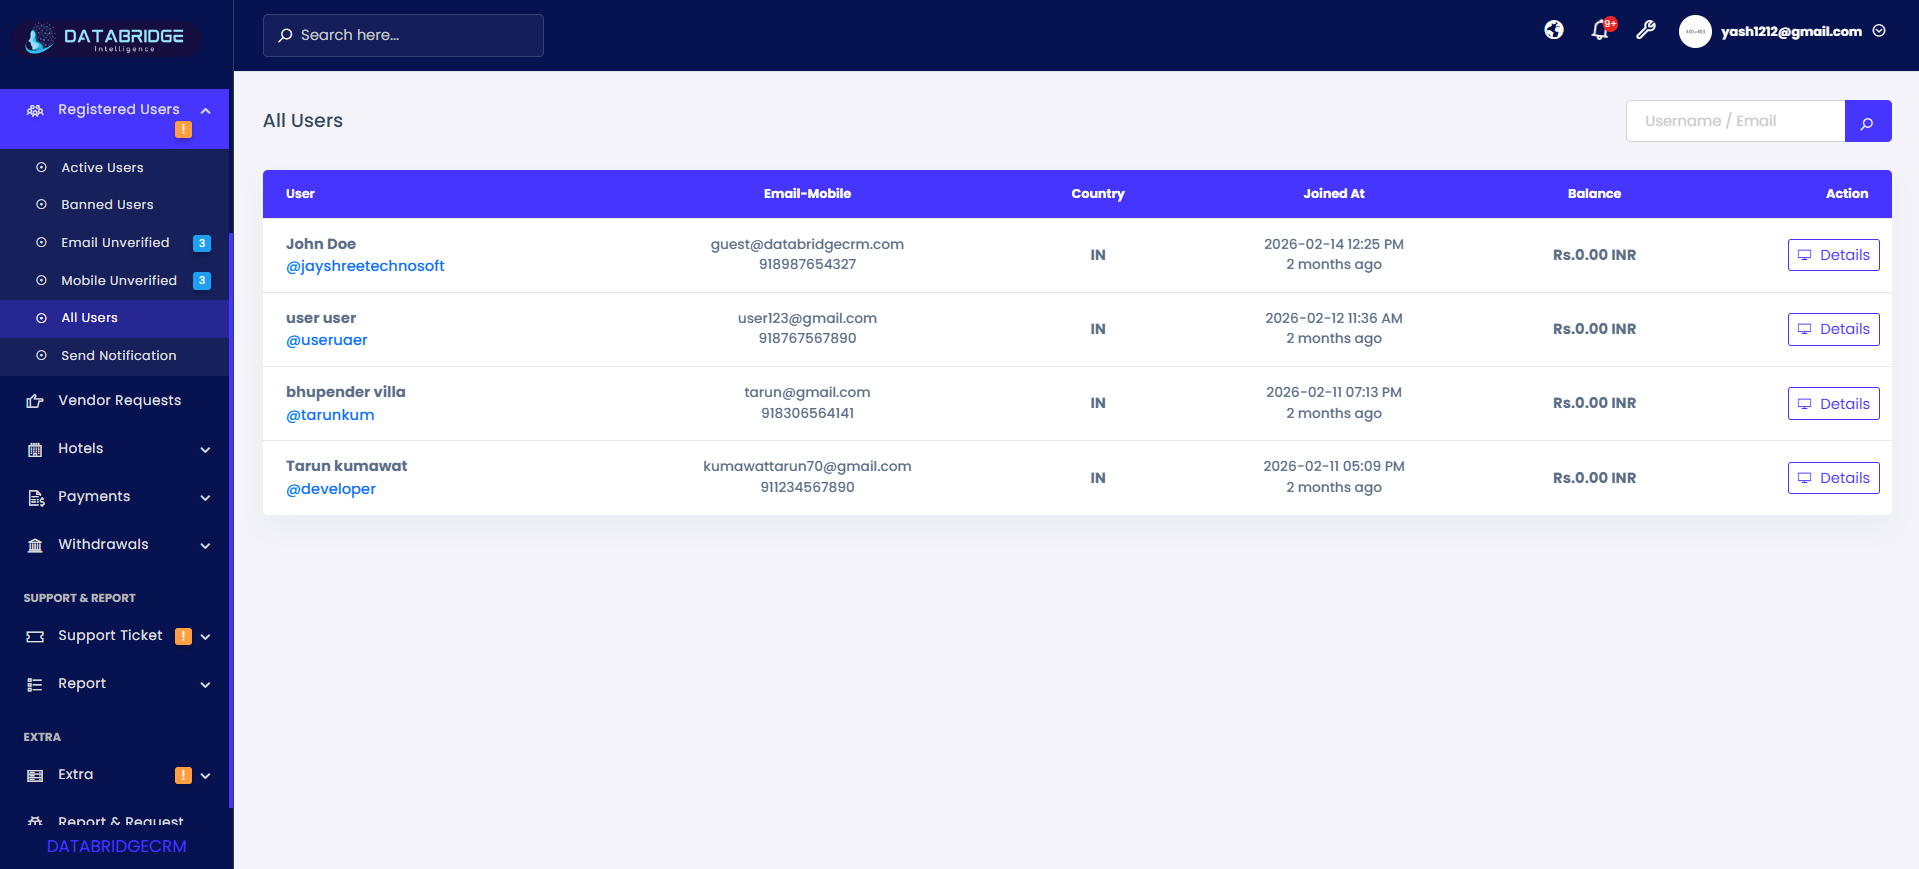
All Users Screen:
This screen provides a complete list of all users in the system, regardless of their status (active, unverified, etc.), offering a centralized user overview.
Features:
-Combined list of all users
-Search functionality
-Columns: User, Email/Mobile, Country, Joined Date, Balance
-“Details” button for each user
-Unified data view
Functionality:
-Displays complete user database
-Admin can search and analyze all users
-Helps in reporting and monitoring
-Provides full visibility of platform usage
-Acts as a master user management screen
1
Registered Users
2
All Users
Send Notification
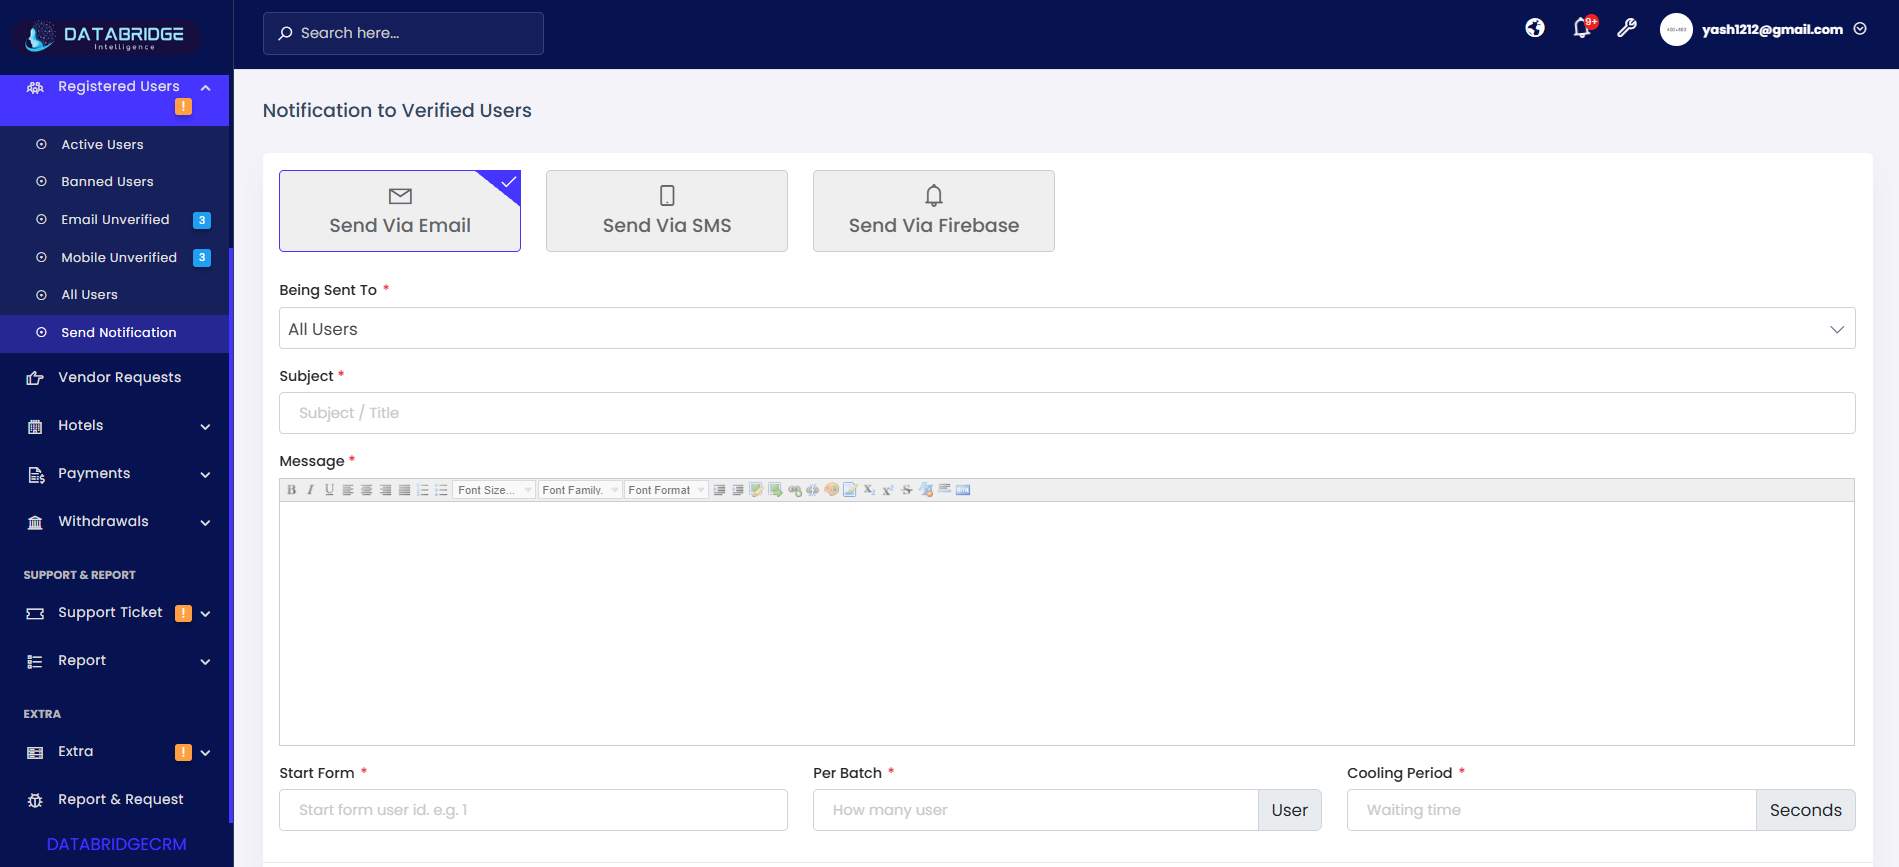
A. Send Via Email:
This screen allows administrators to send bulk email notifications to users with subject and rich-text message formatting.
Features:
-Option to select "Send Via Email"
-Dropdown: Select target users (All Users, specific groups)
Subject field
-Rich text editor for message
-Batch control fields (Start From, Per Batch, Cooling Period)
-Submit button
Functionality:
-Admin selects recipient group
-Enters subject and formatted message
-Configures batch sending parameters
-System sends emails in controlled batches
-Prevents server overload using cooling time
-Ensures scalable bulk communication
1
Registered Users
2
Send Notification
3
Send Via Email
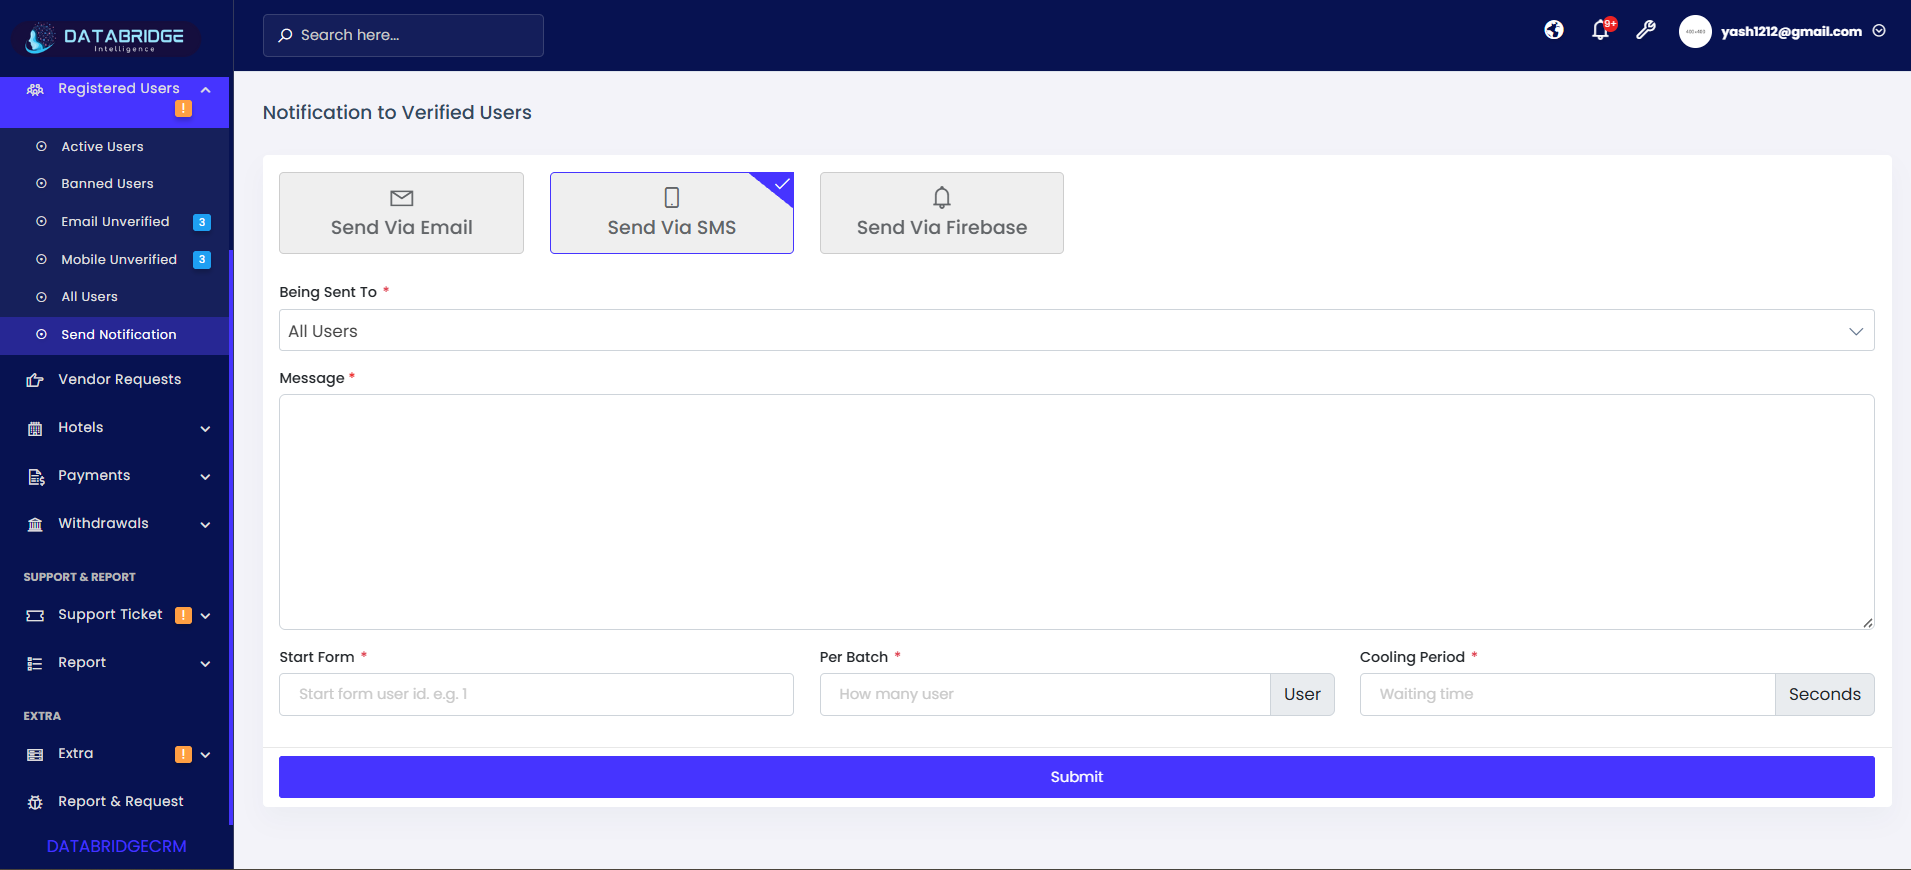
B. Send Via SMS:
This screen allows sending bulk SMS notifications to users in a simple text format.
Features:
-SMS selection tab
-Message input field
-User targeting dropdown
-Batch sending controls
-Simple UI for quick communication
Functionality:
-Admin writes SMS message
-Selects user group
-Defines batch size and delay
-System sends SMS in intervals
-Ensures fast and efficient communication
-Useful for alerts and short notifications
1
Registered Users
2
Send Notification
3
Send Via SMS
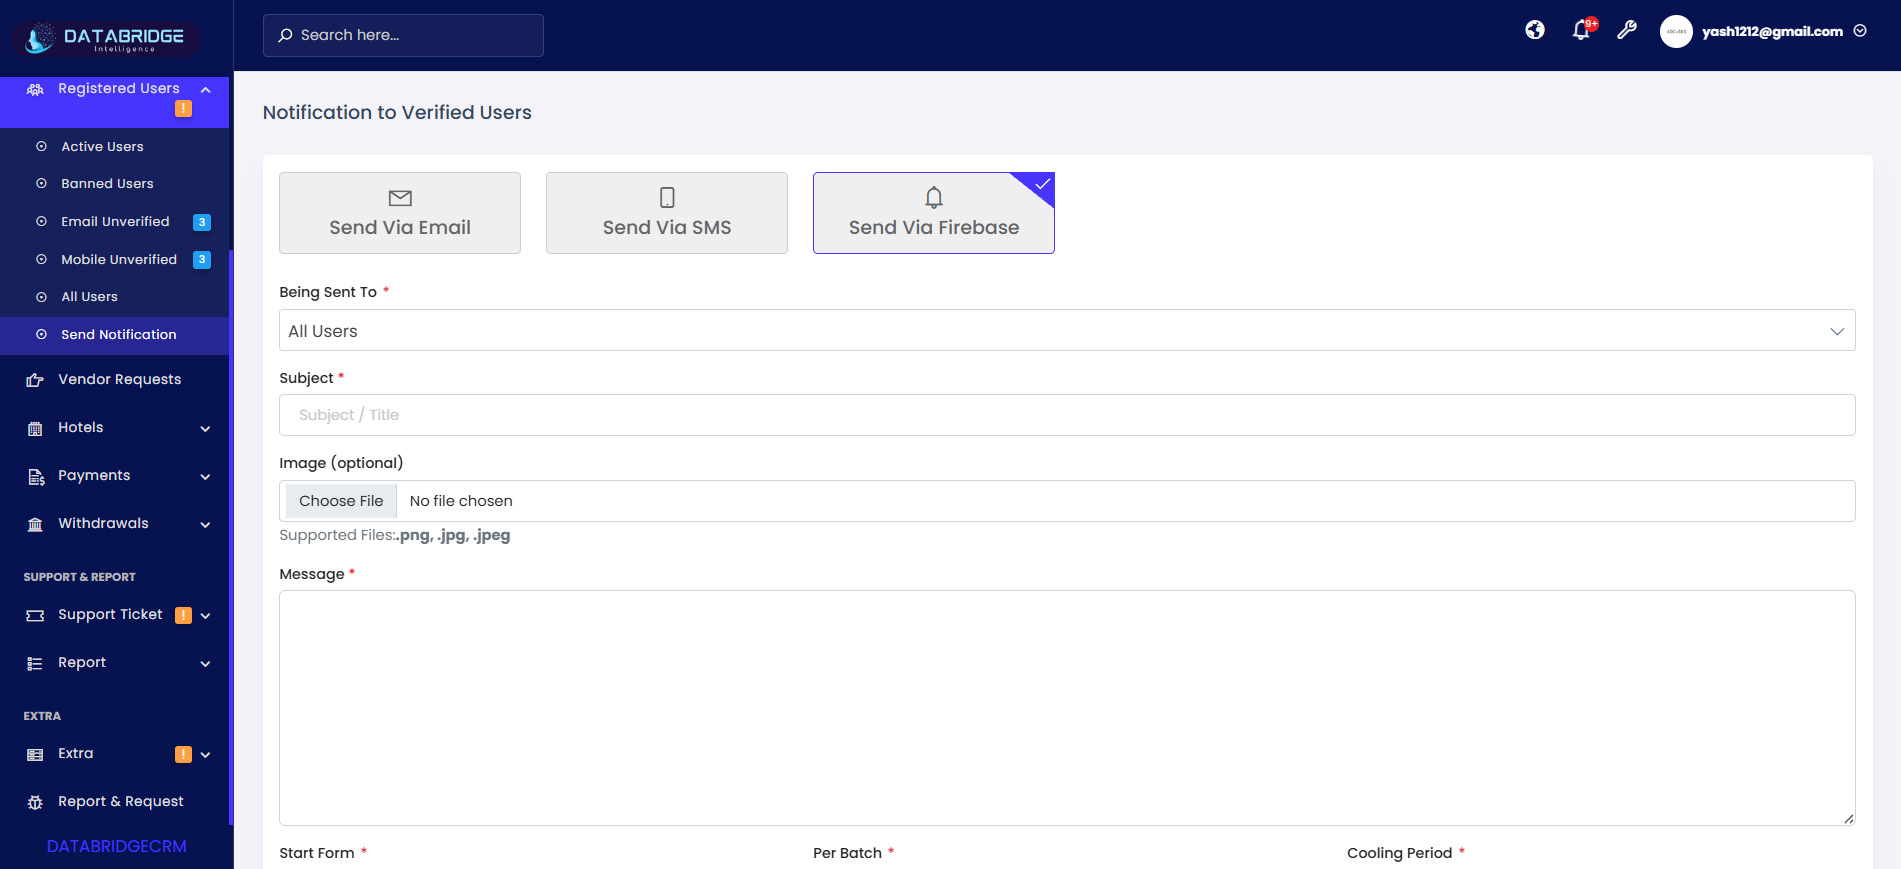
C. Send Via Firebase (Push Notification):
This screen enables sending push notifications via Firebase, including optional image support for enhanced engagement.
Features:
-Firebase notification option
-Subject/title field
-Optional image upload (.png, .jpg, .jpeg)
-Message field
-Batch configuration options
-User selection dropdown
Functionality:
-Admin enters title and message
-Optionally uploads an image
-Selects target audience
-Configures batch sending
-System sends push notifications via Firebase
-Enhances user engagement with rich notifications
1
Registered Users
2
Send Notification
3
Send Via Firebase
Vendor Requests
The Vendor Requests module allows administrators to manage and review all requests submitted by vendors who want to list their hotels or services on the platform. It provides a centralized view of vendor details, hotel information, and location data, helping admins verify the authenticity of each request.This screen simplifies the onboarding process by enabling quick evaluation and decision-making, ensuring that only verified and approved vendors are added to the system for further operations.
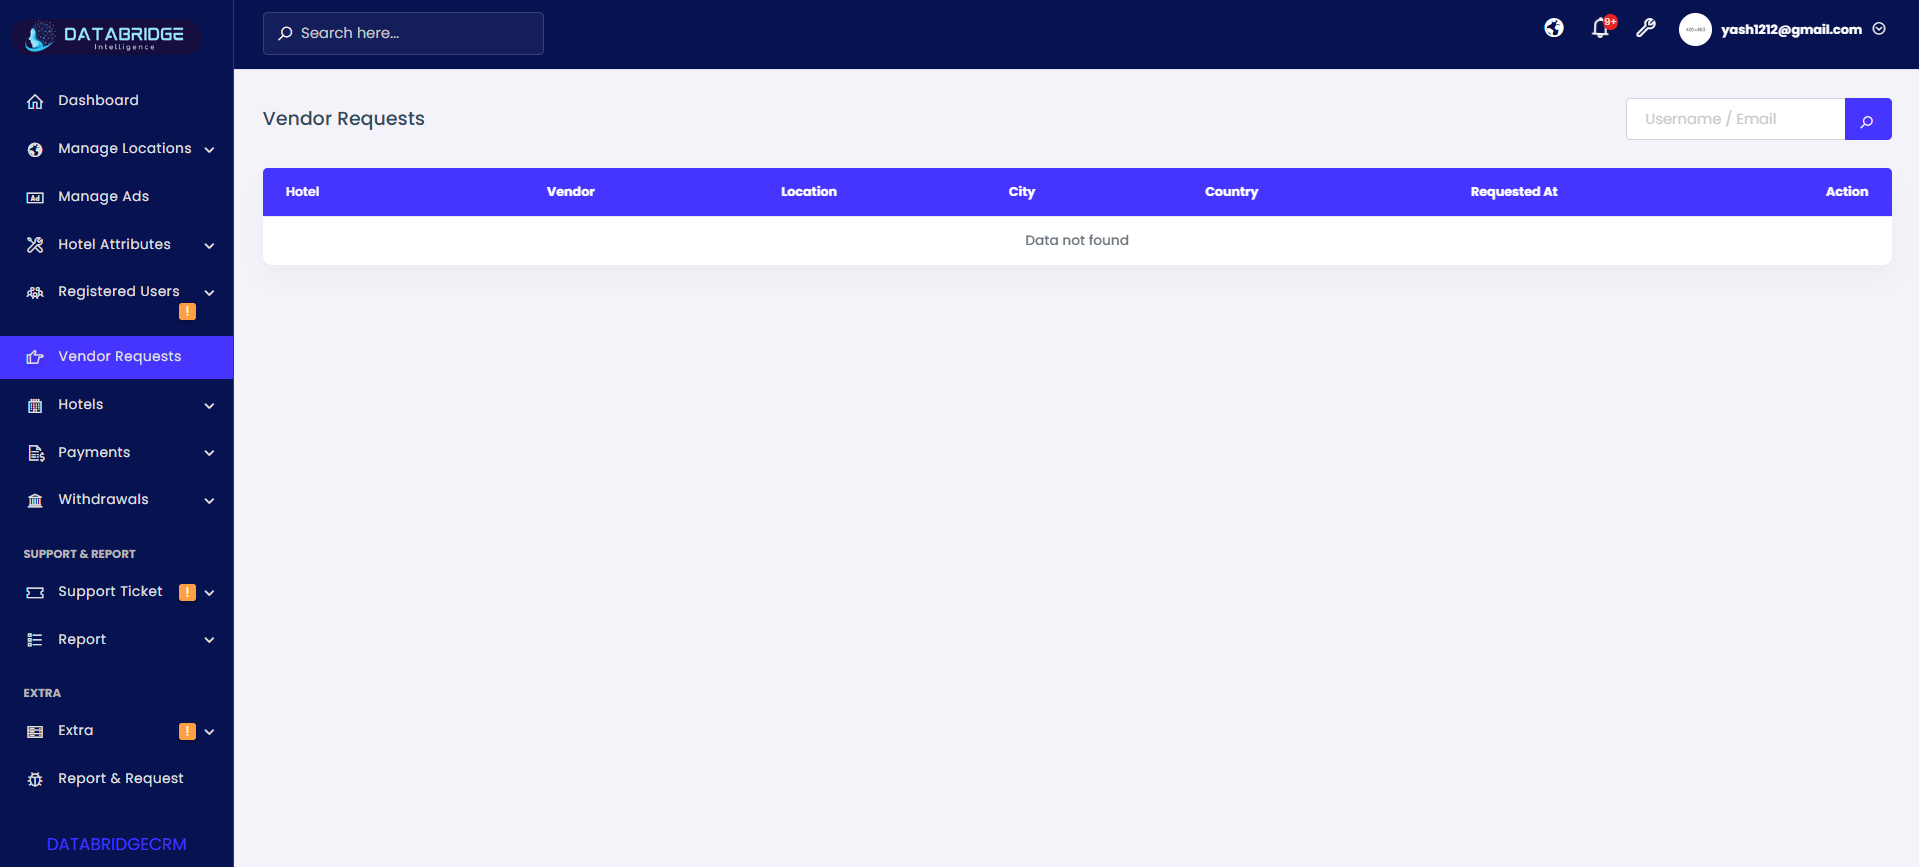
Vendor Requests:
The Vendor Requests screen allows administrators to view and manage all incoming requests submitted by vendors who want to list their hotels or services on the platform. It provides a structured overview of request details such as hotel name, vendor information, location, and request date.
Features:
-Vendor Request Listing – Displays all vendor requests in a tabular format with relevant details.
-Search Functionality – Admin can search requests using username or email from the search bar.
-Detailed Columns View – Includes Hotel Name, Vendor Name, Location, City, Country, and Request Date.
-Action Controls – Provides action buttons to process requests (e.g., approve, reject, or view details).
-Real-Time Status Handling – Shows pending requests and updates status after admin action.
Functionality:
-View Vendor Requests – Admin can see all submitted vendor requests in one centralized screen.
-Verify Vendor Information – Allows checking vendor and hotel details before approval.
-Approve/Reject Requests – Admin can take action to approve or decline vendor onboarding.
-Search & Filter Requests – Quickly find specific requests using search input.
-Data Handling – If no requests are available, the system displays a “Data not found” message.
Hotels
The Hotels Module in DatabridgeCRM is designed to manage all hotel listings available on the platform, including active, banned, and all registered hotels. It provides administrators with a centralized interface to monitor hotel details such as location, vendor information, contact details, and listing status.This module enables efficient control over hotel visibility, allowing admins to feature/unfeature listings, review hotel data, and maintain platform quality by managing active and restricted hotels. It also supports communication with vendors through integrated notification options, ensuring smooth coordination and management of hotel operations.
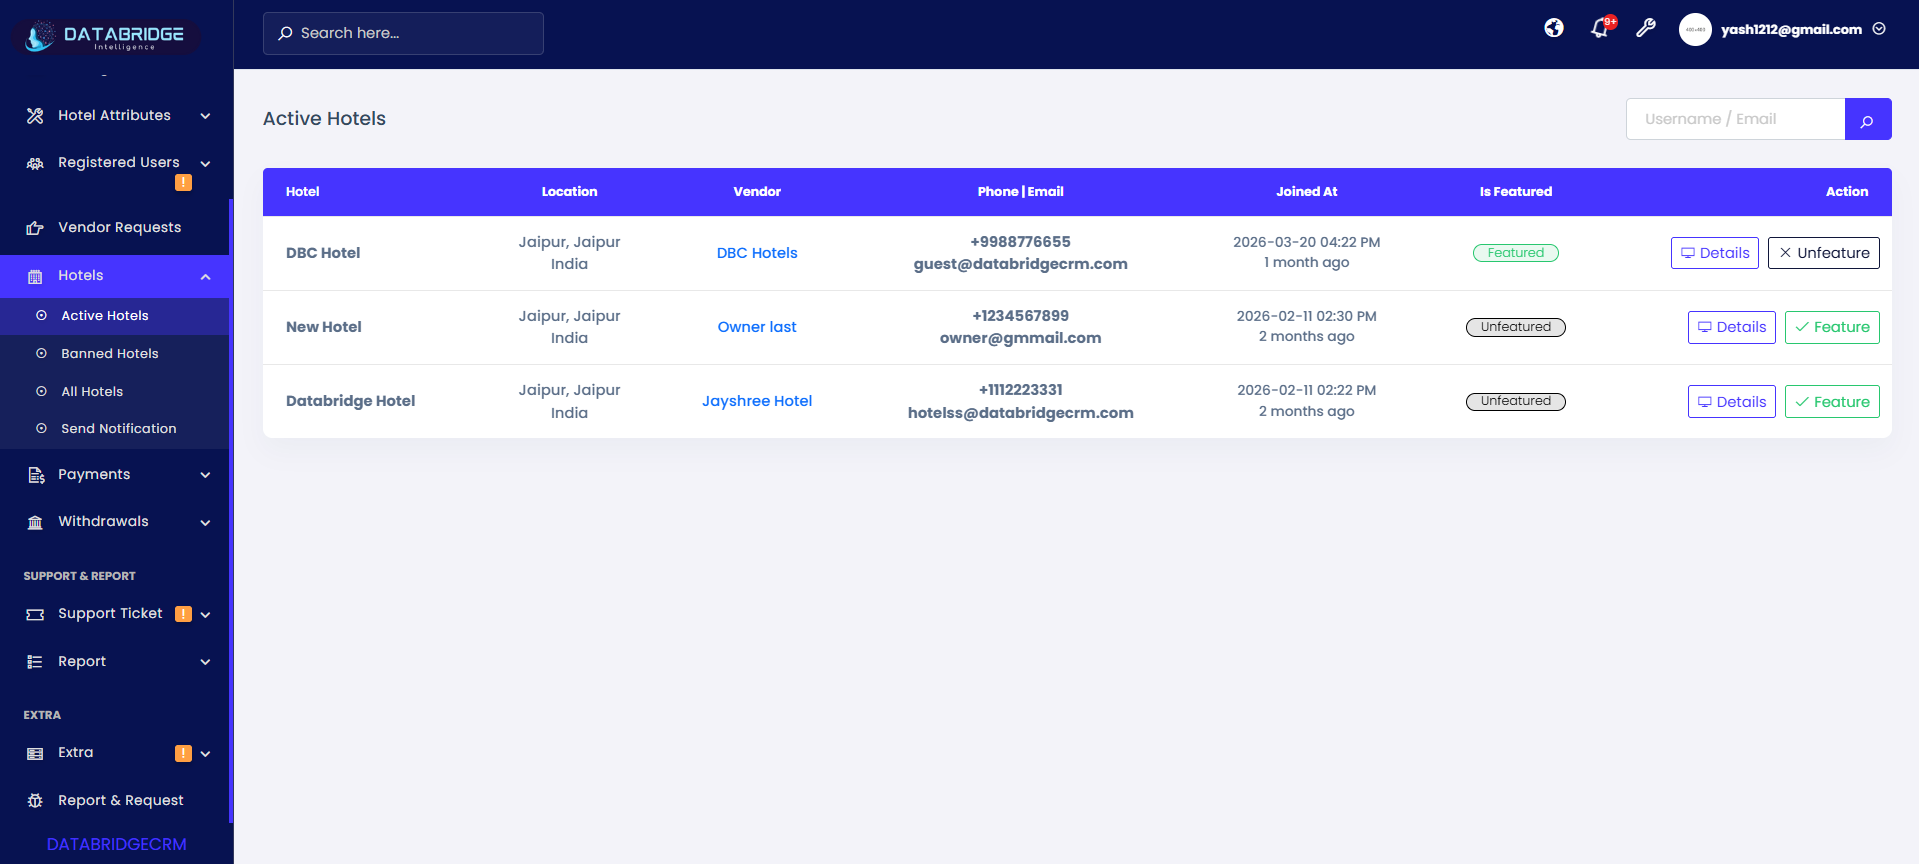
Active Hotels:
The Active Hotels screen displays all hotels that are currently active and available on the platform. It provides key details such as hotel name, location, vendor information, and contact details, along with their featured status. This screen helps administrators monitor and manage active listings efficiently.
Features:
-Active Hotel Listing – Shows all active hotels in a structured table format.
-Search Functionality – Search hotels using username or email.
-Detailed Information Columns – Includes Hotel, Location, Vendor, Contact, Join Date, and Featured Status.
-Featured Toggle – Admin can mark/unmark hotels as featured.
-Action Buttons – Includes “Details” and feature/unfeature options.
Functionality:
-View Active Hotels – Displays all currently active hotel records.
-Manage Featured Status – Toggle hotel visibility as featured/unfeatured.
-Access Hotel Details – View complete hotel information via the details button.
-Search Hotels – Quickly locate specific hotels.
-Real-Time Updates – Reflects current status changes instantly.
1
Hotels
2
Active Hotels
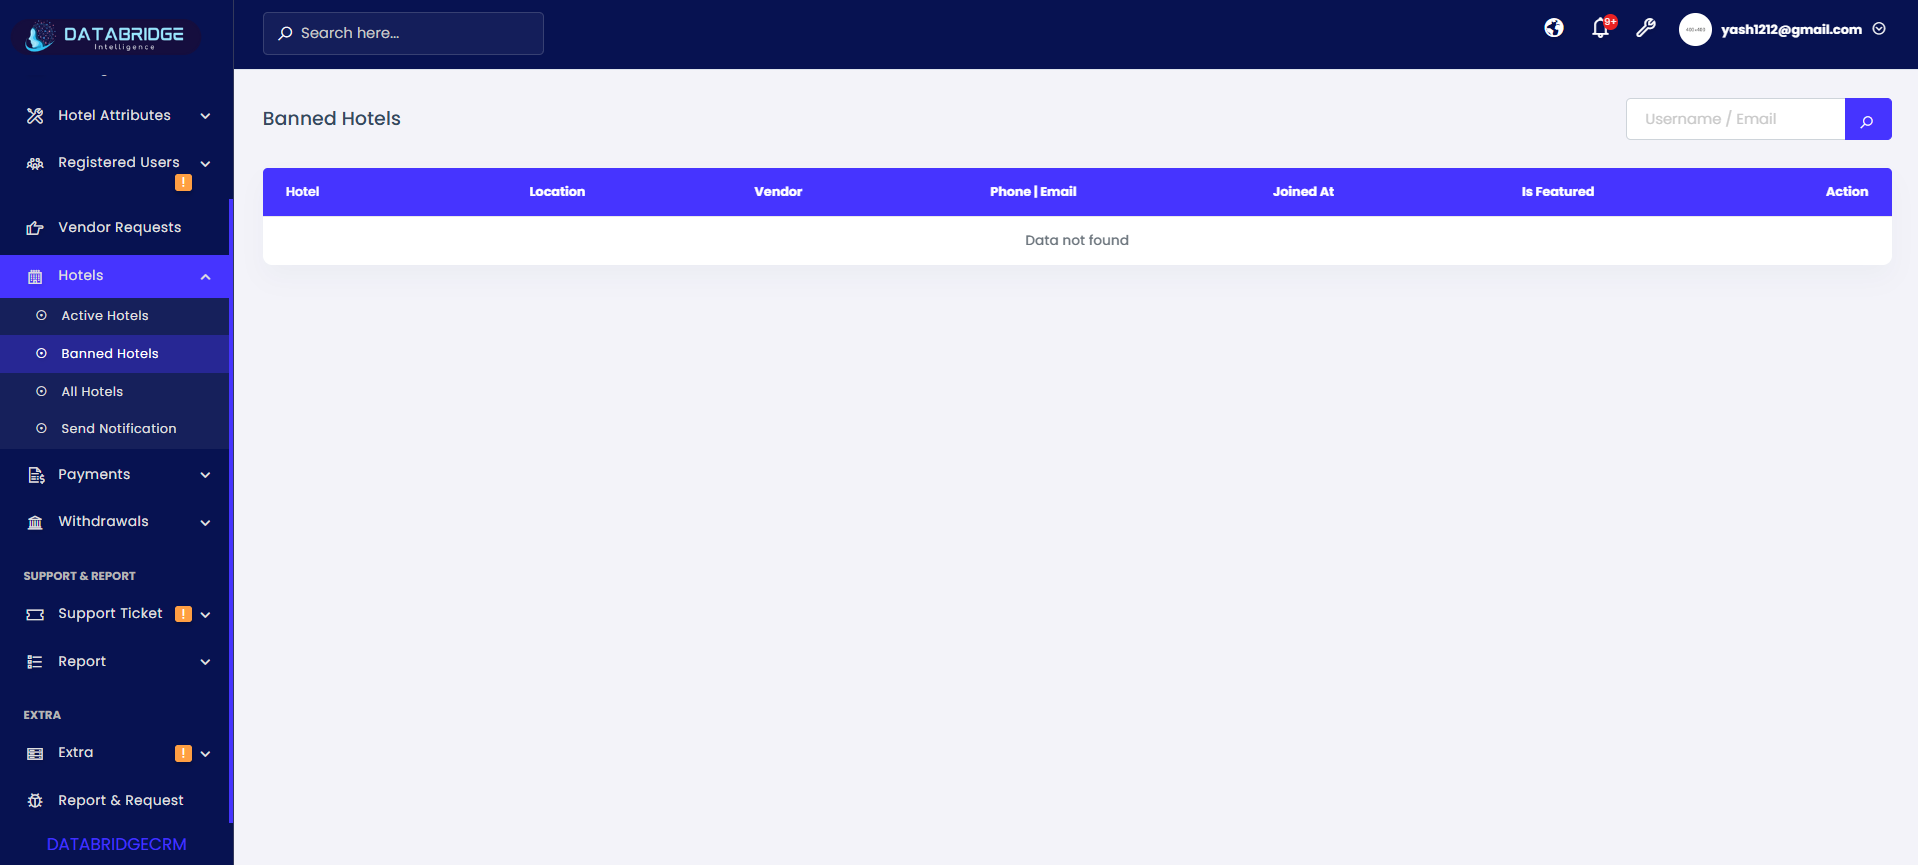
Banned Hotels:
The Banned Hotels screen lists all hotels that have been restricted or deactivated by the administrator. This module helps maintain platform quality by tracking hotels that violate policies or are no longer approved.
Features:
-Banned Hotel List – Displays all restricted hotels.
-Search Option – Find banned hotels quickly.
-Structured Data View – Shows hotel and vendor details.
-Status Visibility – Clearly indicates banned state.
-Empty State Handling – Shows “Data not found” if no records exist.
Functionality:
-View Banned Hotels – Access all blocked hotel entries.
-Monitor Violations – Helps track policy-based restrictions.
-Search Records – Locate specific banned hotels.
-Maintain Platform Integrity – Ensures only valid listings remain active.
-System Feedback – Displays proper message when no data is available.
1
Hotels
2
Banned Hotels
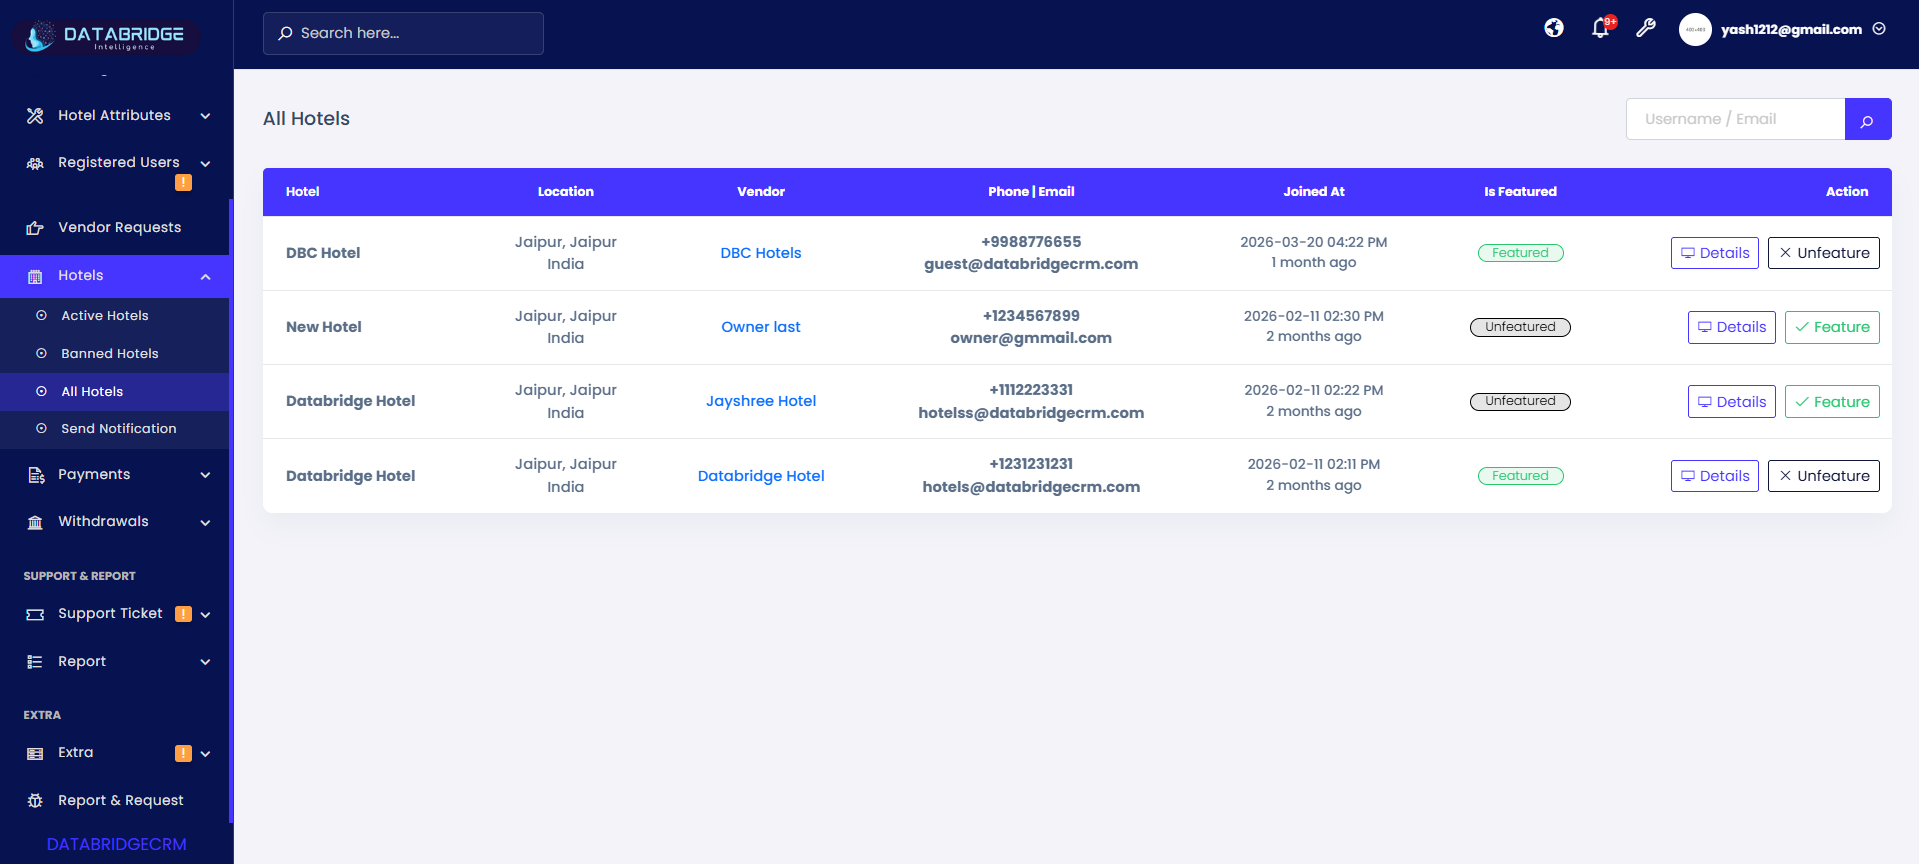
All Hotels:
The All Hotels screen provides a comprehensive list of all hotels available in the system, including both active and inactive entries. It serves as a centralized view for administrators to manage all hotel records from a single interface.
Features:
-Complete Hotel Listing – Displays all hotels regardless of status.
-Search Functionality – Search by username or email.
-Detailed Columns – Includes hotel info, vendor, contact, and status.
-Featured Control – Toggle featured status directly.
-Action Buttons – Access details and manage hotel status.
Functionality:
-View All Records – Shows both active and inactive hotels.
-Manage Listings – Control visibility and featured status.
-Search & Filter – Quickly find specific hotels.
-Access Details – Navigate to detailed hotel view.
-Centralized Management – Perform all actions from one screen.
1
Hotels
2
All Hotels

Send Notification:
Send Via Email.:
This screen allows administrators to send notifications to all verified vendors via Email. It includes options to define recipients, subject, and message content, ensuring effective communication with vendors.
Features:
-Send via Email Option – Select email notification method.
-Recipient Selection – Choose “All Vendors” or specific users.
-Subject Field – Add notification title.
-Rich Text Message Editor – Format message content.
-Batch & Timing Controls – Configure sending limits and delays.
Functionality:
-Compose Email Notification – Enter subject and message.
-Select Target Audience – Choose vendors to notify.
-Control Sending Batch – Limit number of emails per batch.
-Set Cooling Period – Define delay between batches.
-Send Notification – Deliver message to selected vendors.
1
Hotels
2
Send Notification
3
Send Via Email
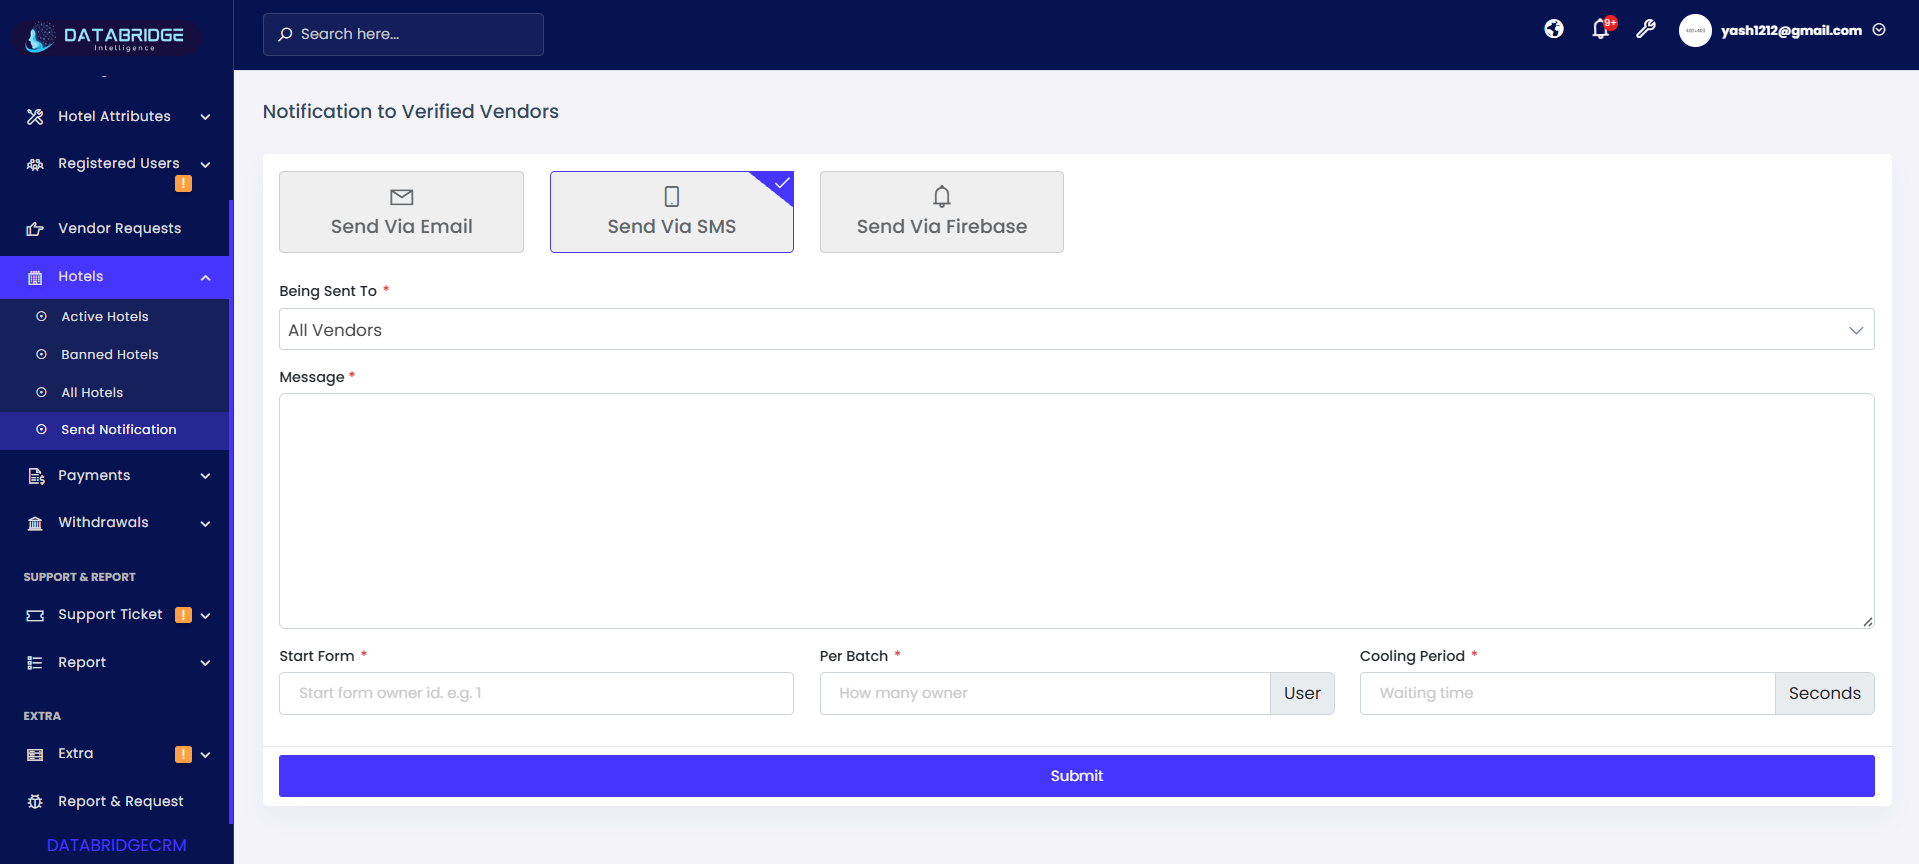
Send Via SMS:
This screen enables administrators to send notifications to vendors via SMS, providing a fast and direct communication method.
Features:
-SMS Notification Option – Switch to SMS mode.
-Recipient Selection – Choose vendors.
-Message Field – Enter SMS content.
-Batch Control – Manage number of messages sent at once.
-Cooling Period Setting – Control delay between SMS batches.
Functionality:
-Compose SMS Message – Enter notification content.
-Select Vendors – Define recipients.
-Batch Processing – Send SMS in controlled groups.
-Delay Management – Prevent overload using cooling period.
-Send SMS – Deliver notifications instantly.
1
Hotels
2
Send Notification
3
Send Via SMS
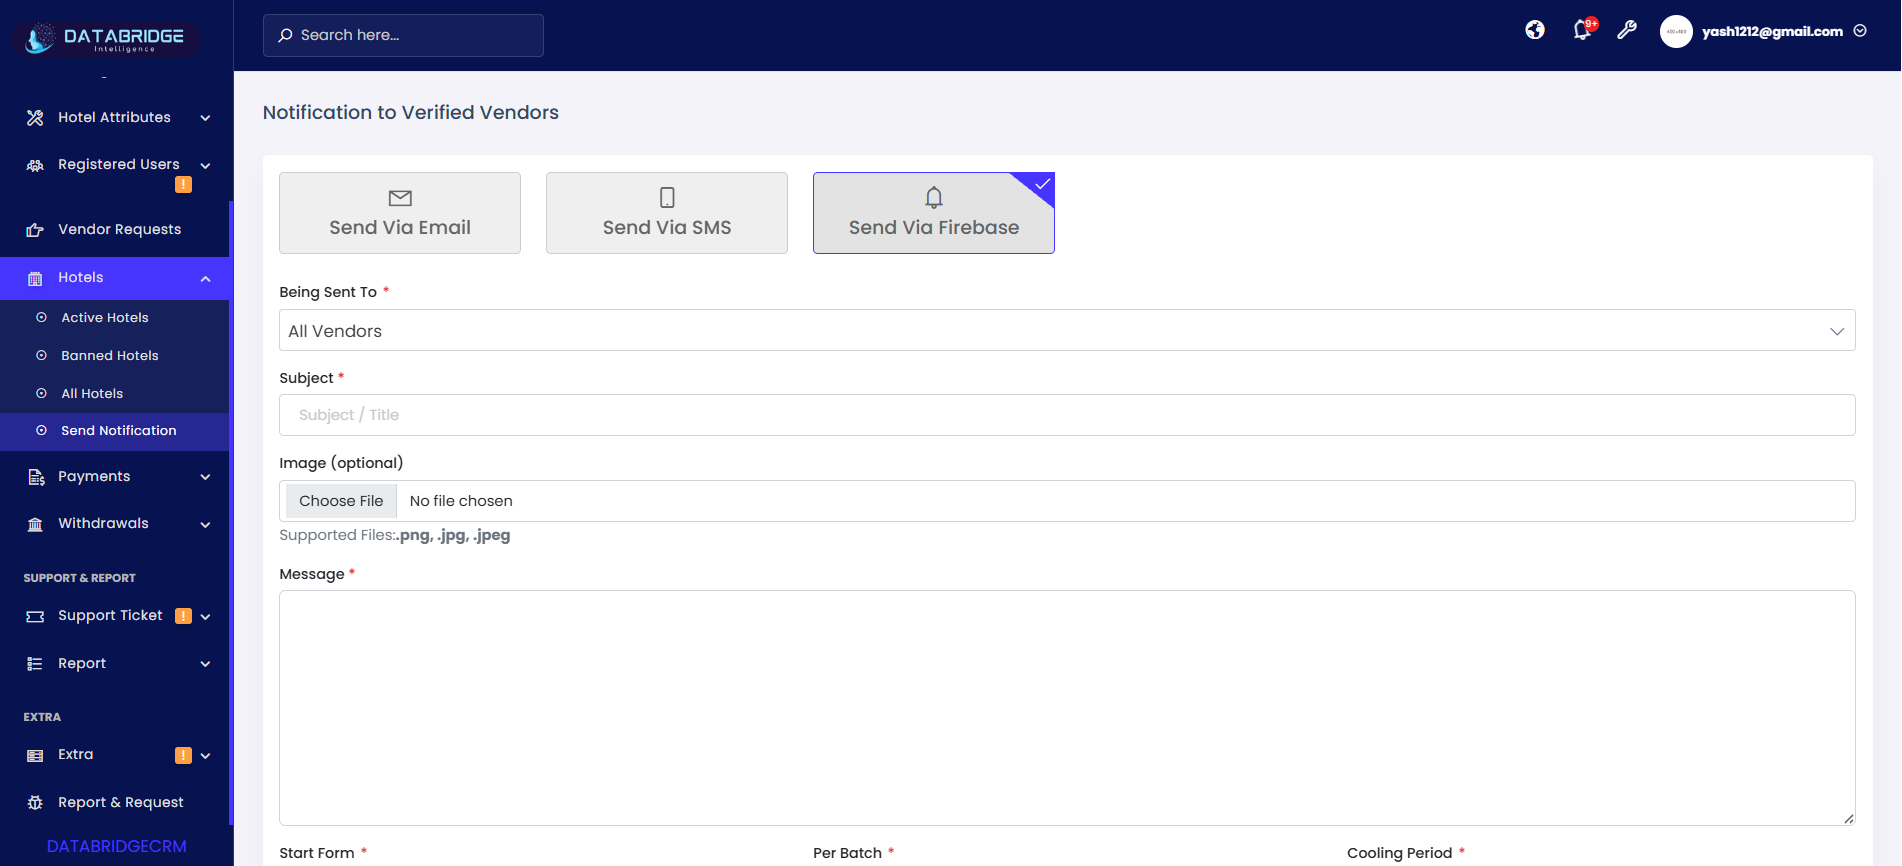
Send Via Firebase:
This screen allows sending push notifications via Firebase, enabling real-time alerts directly to vendor devices.
Features:
-Firebase Notification Option – Select push notification method.
-Subject Field – Add notification title.
-Image Upload (Optional) – Attach image to notification.
-Message Field – Add notification content.
-Batch & Timing Controls – Manage sending flow.
Functionality:
-Create Push Notification – Add title, message, and optional image.
-Select Vendors – Define recipients.
-Control Batch Sending – Limit number of users per batch.
-Set Cooling Period – Manage delay between sends.
-Send Notification – Deliver real-time alerts via Firebase.
1
Hotels
2
Send Notification
3
Send Via Firebase
Payments
The Payments Module in the DatabridgeCRM system is designed to manage and monitor all financial transactions, including deposits made by users and vendors. It provides a centralized interface to track payment statuses such as pending, approved, successful, rejected, and initiated transactions.This module ensures smooth financial operations by offering detailed transaction records, filtering options, and real-time updates, helping administrators maintain transparency, accuracy, and control over all payment activities within the platform.
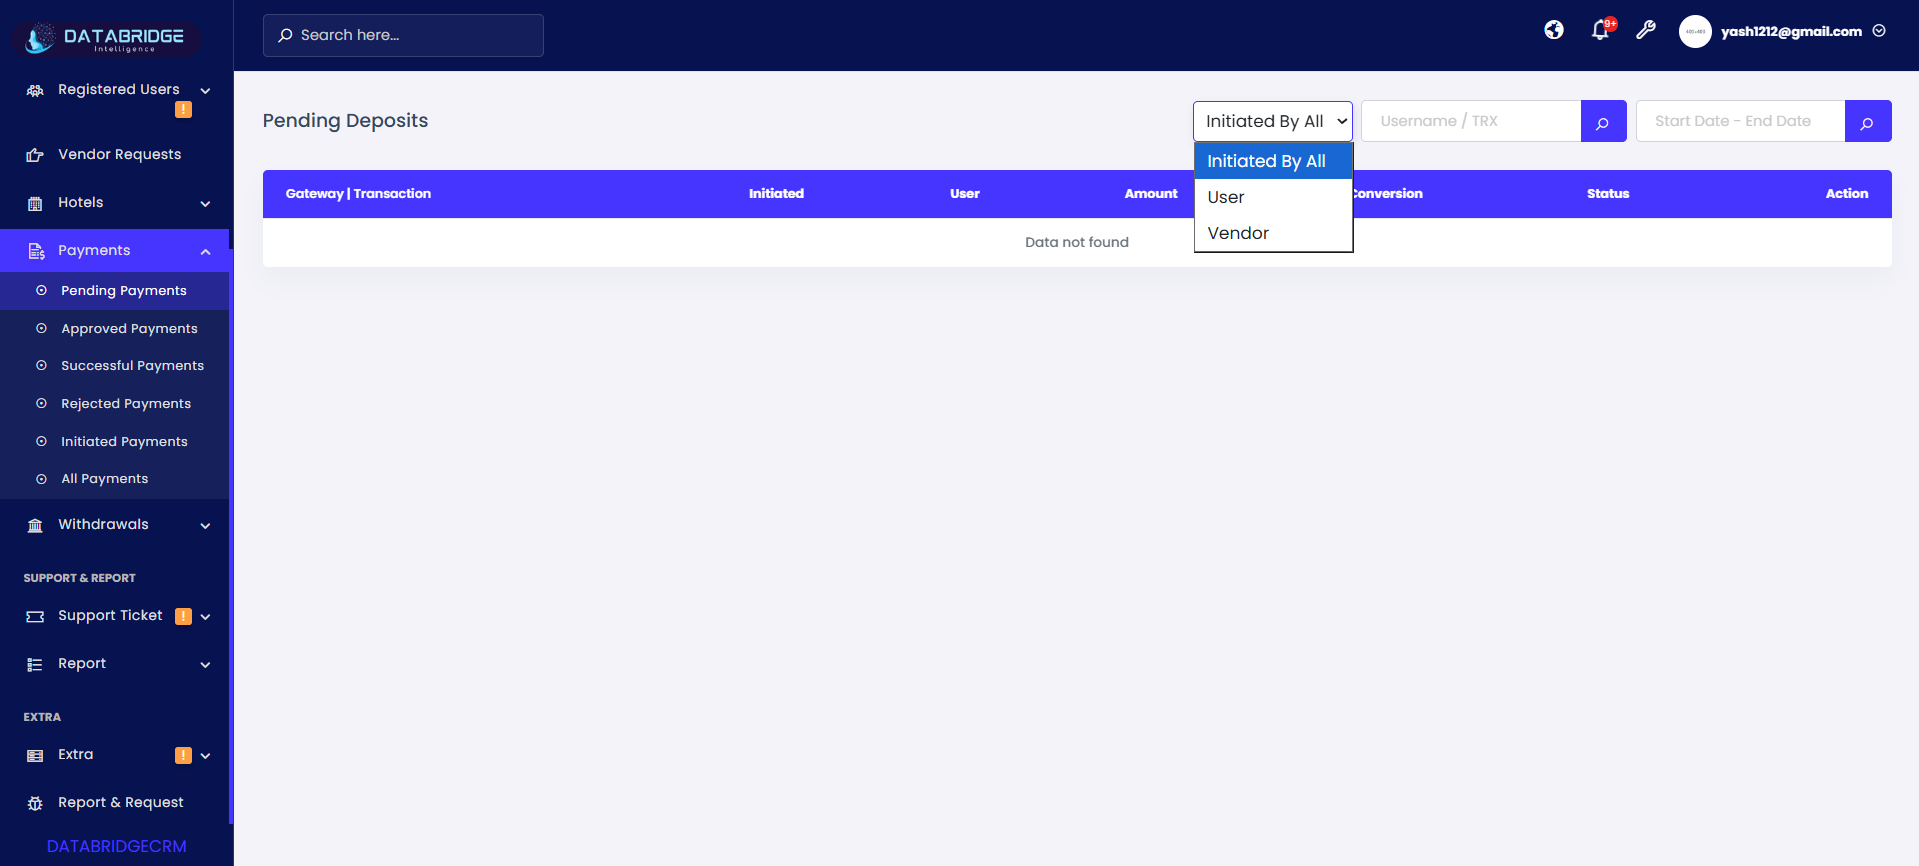
Pending Payments:
The Pending Payments screen displays all deposit transactions that are currently under review or awaiting approval. It helps admins track incomplete or unverified payments initiated by users or vendors. This screen ensures that no transaction is missed before processing.
Features:
-Displays all pending deposit transactions in a structured table format
-“Initiated By” dropdown to filter transactions (All / User / Vendor)
-Search option using Username / Transaction ID (TRX)
-Date range filter to view transactions within a specific period
-Shows transaction details like gateway, user, amount, and status
-Action column to review or process pending requests
Functionality:
-Admin can view all pending transactions in real-time
-Filter transactions based on initiator using dropdown
-Search and locate specific transactions quickly
-Verify payment details before approval/rejection
-Navigate to detailed view for further action
1
Payments
2
Pending Payments

Approved Payments:
The Approved Payments screen lists all successfully verified and approved deposit transactions. It helps administrators track confirmed payments and maintain financial transparency across the system.
Features:
-Displays all approved transactions in tabular format
-“Initiated By” dropdown for filtering (All / User / Vendor)
-Search functionality by Username / TRX
-Date filter to track approvals over time
-Shows amount, conversion, and approval status
-Action button to view transaction details
Functionality:
-Admin can monitor all approved deposits
-Apply filters to analyze user/vendor payments
-Track payment history with timestamps
-Access detailed transaction records
-Ensure accurate financial reporting
1
Payments
2
Approved Payments

Successful Payments:
The Successful Payments screen shows all transactions that have been completed successfully through the payment gateway. It provides a clear overview of finalized deposits without any pending issues.
Features:
-Lists all successful payment records
-“Initiated By” dropdown for filtering transactions
-Search option for Username / TRX lookup
-Date range filter for time-based analysis
-Displays transaction amount, conversion, and status
-Clean table layout for quick visibility
Functionality:
-View completed and processed transactions
-Filter by user or vendor activity
-Track successful payment trends
-Verify transaction completion status
-Maintain accurate financial logs
1
Payments
2
Successful Payments
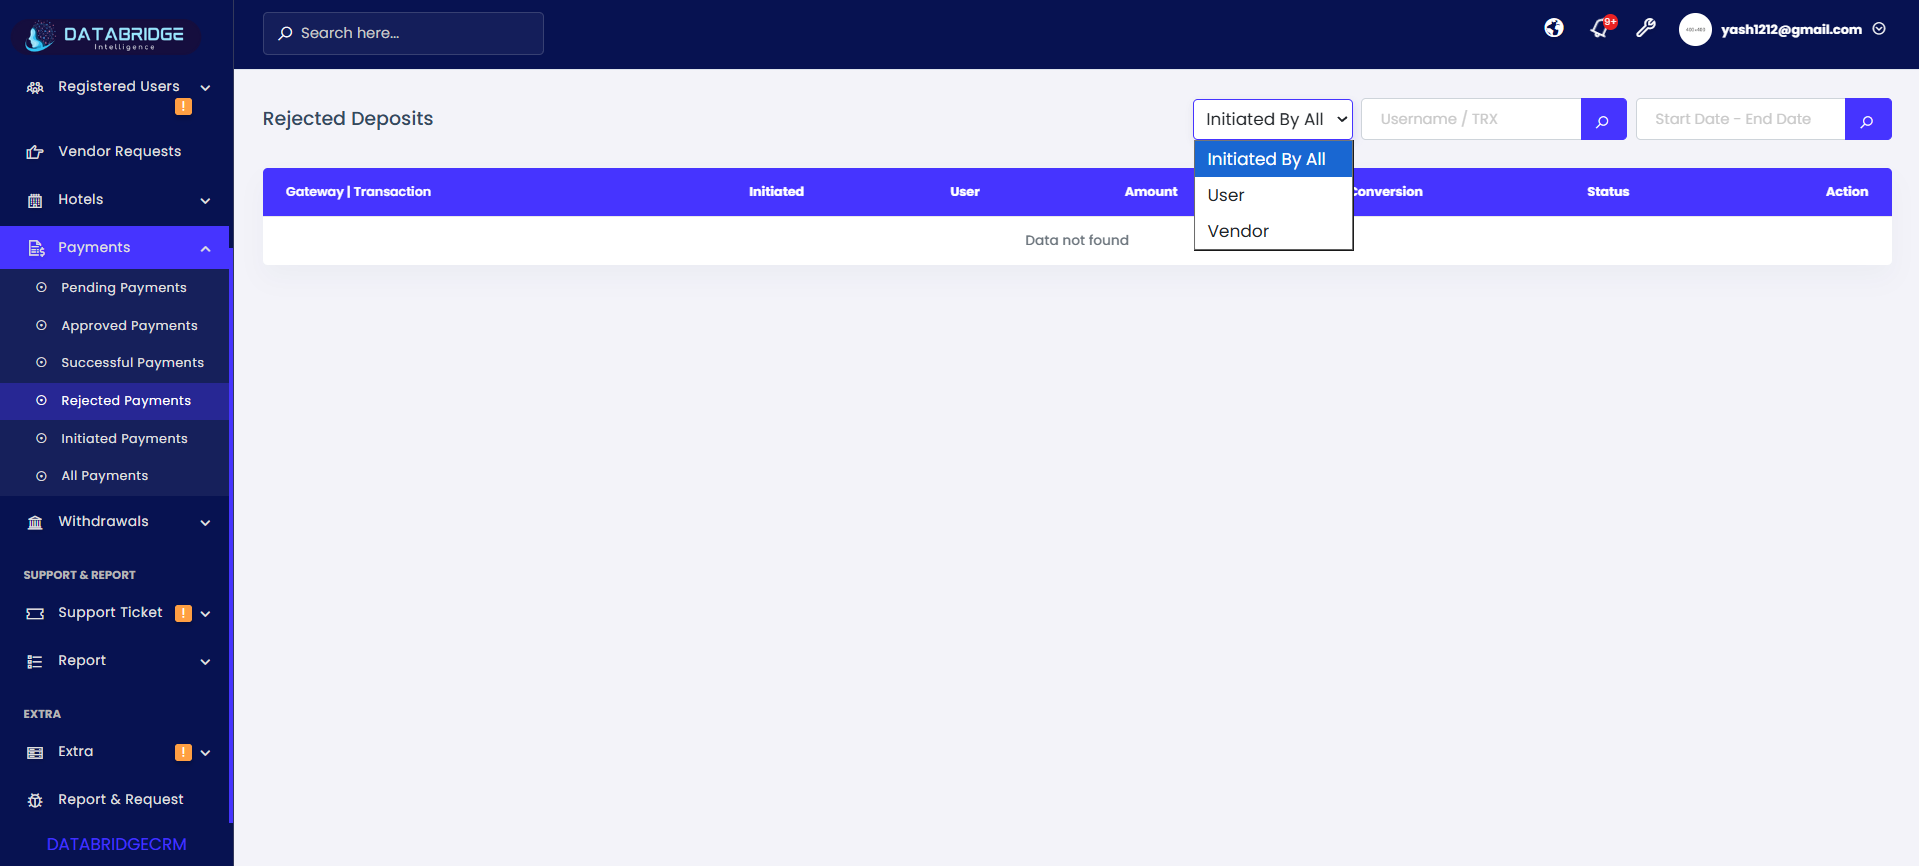
Rejected Payments:
The Rejected Payments screen contains all transactions that were declined or failed during verification. It helps admins analyze failed payments and take corrective actions if required.
Features:
-Displays all rejected transactions
-“Initiated By” dropdown for filtering (All / User / Vendor)
-Search functionality using Username / TRX
-Date filter to review rejected payments
-Shows rejection status along with transaction details
-Action option to review failure reasons
Functionality:
-Admin can review rejected transactions
-Identify reasons for payment failure
-Filter and search specific records
-Maintain records for audit and reporting
-Take corrective action if needed
1
Payments
2
Rejected Payments
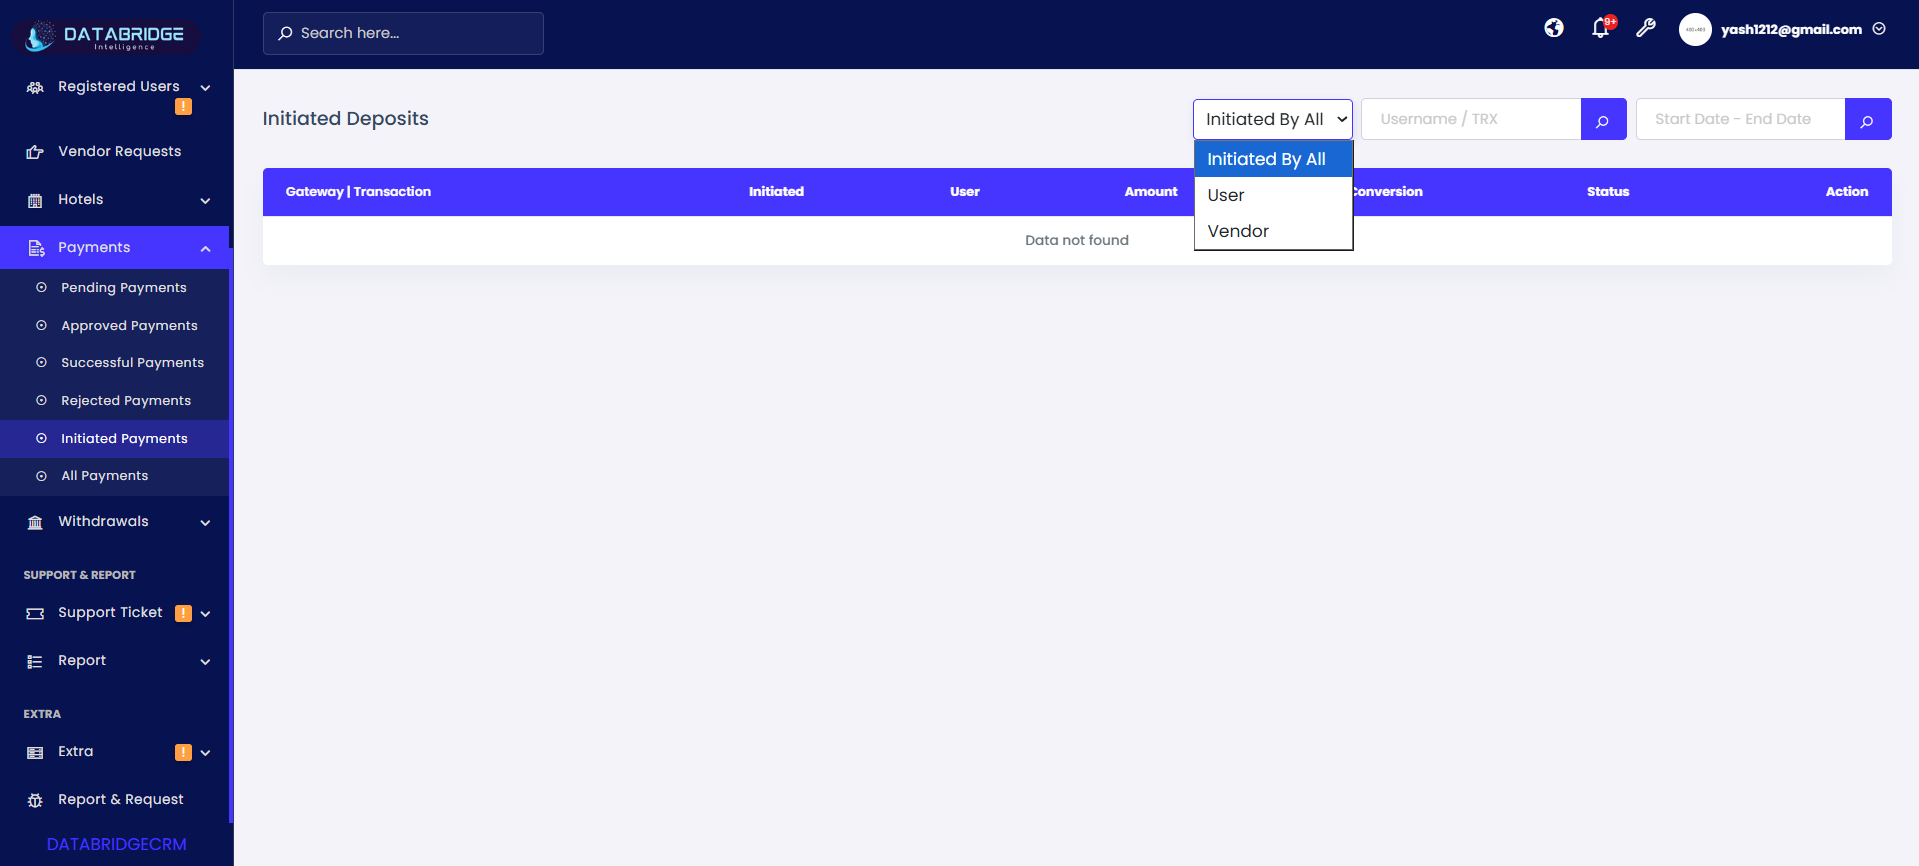
Initiated Payments:
The Initiated Payments screen shows all transactions that have been started but not yet processed or completed. It helps track newly created deposits in their initial stage.
Features:
-Displays all initiated transactions
-“Initiated By” dropdown for filtering initiators
-Search option (Username / TRX)
-Date range filter for tracking recent activity
-Shows transaction initiation details
-Status column to track progress
Functionality:
-Monitor newly created transactions
-Track payment progress from initiation stage
-Filter by user/vendor source
-Search and analyze transaction flow
-Ensure smooth payment lifecycle tracking
1
Payments
2
Initiated Payments
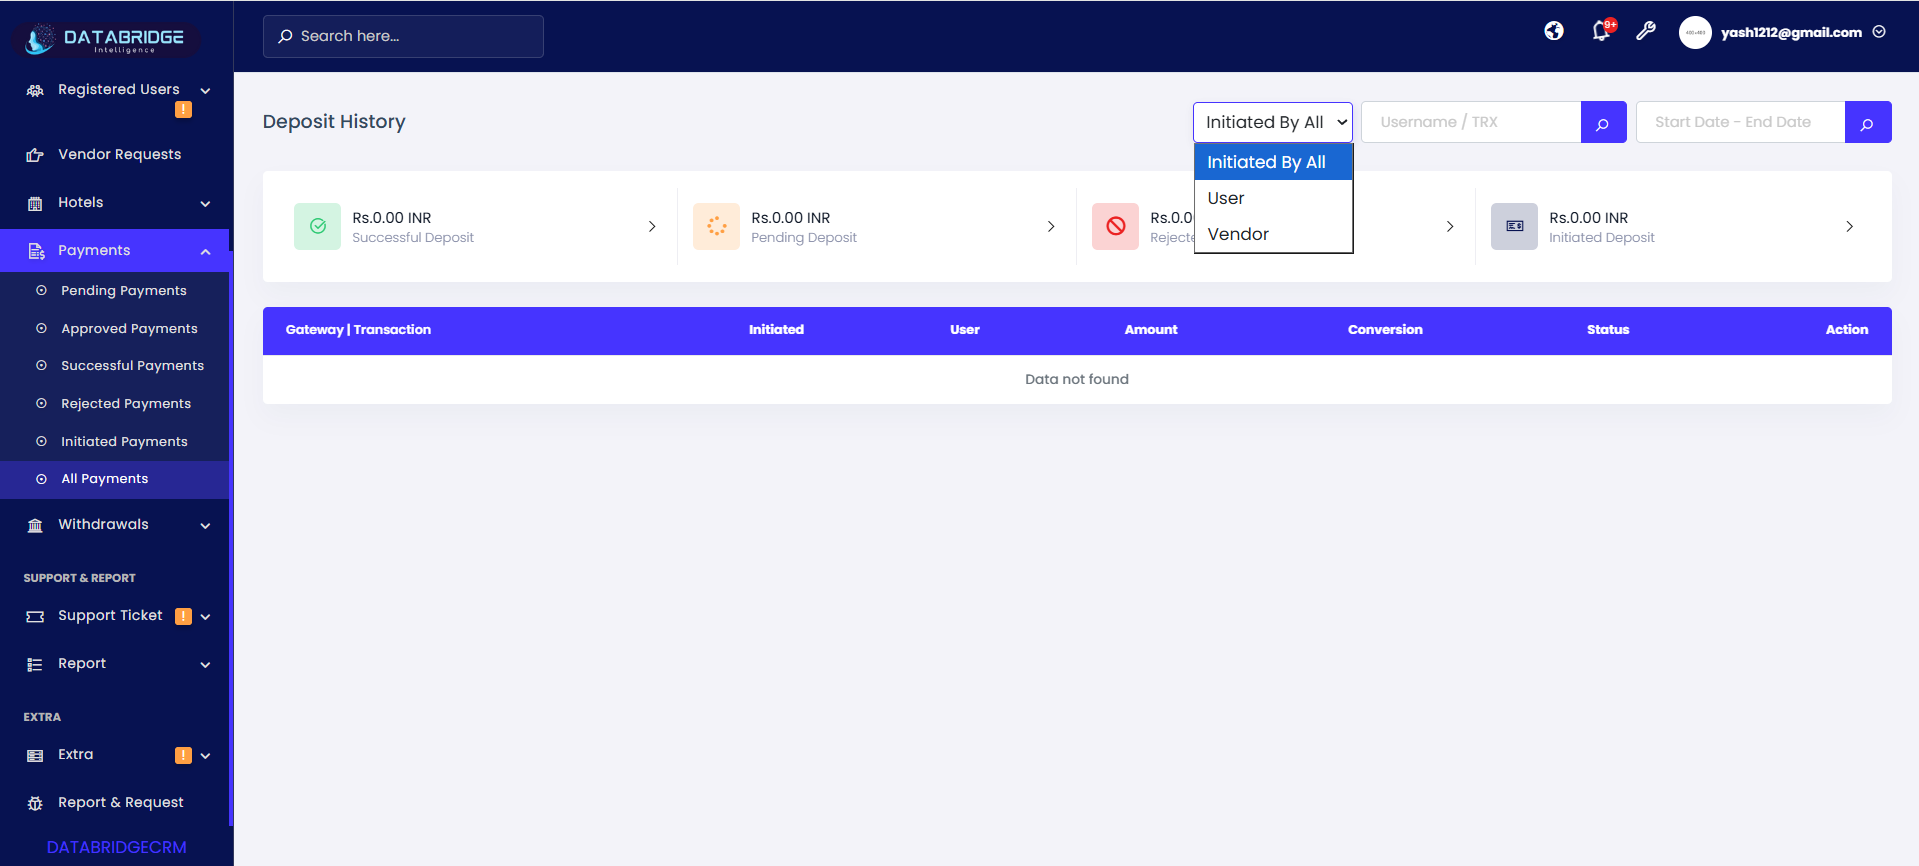
All Payments (Deposit History):
The All Payments screen provides a complete overview of all deposit transactions, including successful, pending, rejected, and initiated payments. It acts as a centralized financial dashboard for transaction monitoring.
Features:
-Displays summary cards (Successful, Pending, Rejected, Initiated)
-“Initiated By” dropdown for filtering all transactions
-Search bar for Username / TRX
-Date range filter for historical data
-Detailed table with all transaction records
-Status indicators for quick identification
Functionality:
-View complete transaction history in one place
-Analyze payment trends using summary cards
-Filter and search across all payment types
-Monitor financial activity efficiently
-Access detailed transaction insights
1
Payments
2
All Payments
Withdrawals
The Withdrawals module in DatabridgeCRM manages all payout requests initiated by users or vendors, allowing administrators to monitor, verify, and process fund withdrawals efficiently. It provides a structured system to handle withdrawal requests through different stages such as pending, approved, rejected, and overall transaction tracking.This module ensures secure financial operations by enabling proper validation, status tracking, and record maintenance of all withdrawal activities. It helps maintain transparency, prevents unauthorized transactions, and supports accurate financial reporting within the system.
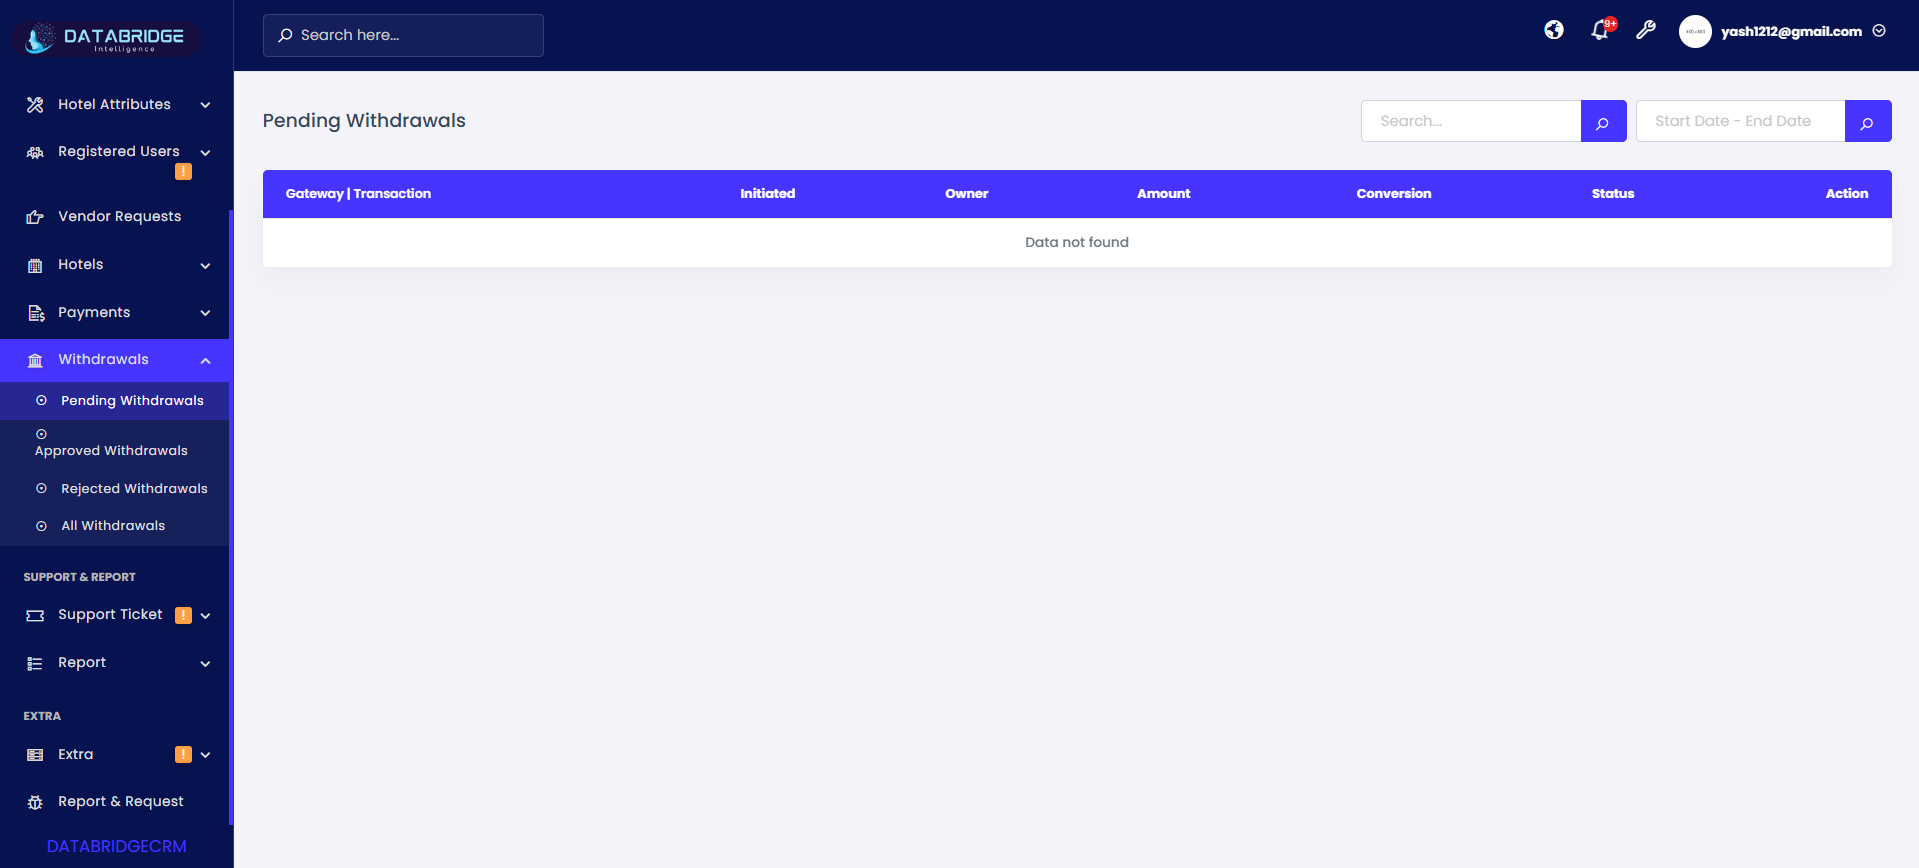
Pending Withdrawals:
The Pending Withdrawals screen displays all withdrawal requests that are submitted by users/vendors and are awaiting approval. It helps administrators review and verify withdrawal details before processing them further.
Features:
-Displays withdrawal requests with transaction details like gateway, owner, amount, and status
-Search functionality to find specific transactions quickly
-Date range filter to view withdrawals within a selected period
-Status column to identify pending requests easily
-Action column for approving or rejecting withdrawal requests
Functionality:
-Admin reviews all pending withdrawal requests
-Verifies transaction details before taking action
-Can approve or reject requests directly from the screen
-Helps maintain control over outgoing payments
-Ensures proper validation before funds are released
1
Withdrawals
2
Pending Withdrawals

Approved Withdrawals:
The Approved Withdrawals screen shows all withdrawal requests that have been successfully verified and approved by the administrator. These transactions are ready for or already processed for payout.
Features:
-List of all approved withdrawal transactions
-Search bar to filter specific records
-Date filter to track approvals within a timeframe
-Displays transaction details including owner and amount
-Status indicator showing approved withdrawals
Functionality:
-Allows admin to track approved withdrawal history
-Ensures transparency in processed payments
-Helps in auditing approved transactions
-Maintains a record of completed withdrawal approvals
-Supports financial tracking and reporting
1
Withdrawals
2
Approved Withdrawals
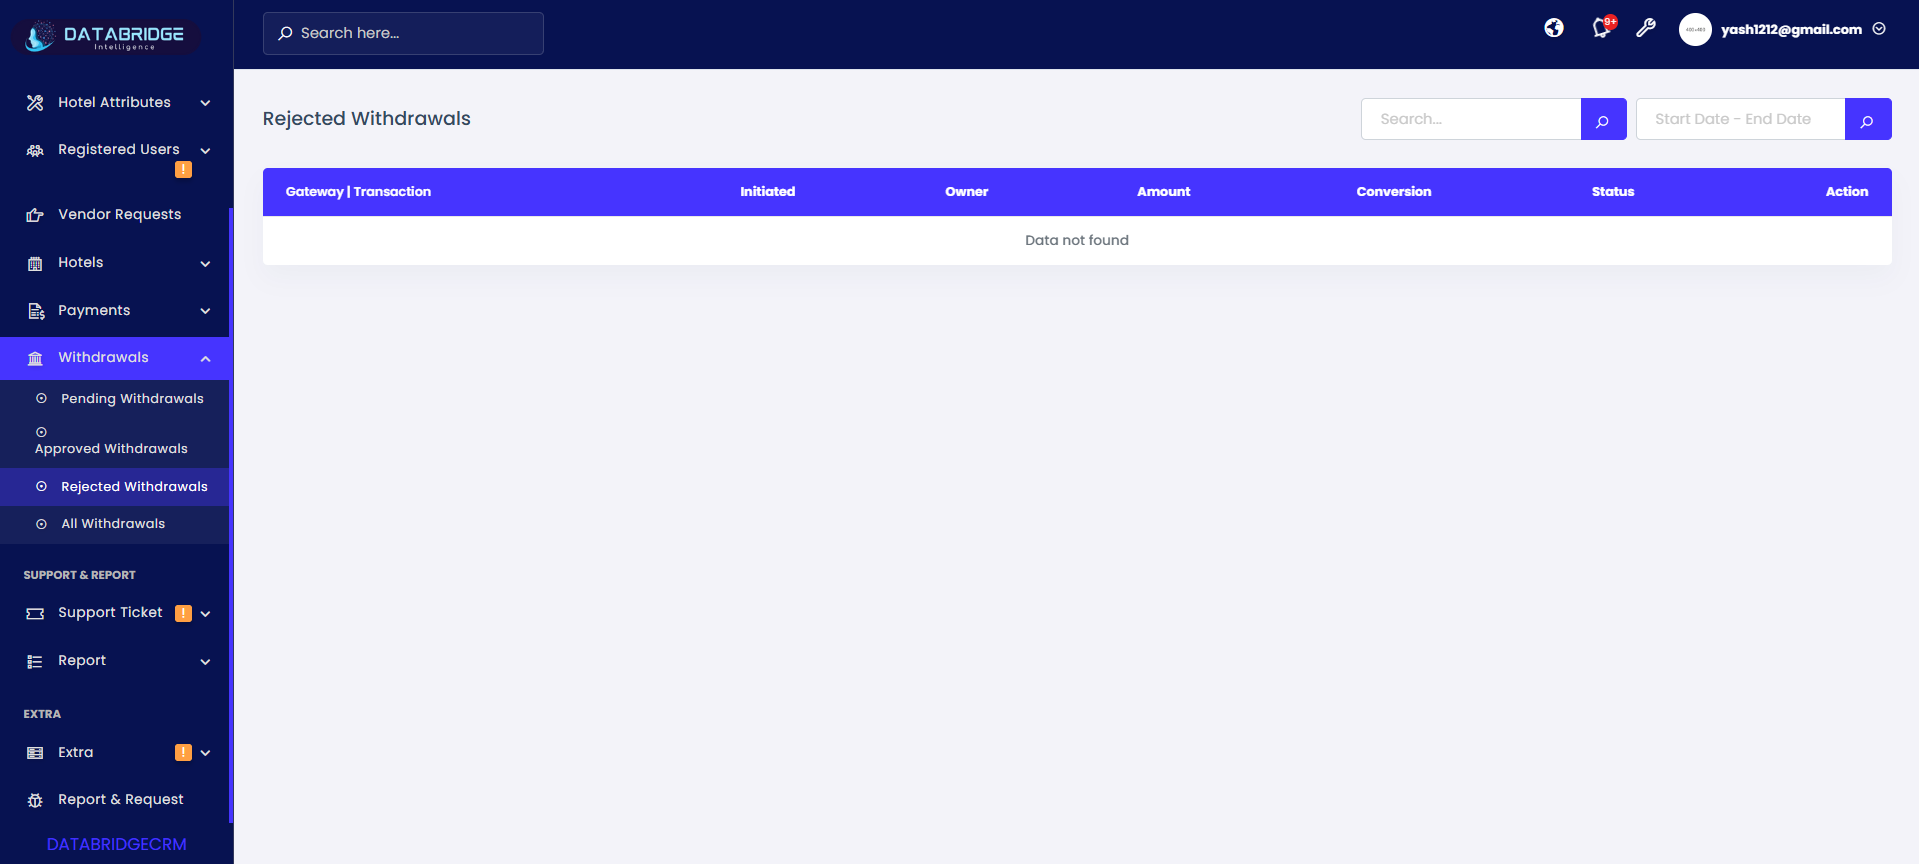
Rejected Withdrawals:
The Rejected Withdrawals screen contains all withdrawal requests that have been declined due to validation issues or policy restrictions. It helps admins maintain records of rejected transactions.
Features:
-Displays all rejected withdrawal requests
-Search option to locate specific rejected transactions
-Date filter for filtering records by timeframe
-Status column indicating rejection
-Detailed transaction information for review
Functionality:
-Admin can review reasons for rejection
-Helps maintain transparency with users/vendors
-Keeps a record of invalid or failed requests
-Supports audit and compliance tracking
-Prevents unauthorized or incorrect withdrawals
1
Withdrawals
2
Rejected Withdrawals
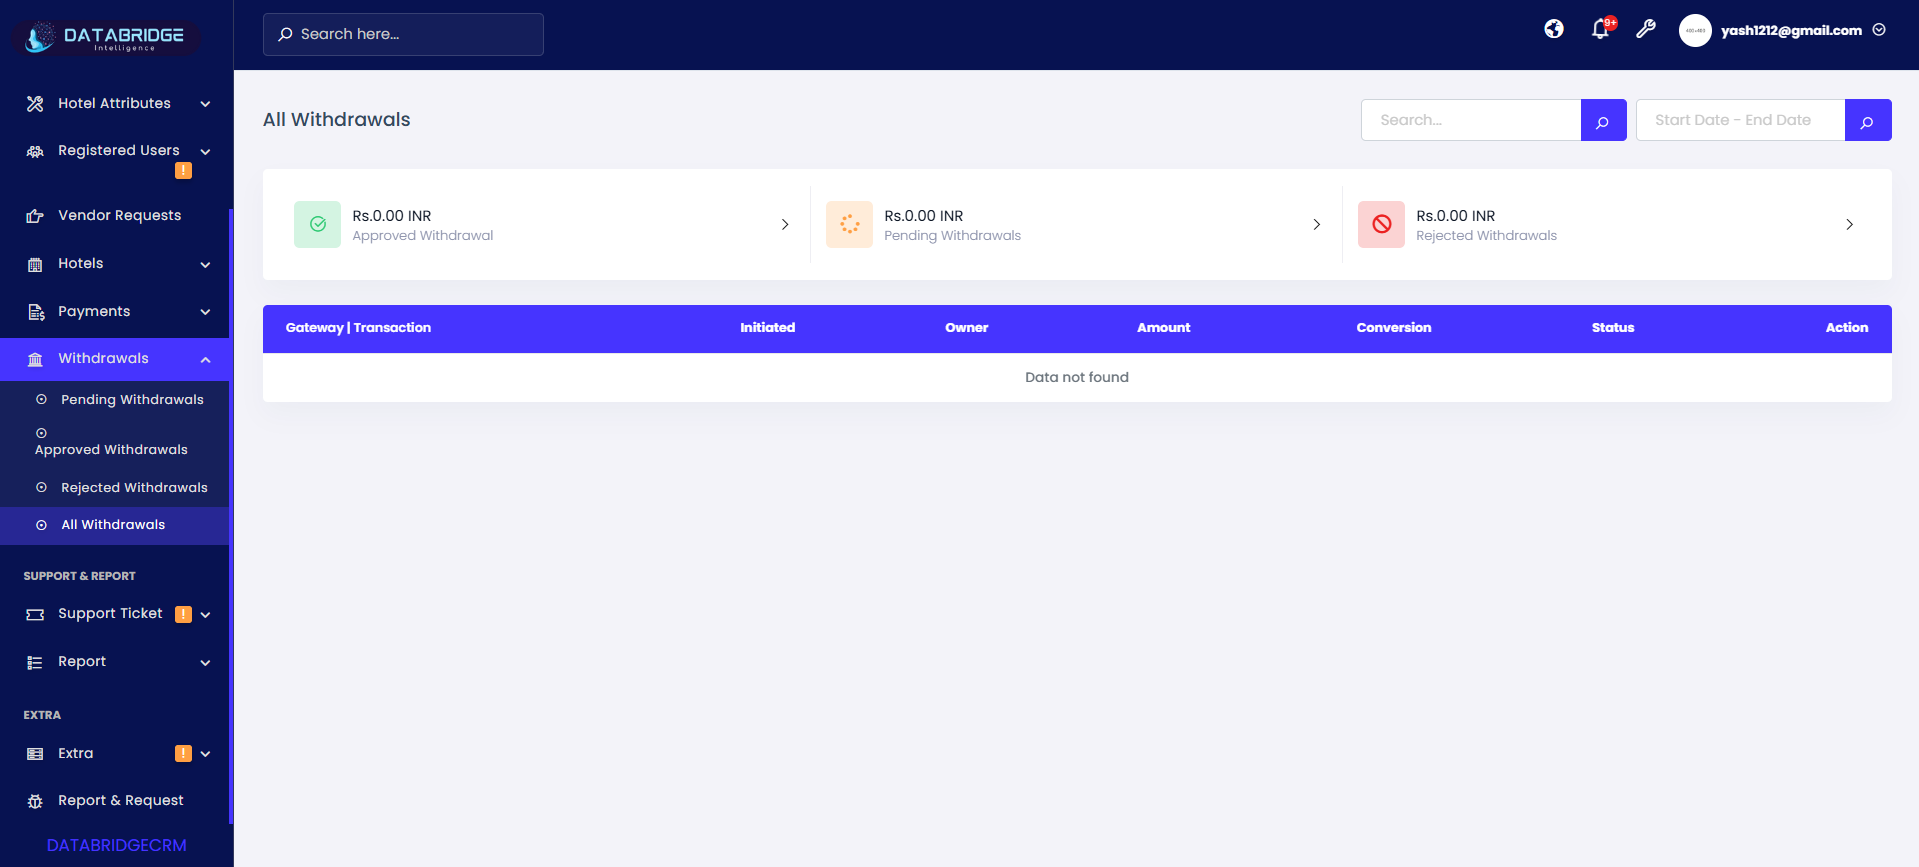
All Withdrawals:
The All Withdrawals screen provides a consolidated view of all withdrawal transactions, including pending, approved, and rejected requests. It also includes a summary section for quick insights.
Features:
-Combined list of all withdrawal transactions
-Summary cards showing Approved, Pending, and Rejected totals
-Search functionality for quick lookup
-Date range filter for detailed tracking
-Status column to differentiate transaction types
Functionality:
-Gives a complete overview of withdrawal activities
-Helps admins analyze overall transaction flow
-Provides quick summary insights for decision-making
-Enables easy filtering and tracking of all records
-Supports reporting and financial monitoring
1
Withdrawals
2
All Withdrawals
Support Ticket
The Support Ticket module in DatabridgeCRM is designed to manage and track all customer and vendor support requests in a structured and efficient manner. It allows administrators to monitor issues, respond to queries, and ensure timely resolution through organized ticket handling.This module categorizes tickets into different statuses such as pending, answered, and closed, providing complete visibility of support activities. It helps improve communication, maintain service quality, and ensures that all user concerns are properly addressed and documented within the system.
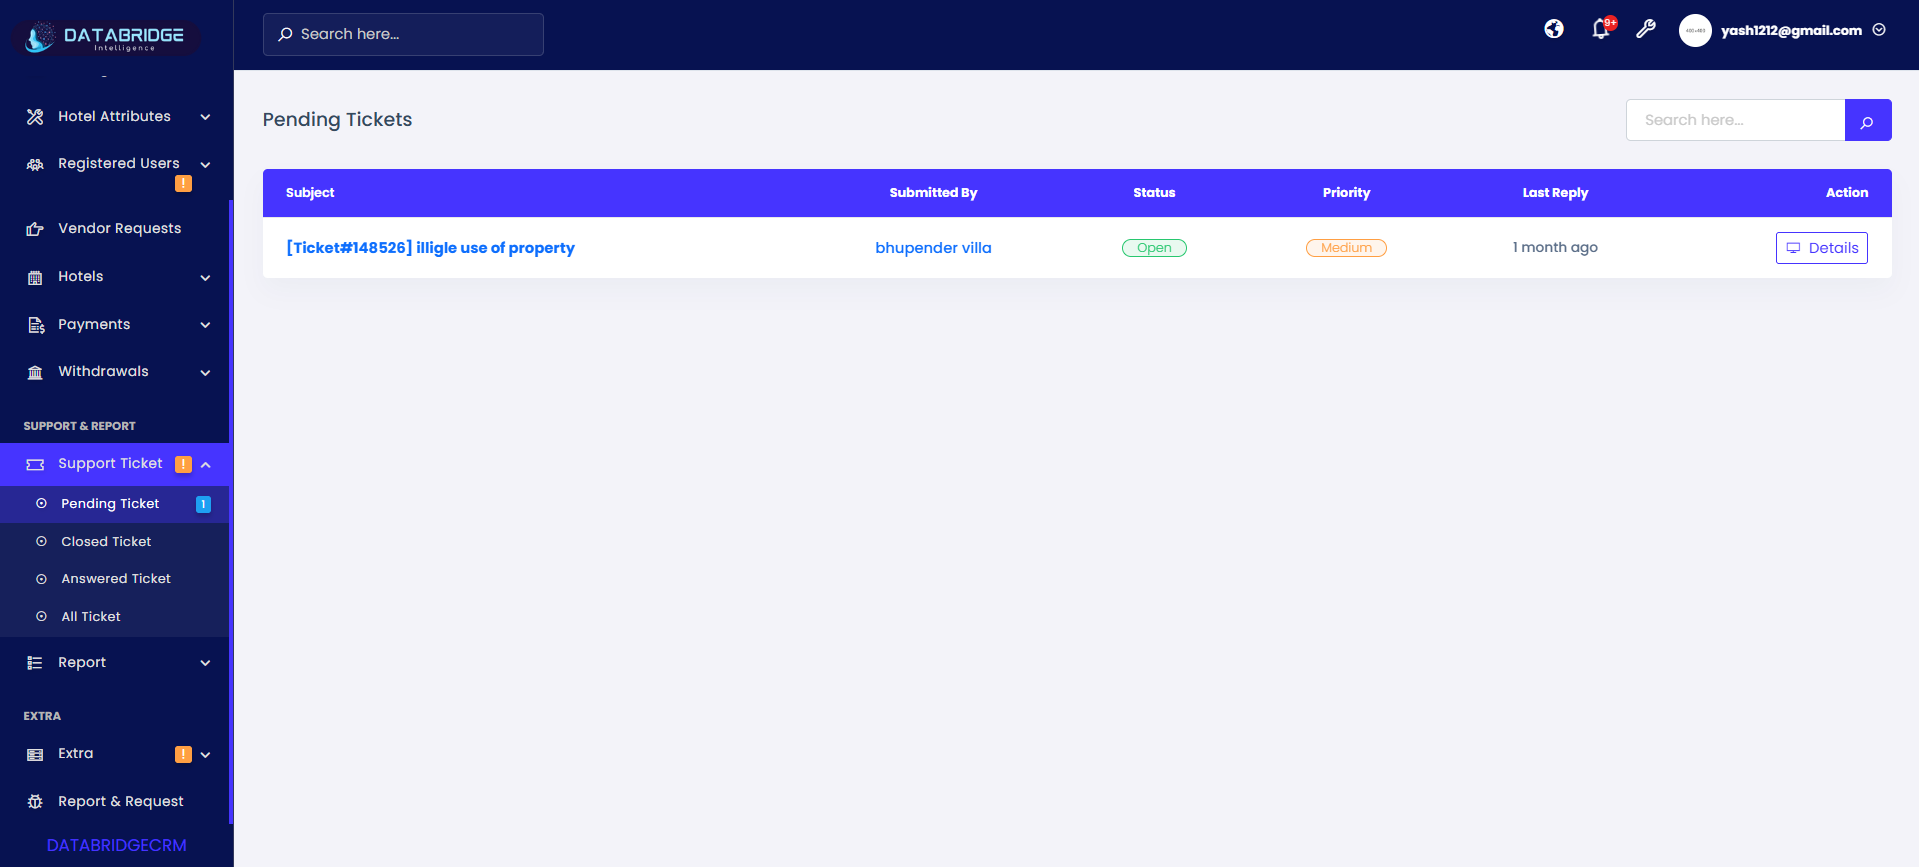
Pending Tickets:
The Pending Tickets screen displays all support requests that are currently open and awaiting response or resolution. It helps administrators track unresolved issues and prioritize actions accordingly.
Features:
-List of all pending/open support tickets
-Displays subject, submitted by, status, priority, and last reply
-Search bar to quickly find specific tickets
-Status indicator (Open) for easy identification
-Action button to view ticket details
Functionality:
-Admin can review all unresolved tickets
-Helps prioritize tickets based on urgency
-Enables quick navigation to detailed ticket view
-Supports timely response to user/vendor issues
-Ensures no request is missed or delayed
1
Support Ticket
2
Pending Tickets
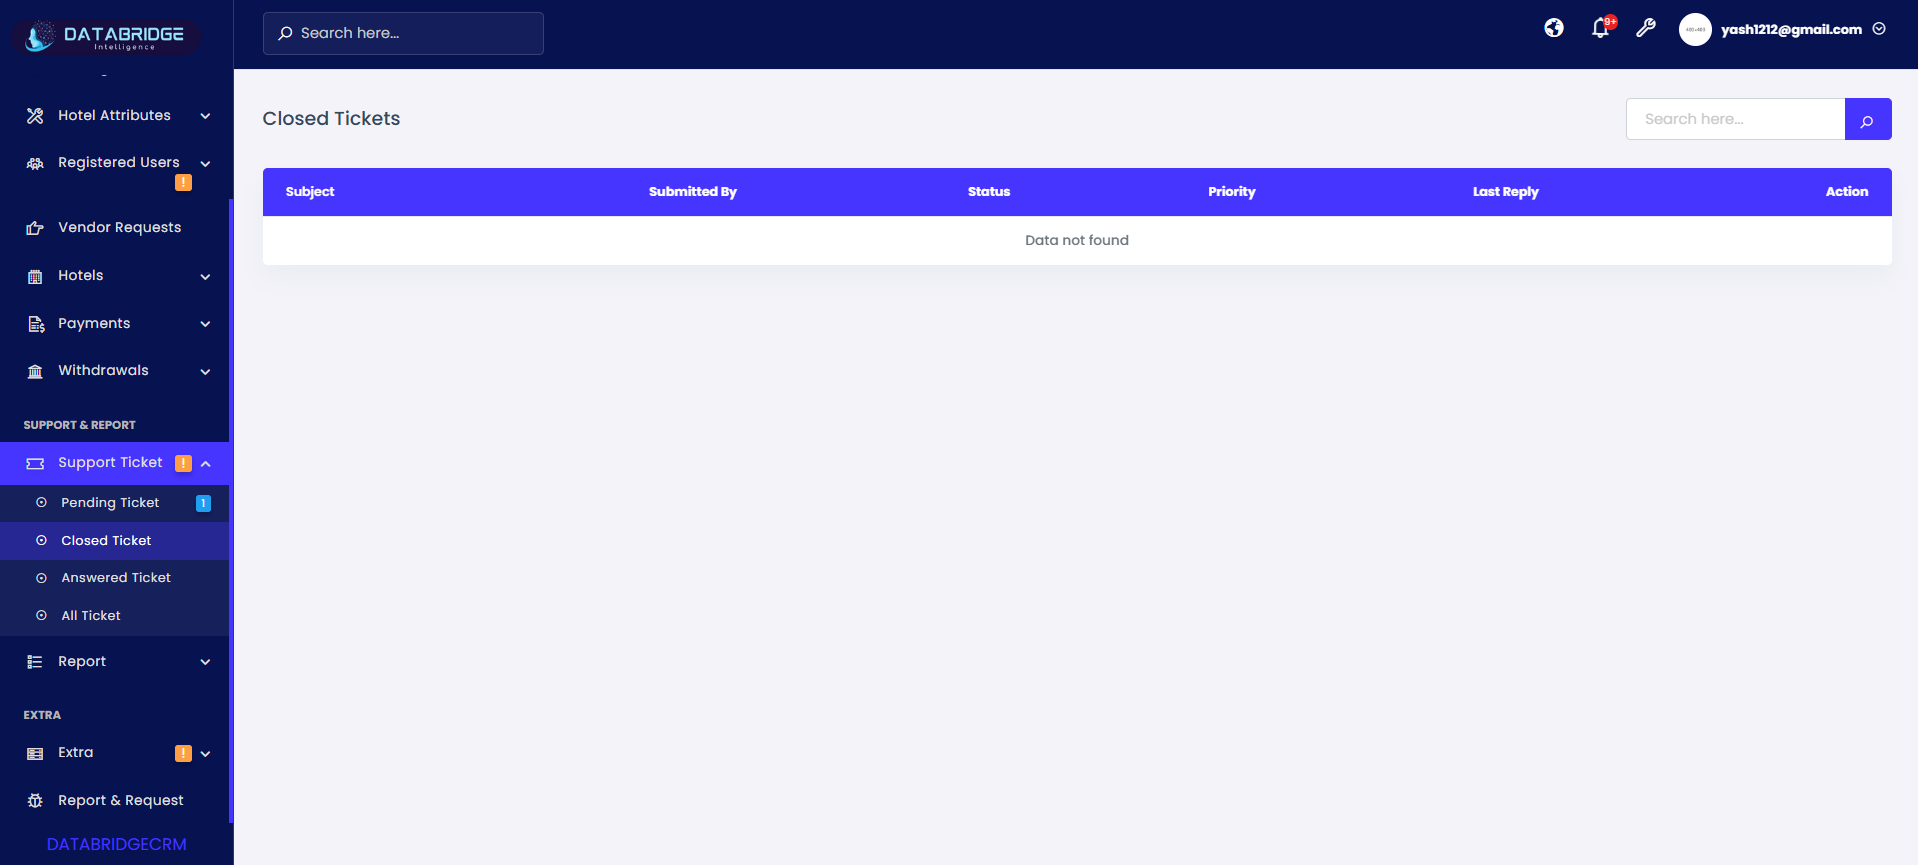
Closed Tickets:
The Closed Tickets screen shows all support tickets that have been successfully resolved and marked as closed. It serves as a record of completed support interactions.
Features:
-Displays all closed/resolved tickets
-Search functionality to locate past tickets
-Shows ticket details including subject and user
-Status indicator for closed tickets
-Action button to review ticket history
Functionality:
-Allows admin to track resolved issues
-Maintains a history of completed support cases
-Helps in performance and resolution analysis
-Enables review of past responses
-Supports audit and reporting
1
Support Ticket
2
Closed Tickets
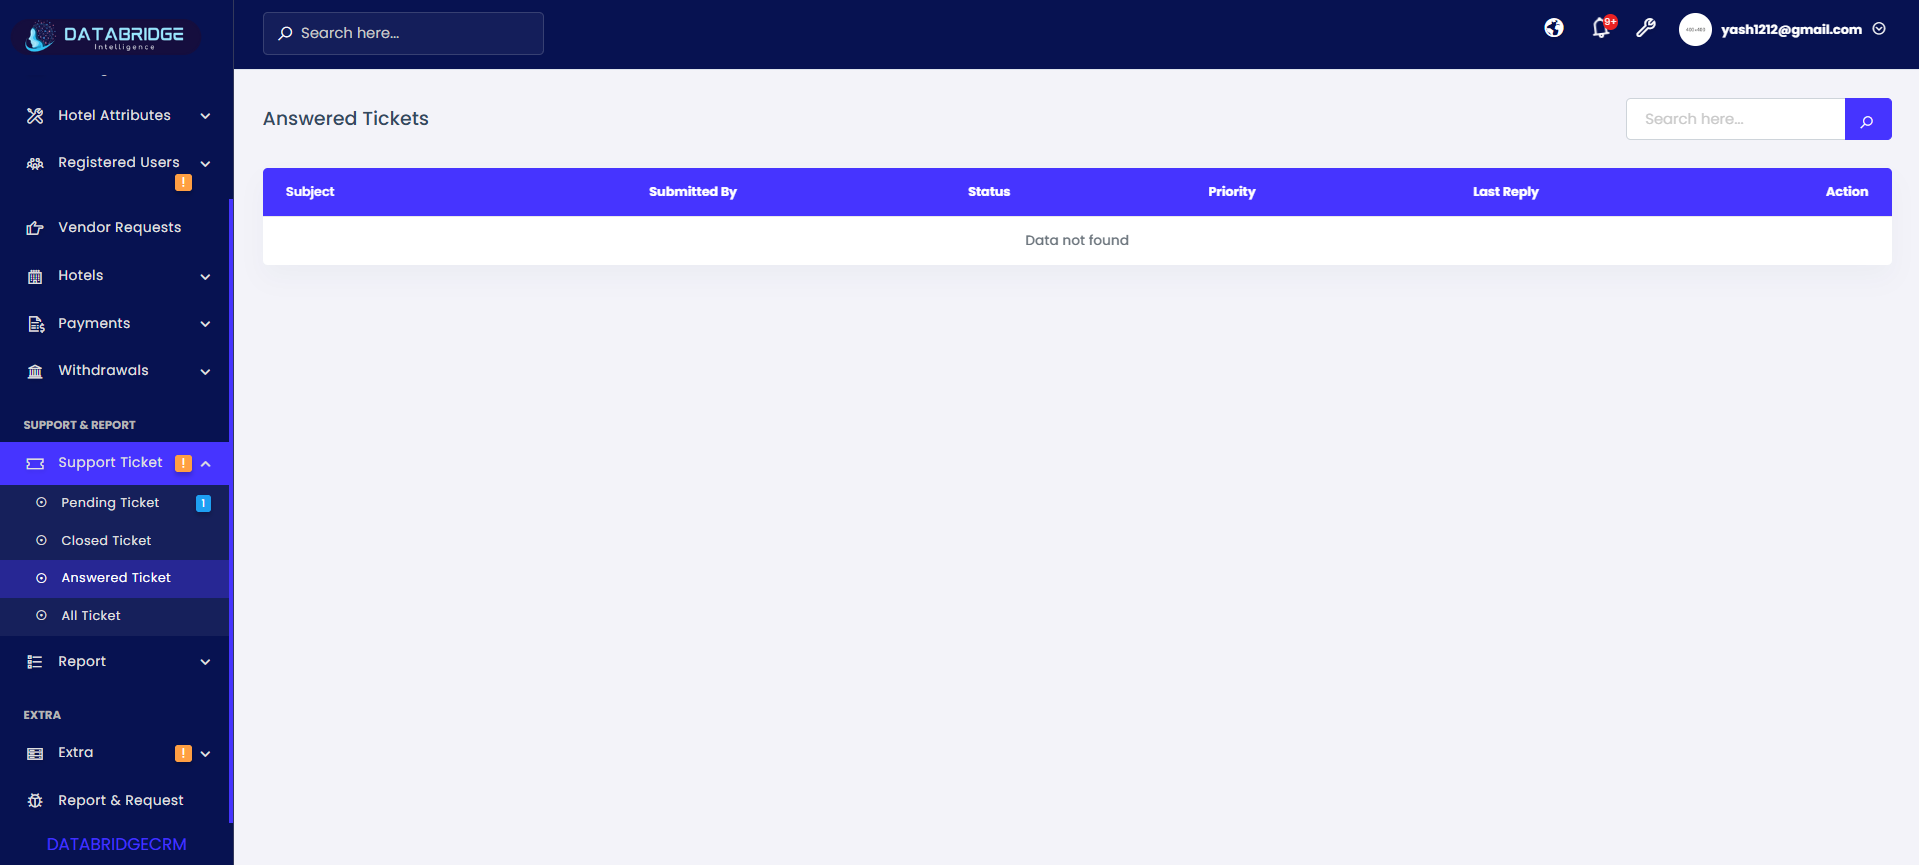
Answered Tickets:
The Answered Tickets screen contains tickets that have received a response from the admin but may still be open for further communication. It helps track ongoing conversations.
Features:
-Displays tickets with admin responses
-Search option for quick filtering
-Shows subject, user, priority, and last reply
-Status indicator for answered tickets
-Action button to view and continue conversation
Functionality:
-Admin can monitor replied tickets
-Helps manage ongoing discussions
-Enables follow-up actions if needed
-Keeps communication organized
-Ensures continuous support interaction
1
Support Ticket
2
Answered Tickets
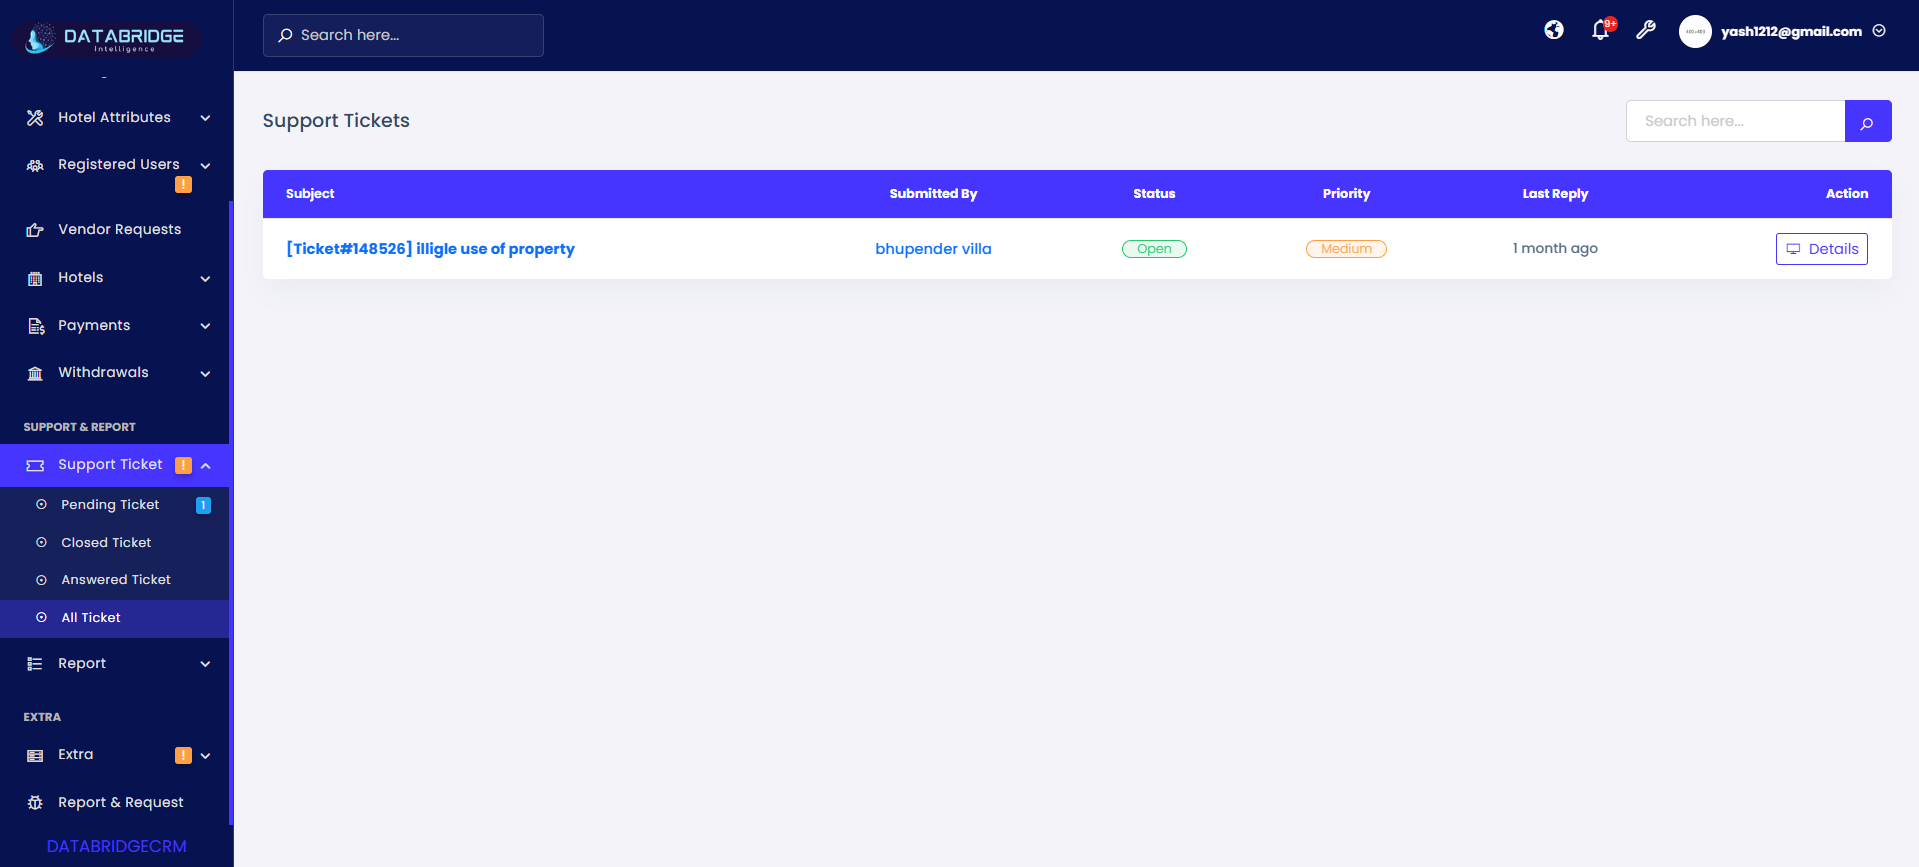
All Tickets:
The All Tickets screen provides a complete overview of all support tickets, including pending, answered, and closed tickets. It acts as a centralized dashboard for support management.
Features:
-Combined list of all ticket statuses
-Search bar for quick lookup
-Displays complete ticket details
-Status and priority indicators
-Action button to access ticket details
Functionality:
-Provides a unified view of all support activities
-Helps admins track overall ticket flow
-Enables easy filtering and monitoring
-Supports reporting and analytics
-Improves support management efficiency
1
Support Ticket
2
All Tickets
Reports
The Reports module in Databridgecrm provides a centralized view of all system activities, including transactions, user logins, vendor access, and notification history. It helps administrators analyze data, monitor system usage, and generate insights for better decision-making.This module ensures transparency by offering structured reports with filtering options, enabling users to track performance, identify trends, and audit system operations efficiently.
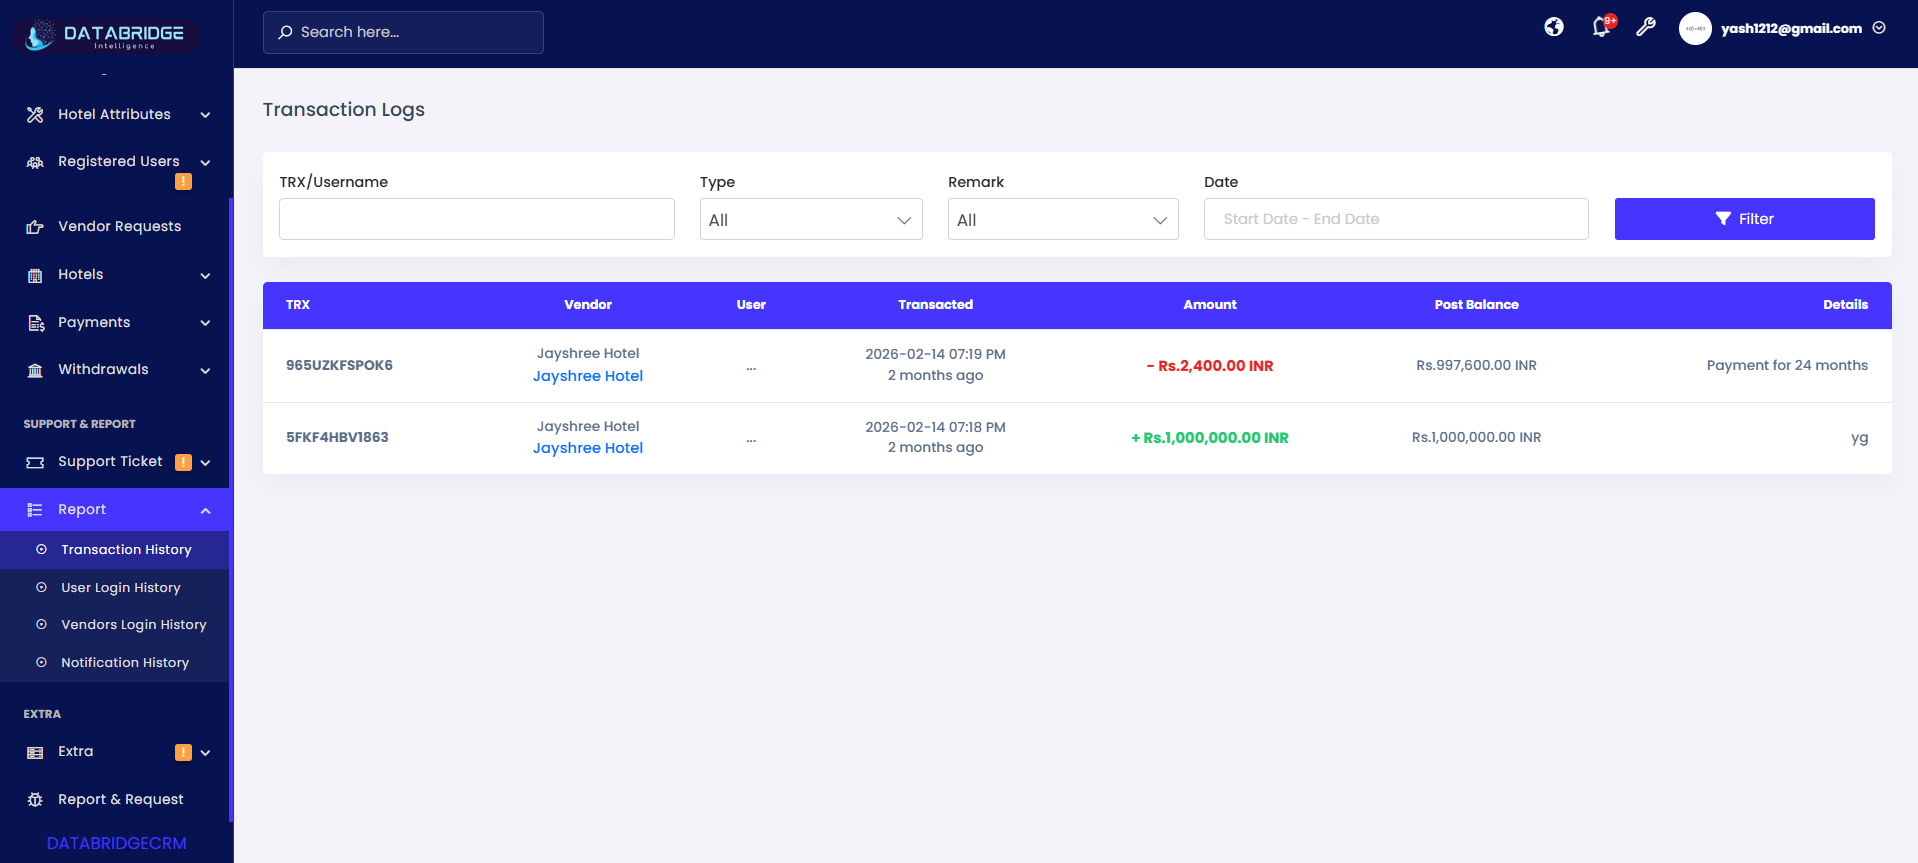
Transaction History:
This screen displays a complete log of all financial transactions performed within the system, including deposits, withdrawals, and adjustments. It helps administrators track transaction flow, monitor balances, and review detailed financial activities.
Features:
-Search by TRX / Username to quickly locate transactions
-Dropdown filters for Type and Remark selection
-Date range filter to view transactions within a specific period
-Filter button to apply multiple conditions together
-Displays detailed columns like Vendor, User, Amount, and Post Balance
Functionality:
-Admin can filter transactions using multiple criteria (Type, Remark, Date)
-Shows both credit (+) and debit (-) transactions with color indicators
-Displays post balance after each transaction for tracking account status
-Clicking on records helps review transaction details
-Ensures transparency and audit tracking of all financial activities
1
Reports
2
Transaction History
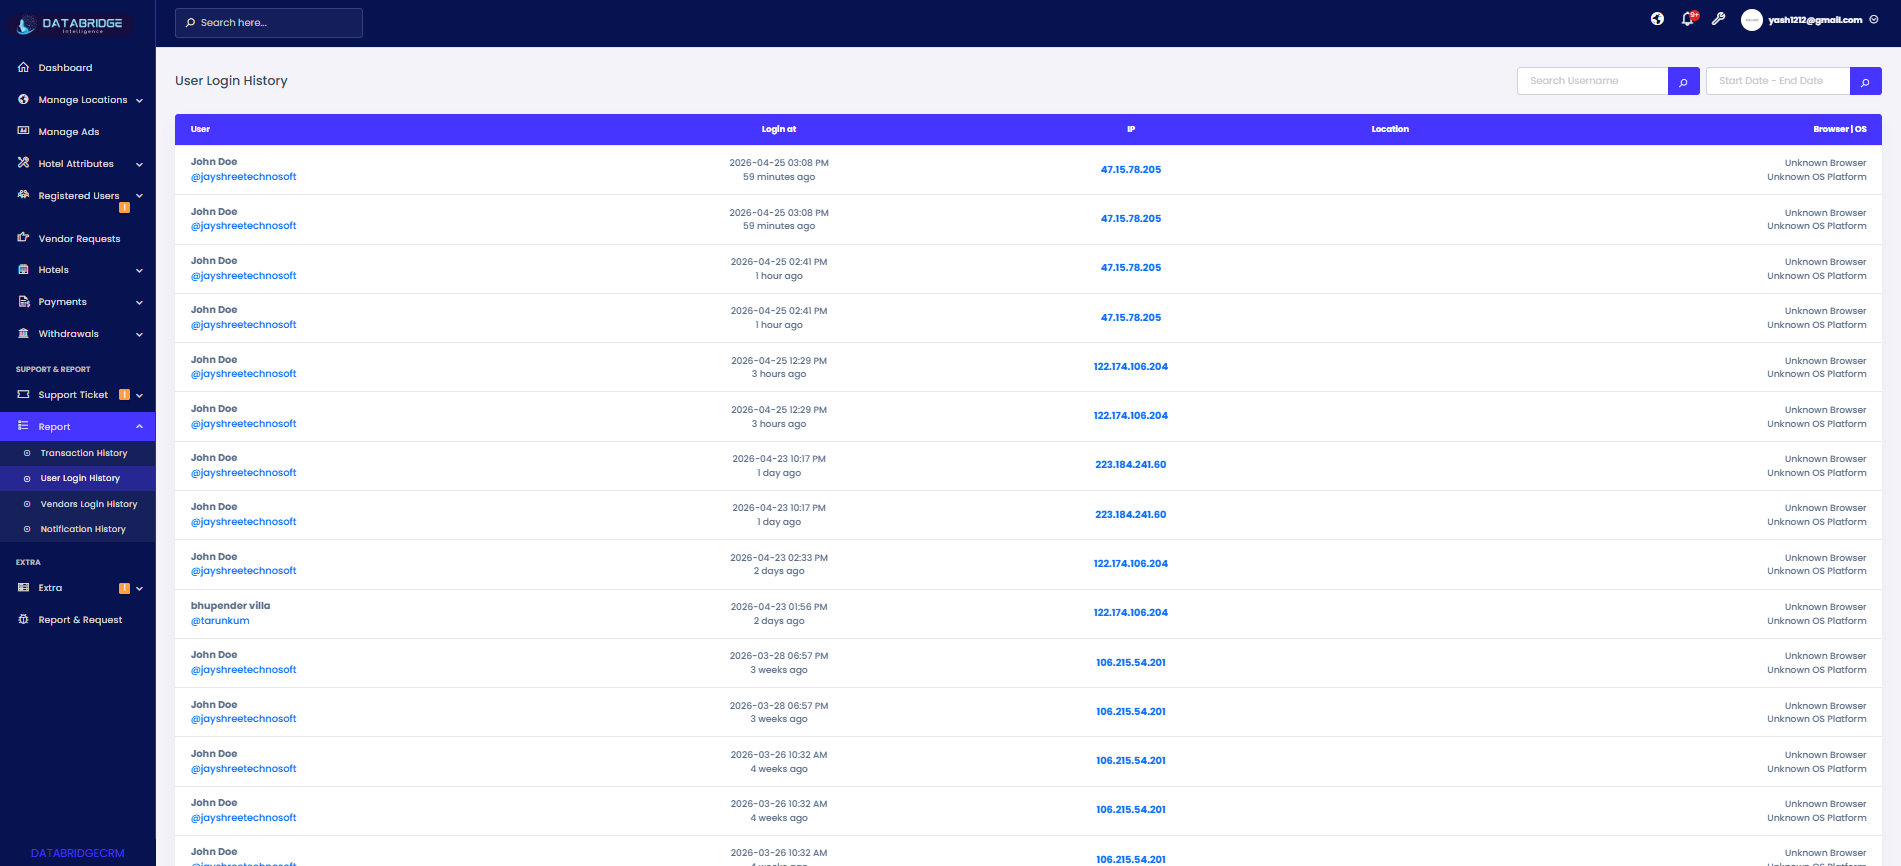
User Login History:
This screen records all login activities of users, providing detailed insights into login time, IP address, and device information. It helps monitor user behavior and enhances system security.
Features:
-Search bar to find specific users
-Date filter to track login activities within a selected period
-Displays IP Address, Location, and Browser/OS details
-Organized table layout for easy monitoring
-Real-time login tracking visibility
Functionality:
-Admin can track who logged in and when
-Displays IP-based access details for security monitoring
-Helps detect suspicious or unusual login activity
-Maintains historical login data for auditing
-Supports filtering to analyze specific time-based login patterns
1
Reports
2
User Login History
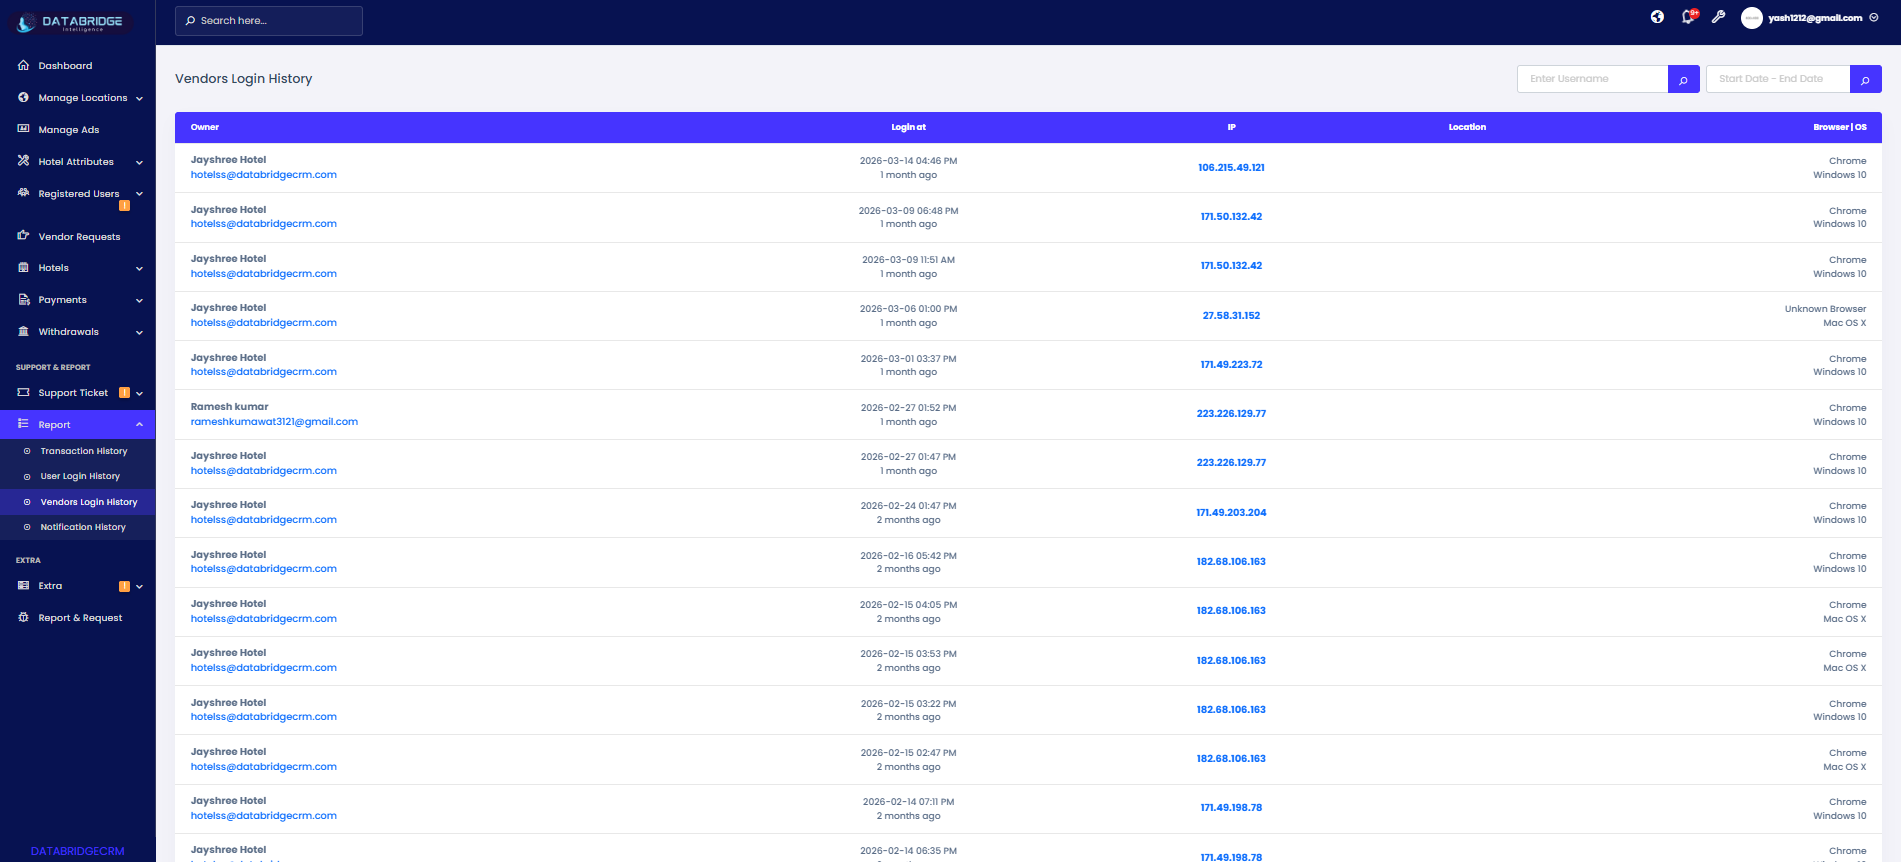
Vendors Login History:
This screen tracks login activities of vendors registered in the system. It provides complete visibility of vendor access, including login time, device details, and IP address.
Features:
-Search by Vendor Username/Email
-Date range filter for login tracking
-Displays IP address and location information
-Shows Browser and Operating System details
-Structured table for vendor activity monitoring
Functionality:
-Admin can monitor vendor login behavior
-Helps ensure secure vendor access management
-Identifies unusual login attempts or multiple access points
-Maintains a record of vendor system usage
-Useful for auditing and troubleshooting vendor-related issues
1
Reports
2
Vendors Login History
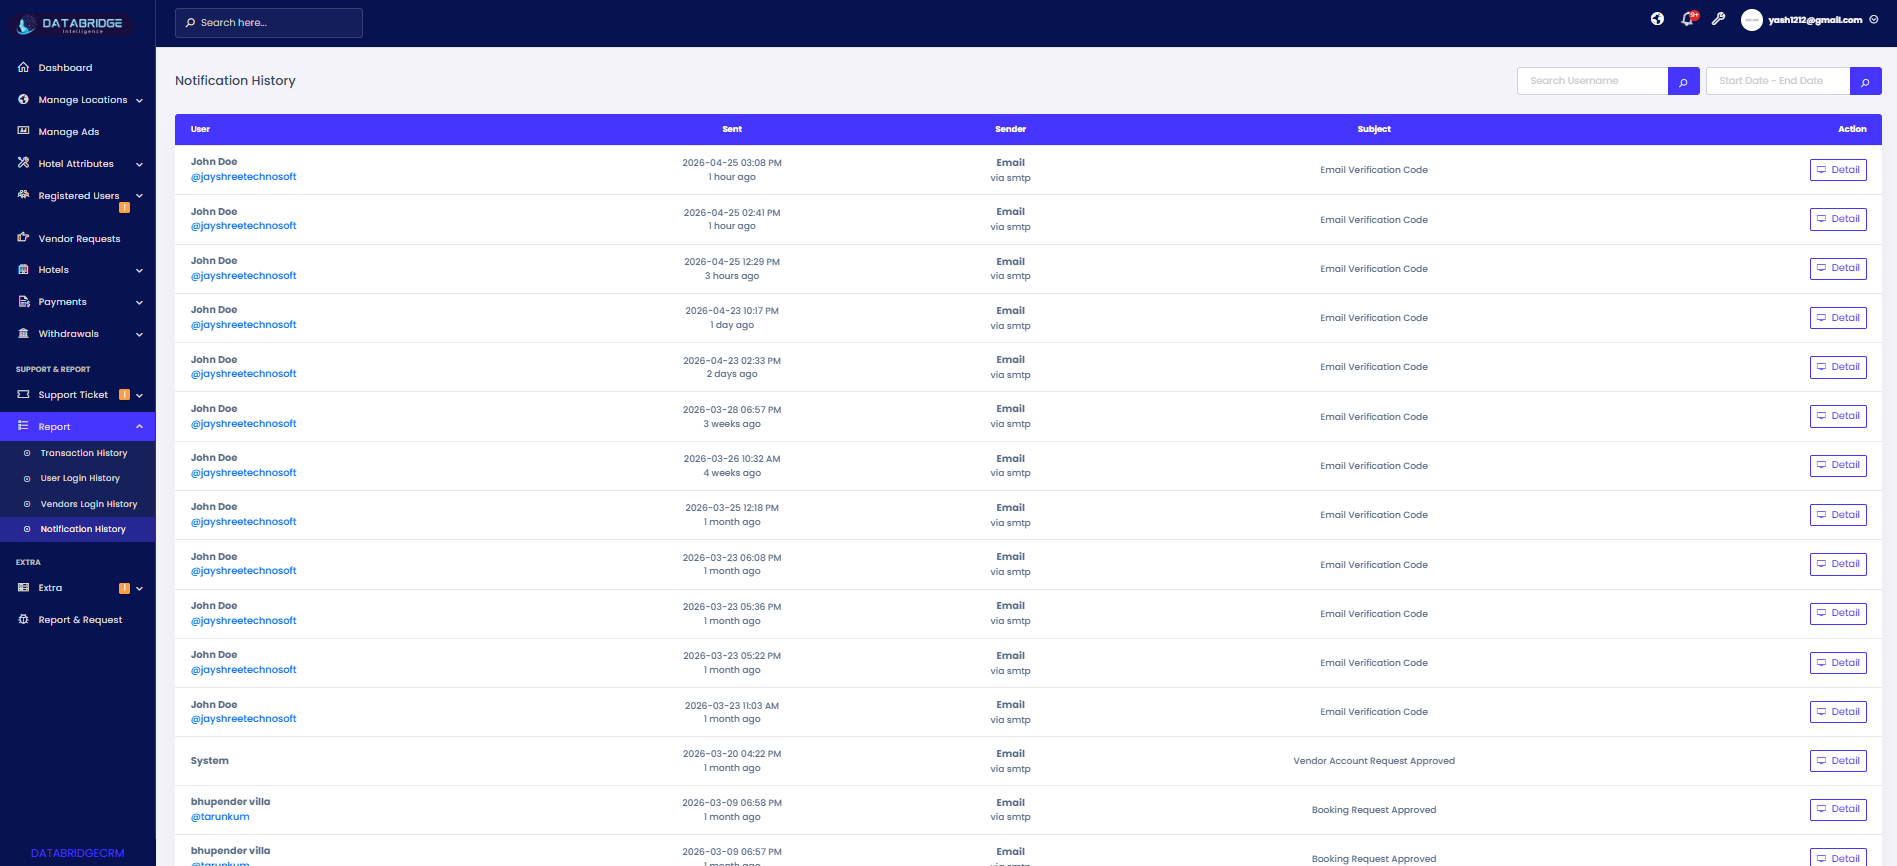
Notification History:
This screen maintains a record of all notifications sent by the system, including emails and alerts. It helps administrators track communication history and verify message delivery.
Features:
-Search by Username to find specific notifications
-Date filter to track notification history
-Displays Sender type (Email/System)
-Shows Subject and message details
-Details button to view complete notification information
Functionality:
-Admin can view all sent notifications and their status
-Tracks email communication logs (via SMTP)
-Helps verify whether notifications were sent successfully
-Supports troubleshooting of communication issues
-Maintains a centralized log for all system alerts and messages
1
Reports
2
Notification History
Extra
The Extra module in Databridgecrm provides access to additional system-level tools and settings that support application maintenance and monitoring. It includes features like application information, server details, cache management, and system updates.This module helps administrators manage technical configurations, improve system performance, and keep the platform updated, ensuring smooth and efficient system operation.
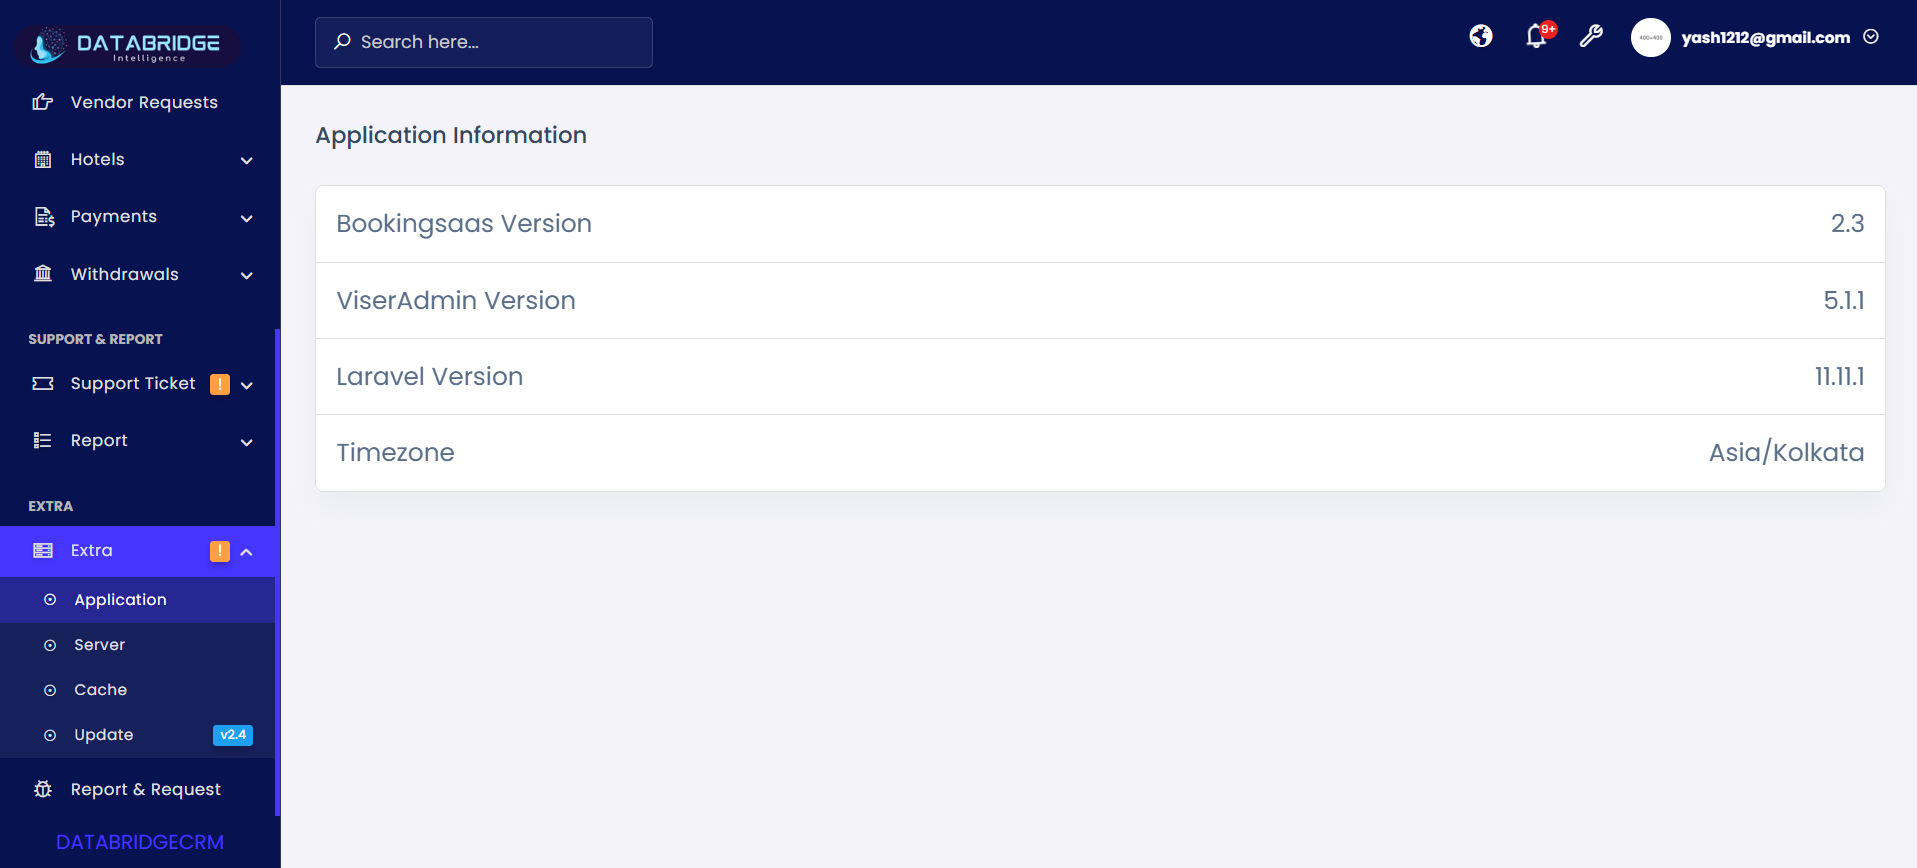
Application Information:
This screen provides detailed information about the application environment, including system versions and configuration details. It helps administrators understand the current setup and software versions being used.
Features:
-Displays BookingSaAS Version
-Shows ViserAdmin Version
-Displays Laravel Framework Version
-Shows System Timezone configuration
-Clean and structured information layout
Functionality:
-Helps admin verify system version compatibility
-Provides quick reference for debugging and support
-Ensures awareness of framework and system versions
-Useful during updates or technical troubleshooting
-Displays real-time configuration details
1
Extra
2
Application
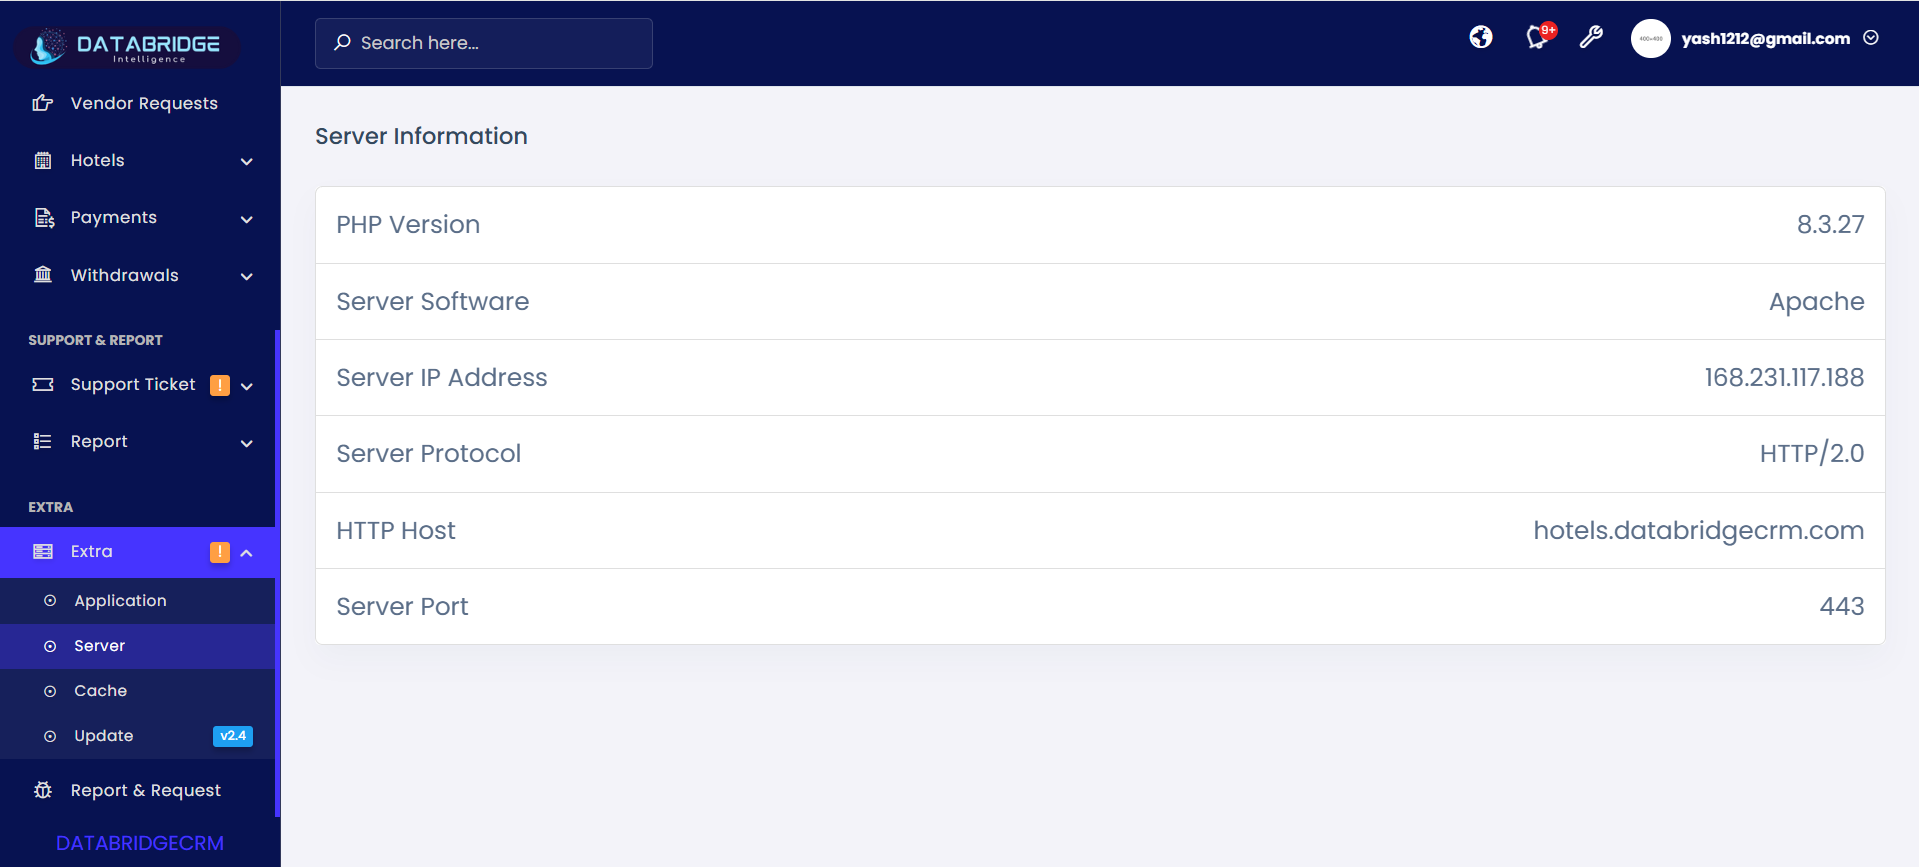
Server Information:
This screen provides technical details about the server environment where the application is hosted. It is useful for monitoring server configurations and ensuring proper system performance.
Features:
-Displays PHP Version
-Shows Server Software (Apache, etc.)
-Displays Server IP Address
-Shows Server Protocol (HTTP/2, etc.)
-Includes Host and Port details
Functionality:
-Helps admin monitor server environment
-Assists in debugging server-related issues
-Ensures compatibility with application requirements
-Provides hosting and network details
-Useful for maintenance and technical audits
1
Extra
2
Server
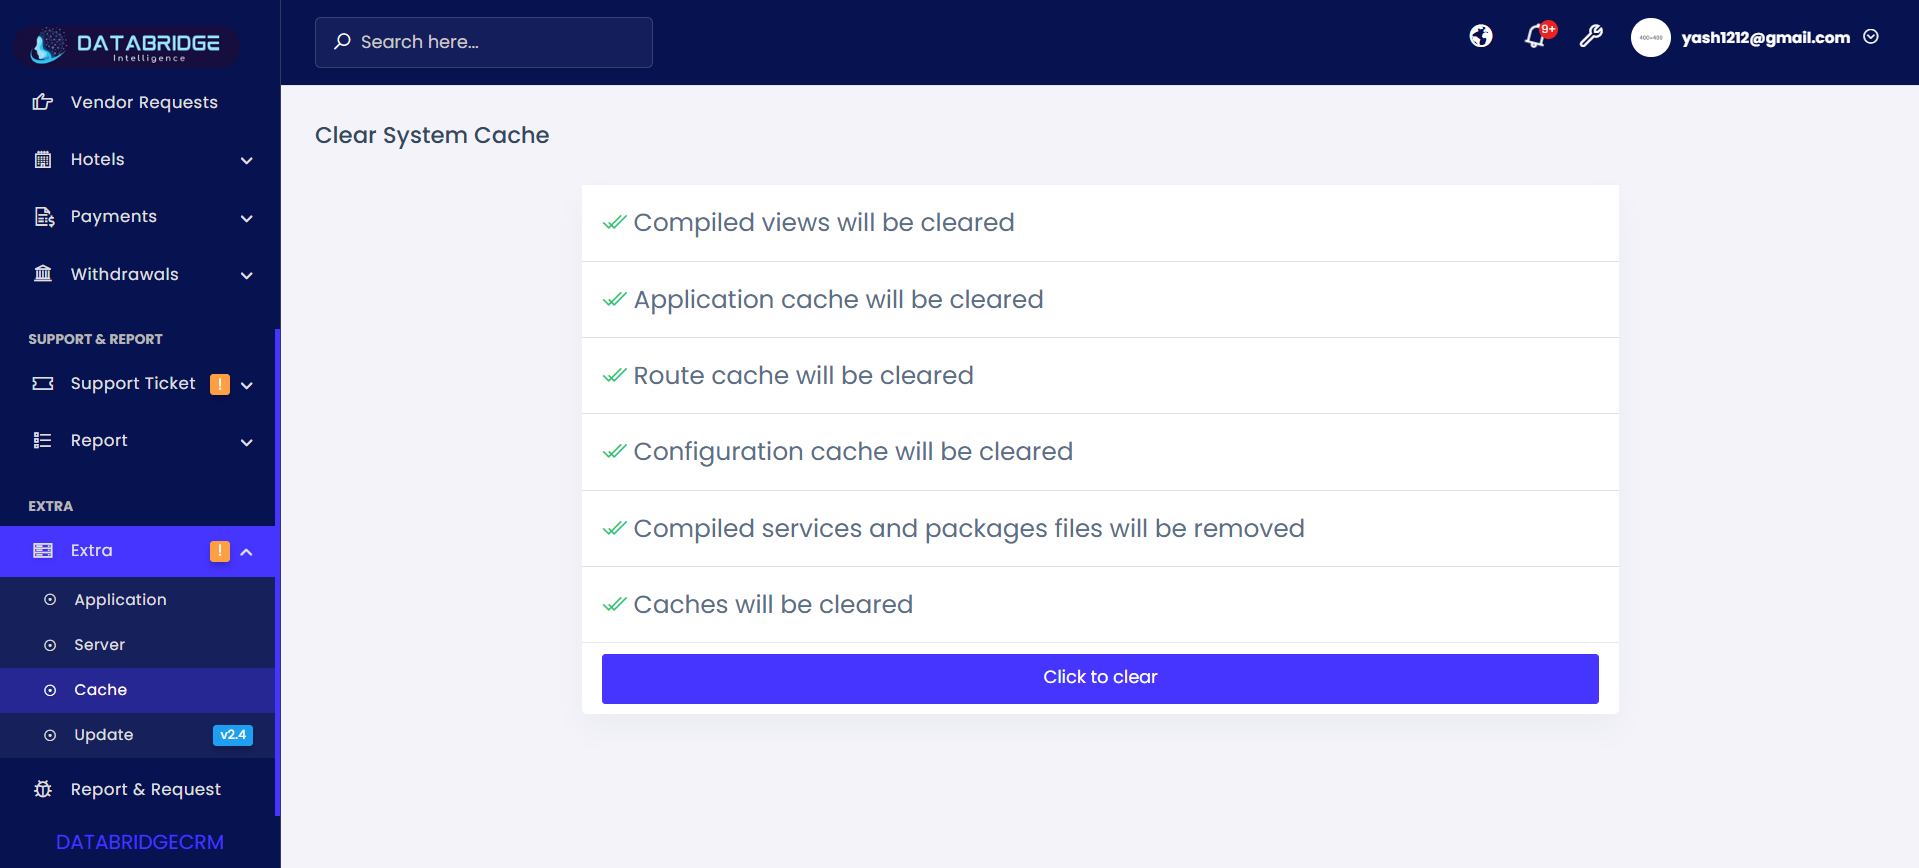
Cache Management (Clear System Cache):
This screen allows administrators to clear different types of system cache to improve performance and ensure updated data is reflected across the application.
Features:
-Displays list of cache types to be cleared:
-Compiled Views
-Application Cache
-Route Cache
-Configuration Cache
-Compiled Services & Packages
-“Click to Clear” button to execute cache clearing
-Visual indicators showing cache actions
Functionality:
-Admin clicks “Click to Clear” to remove all cached data
-Clears outdated system data and refreshes configurations
-Improves system performance and responsiveness
-Resolves issues caused by stale cache
-Ensures latest updates are applied across the system
1
Extra
2
Cache
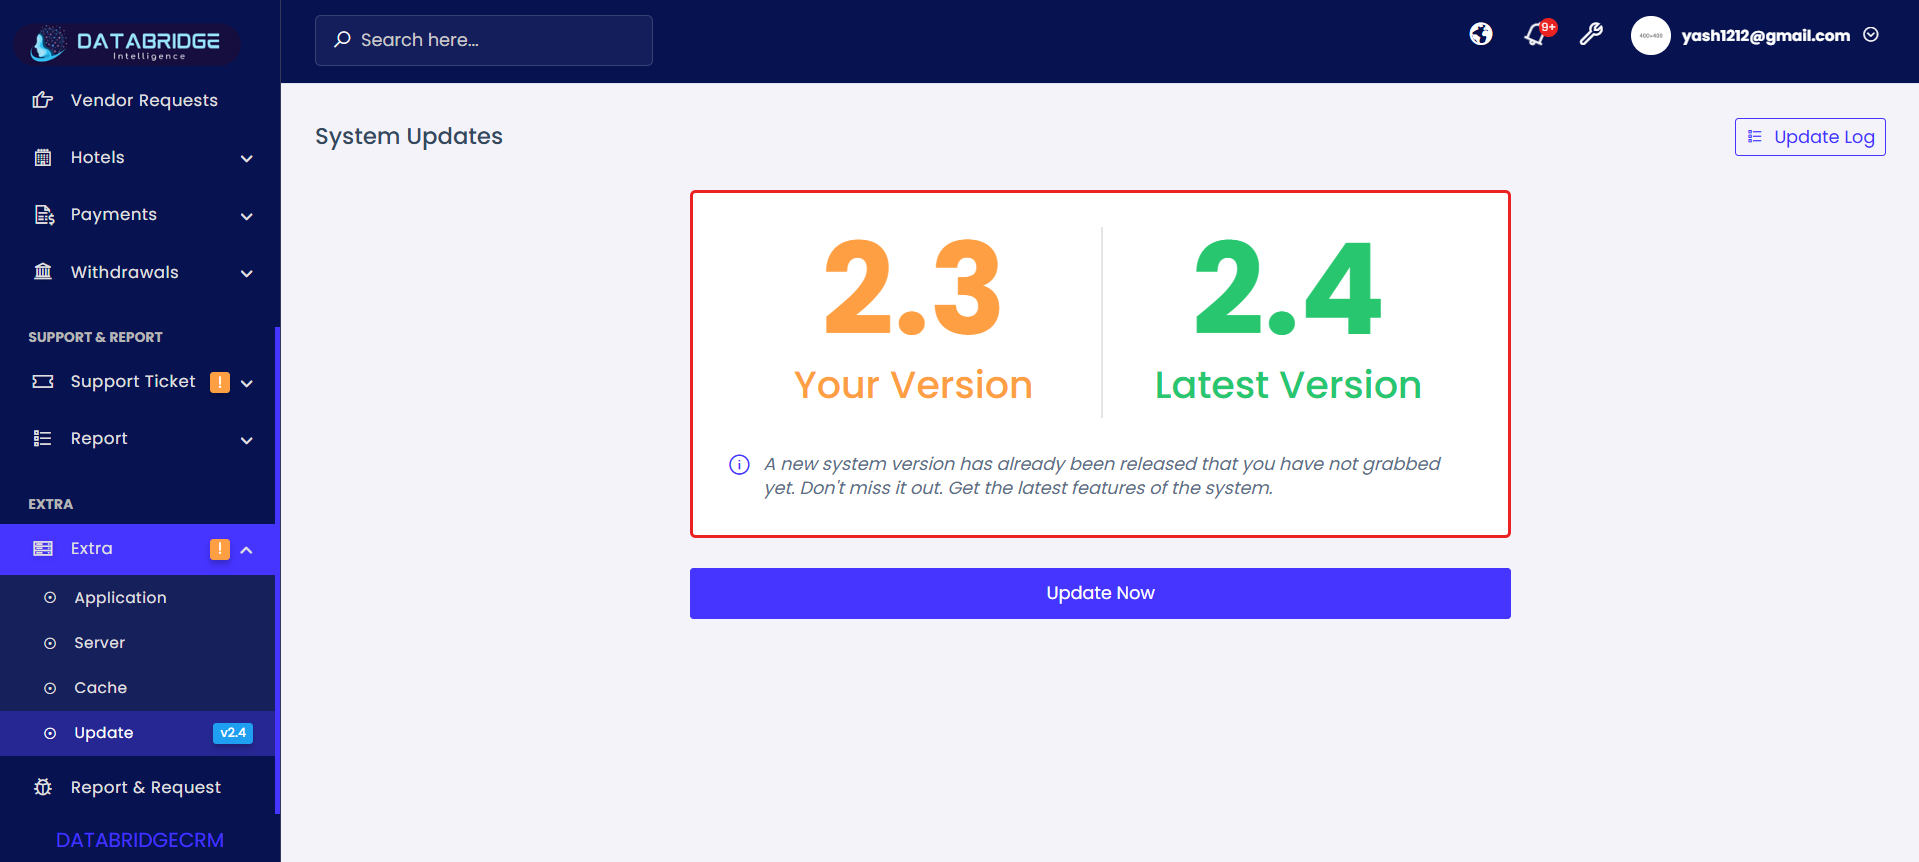
System Updates:
This screen displays the current system version and compares it with the latest available version. It helps administrators keep the system updated with the latest features and improvements.
Features:
-Displays Current Version vs Latest Version
-Shows update availability notification
-“Update Now” button to trigger system update
-Update Log button to view update history
-Visual comparison of versions
Functionality:
-Admin can click “Update Now” to upgrade the system
-Checks and installs latest updates
-Ensures system stays secure and up-to-date
-Provides access to update logs for tracking changes
-Enhances performance with new features and fixes
1
Extra
2
Updates
Report & Request
The Report & Request module in Databridgecrm enables users to report system issues and request support directly from the platform. It provides a simple interface to submit bug reports or assistance requests with proper details.This module helps streamline communication between users and the support team by maintaining a record of all submitted requests along with their status, ensuring faster resolution and better system management.
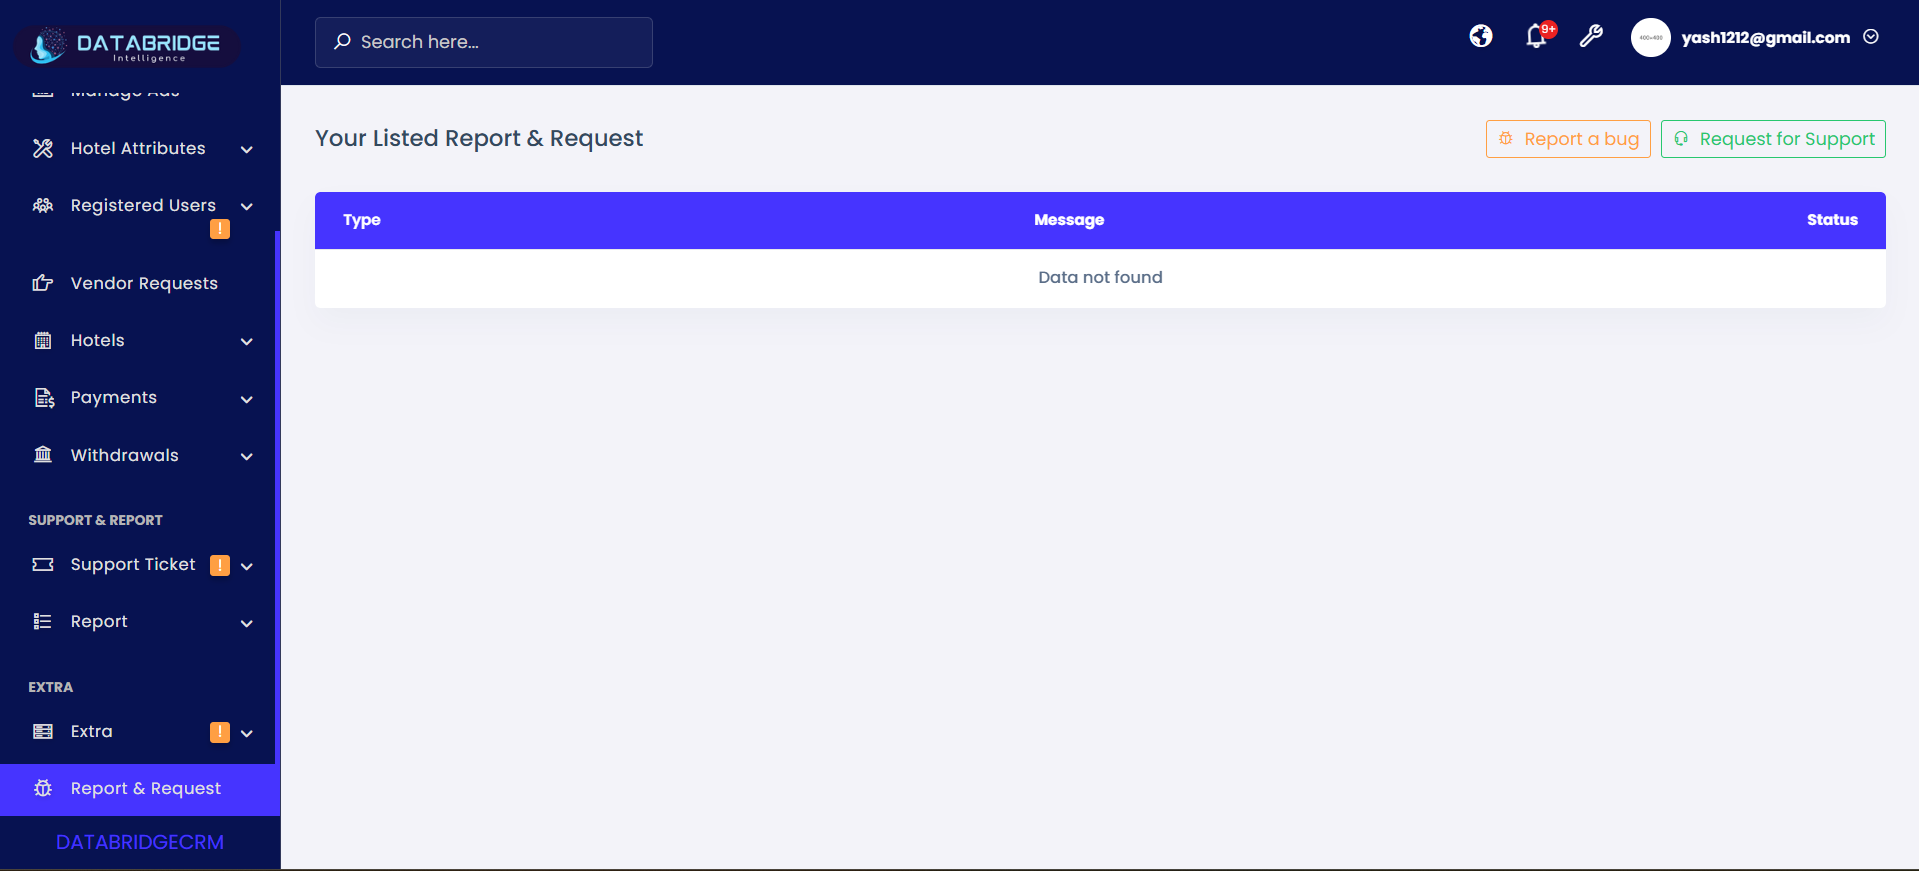
Report & Request Module:
This screen allows users to submit system-related issues or request assistance directly to the support team. It provides a centralized interface to manage bug reports and support requests while tracking their status.
Features:
-Report a Bug Button to submit system errors or issues
-Request for Support Button to ask for help or assistance
-Popup form with:
->Type dropdown (Report Bug / Request Support)
->Message field for detailed description
-Submit button to send request
-Table view showing:
->Type
->Message
->Status of request
-Clean UI for tracking submitted requests
Functionality:
-User clicks “Report a Bug” → opens form with bug type selected
-User clicks “Request for Support” → opens form with support request type
-User fills message details explaining the issue or requirement
-Clicking Submit sends the request to admin/support team
-Submitted requests appear in the list with status tracking
-Helps maintain communication between users and support team
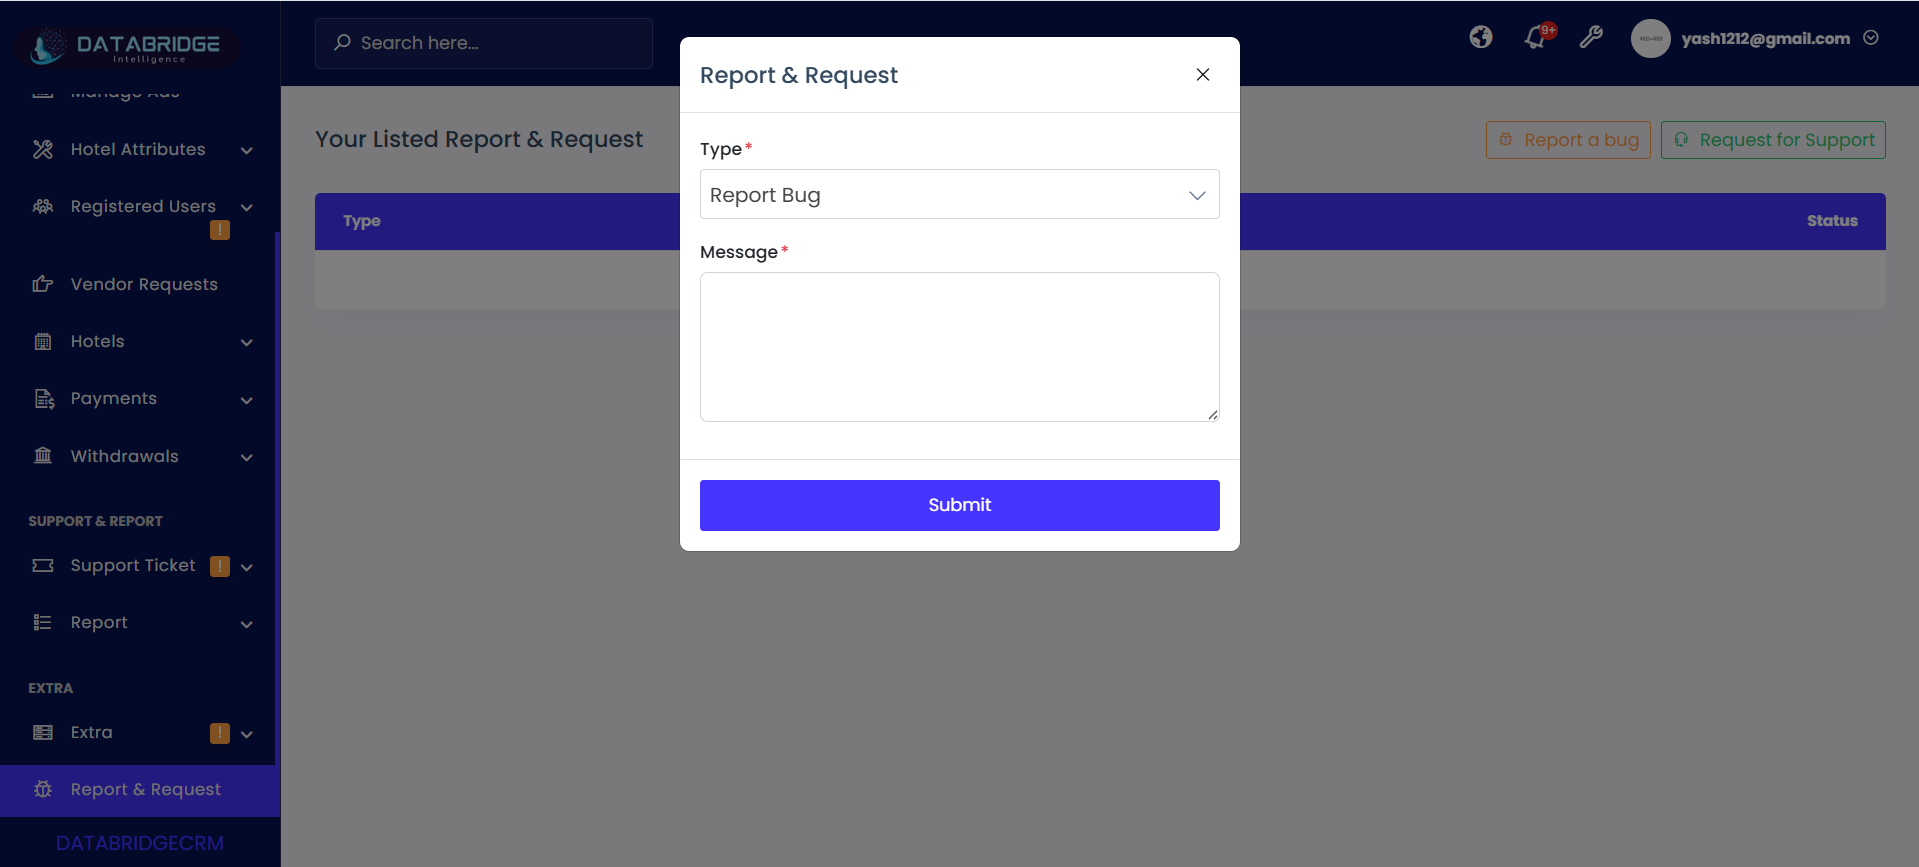
Report a Bug:
The Report a Bug feature in Databridgecrm allows users to report system errors, glitches, or unexpected issues encountered during usage. It provides a simple and structured form to submit detailed information so that the technical team can identify and resolve problems efficiently.
Features:
-Report a Bug button to quickly raise issues
-Opens popup form for bug submission
-Type dropdown (auto-selected as “Report Bug”)
-Message field to describe the issue in detail
-Submit button to send the report
-Displays submitted bugs in list view with status tracking
Functionality:
-User clicks “Report a Bug” → opens submission form
-User enters detailed description of the issue
-Clicking Submit sends bug report to admin/support team
-Report gets recorded and appears in the list
-Admin reviews and updates status of the bug
-Helps in faster issue resolution and system improvement
1
Report & Request
2
Report a Bug
Request for Support:
The Request for Support button allows users to raise assistance requests related to system usage, configuration, or general queries.
Features:
-Opens popup form instantly
-Automatically selects Support Request type
-Includes message input field
-Integrated Submit button
-User-friendly and quick access
Functionality:
-Clicking the button opens the request form
-User enters the issue or help requirement
-On clicking Submit, request is sent to support team
-Request is stored and displayed in the report list
-Enables smooth communication and issue resolution
1
Report & Request
2
Request for Support